
User Manual
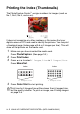

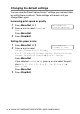


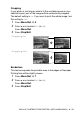

Table Of Contents
- USER’S GUIDE MFC-5440CN/MFC-5840CN
- Brother numbers
- Ordering accessories and supplies
- Safety precautions
- Choosing a location
- Quick Reference Guide
- Table of Contents
- 1 Introduction
- 2 Getting started
- Initial Setup
- General Setup
- Setting the Mode Timer
- Setting the Paper Type
- Setting the Paper Size
- Setting the Ring Volume
- Setting the Beeper Volume
- Setting the Speaker Volume
- Turning on Automatic Daylight Savings Time
- Setting the LCD Contrast
- Setting the Tray Use for Copy mode (MFC-5840CN only)
- Setting the Tray Use for Fax mode (MFC-5840CN only)
- 3 Setup Send
- 4 Setup Receive
- 5 Quick-Dial numbers and dialing options
- 6 Remote Fax Options (Not available for color faxes)
- 7 Printing reports
- 8 Making copies
- 9 Walk-Up PhotoCapture Center™ (MFC-5840CN only)
- 10 Important information
- 11 Troubleshooting and routine maintenance
- Appendix A
- Appendix B
- Glossary
- Specifications
- Index
- Remote Retrieval Access card
- brother USA/CAN

WALK-UP PHOTOCAPTURE CENTER
™
(MFC-5840CN ONLY) 9 - 10
Adjusting brightness
1
Press
Menu/Set
,
4
,
3
.
2
Press
▲
to make a lighter print.
—OR—
Press
▼
to make a darker print.
Press
Menu/Set
.
3
Press
Stop/Exit
.
Adjusting contrast
You can choose the contrast setting. More contrast will make an
image look sharper and more vivid.
1
Press
Menu/Set
,
4
,
4
.
2
Press
▲
to increase the contrast.
—OR—
Press
▼
to decrease the contrast.
Press
Menu/Set
.
3
Press
Stop/Exit
.
Color enhancement (True2Life
®
)
You can turn on the color enhancement (True2Life
®
) feature to print
more vivid images. Printing time will be slower.
1
Press
Menu/Set
,
4
,
5
.
2
Press
▲
or
▼
to select
On
.
Press
Menu/Set
.
—OR—
Select
Off
and press
Menu/Set
, then go to Step 5.
If you select
On
, you can customize the White Balance,
Sharpness or Color Density.
PhotoCapture
3.Brightness
PhotoCapture
4.Contrast
PhotoCapture
5.True2Life