
User Manual
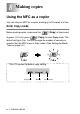


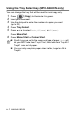
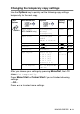

Table Of Contents
- USER’S GUIDE MFC-5440C/MFC-5840CN
- APPROVAL INFORMATION
- Compilation and Publication Notice
- Safety precautions
- Choosing a location
- Quick Reference Guide
- Table of Contents
- 1 Introduction
- 2 Getting started
- 3 Setup Send
- How to enter Fax mode
- How to dial
- How to Fax (B&W and Colour)
- Basic sending operations
- Advanced sending operations
- Broadcasting (Not available for colour faxes)
- Overseas Mode
- Delayed Fax (Not available for colour faxes)
- Delayed Batch Transmission (Not available for colour faxes)
- Setup for Polled Transmit (Standard) (Not available for colour faxes)
- Setup for Polled Transmit with Secure Code (Not available for colour faxes)
- TX Lock (Key Lock for some countries)
- Faxing letter size documents from the scanner glass
- 4 Setup Receive
- 5 Quick-Dial numbers and dialling options
- 6 Remote Fax Options (Not available for colour faxes)
- 7 Printing reports
- 8 Making copies
- 9 Walk-Up PhotoCapture Center™ (MFC-5840CN only)
- 10 Important information
- 11 Troubleshooting and routine maintenance
- Appendix A
- Telephone Service for Australia
- Telephone Service for New Zealand
- Telephone Service for Some Countries
- Advanced receiving operations
- Connecting an external device to your MFC
- Appendix B
- Glossary
- Specifications
- Index
- Remote Retrieval Access card
- brother ARL/ASA/NZ

8 - 7 MAKING COPIES
Using the Tray Select key (MFC-5840CN only)
You can change the tray that will be used for next copy only.
1
Press (
Copy
) to illuminate it in green.
2
Load your document.
3
Use the dial pad to enter the number of copies you want
(up to 99).
4
Press
Tray Select
.
5
Press
▲
or
▼
to select
Auto
,
#1(xxx)
or
#2(xxx)
.
Press
Menu/Set
.
6
Press
Mono Start
or
Colour Start
.
■
If both trays are set to the same and type of paper,
Auto
will
let your MFC take from Tray#1 first, then take from Tray#2 if
Tray#1 runs out of paper.
■
You can only use plain paper sizes Letter, Legal or A4 in
Tray#2.