
User Manual

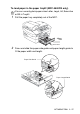

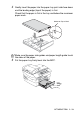


Table Of Contents
- USER’S GUIDE MFC-5440C/MFC-5840CN
- APPROVAL INFORMATION
- Compilation and Publication Notice
- Safety precautions
- Choosing a location
- Quick Reference Guide
- Table of Contents
- 1 Introduction
- 2 Getting started
- 3 Setup Send
- How to enter Fax mode
- How to dial
- How to Fax (B&W and Colour)
- Basic sending operations
- Advanced sending operations
- Broadcasting (Not available for colour faxes)
- Overseas Mode
- Delayed Fax (Not available for colour faxes)
- Delayed Batch Transmission (Not available for colour faxes)
- Setup for Polled Transmit (Standard) (Not available for colour faxes)
- Setup for Polled Transmit with Secure Code (Not available for colour faxes)
- TX Lock (Key Lock for some countries)
- Faxing letter size documents from the scanner glass
- 4 Setup Receive
- 5 Quick-Dial numbers and dialling options
- 6 Remote Fax Options (Not available for colour faxes)
- 7 Printing reports
- 8 Making copies
- 9 Walk-Up PhotoCapture Center™ (MFC-5840CN only)
- 10 Important information
- 11 Troubleshooting and routine maintenance
- Appendix A
- Telephone Service for Australia
- Telephone Service for New Zealand
- Telephone Service for Some Countries
- Advanced receiving operations
- Connecting an external device to your MFC
- Appendix B
- Glossary
- Specifications
- Index
- Remote Retrieval Access card
- brother ARL/ASA/NZ

INTRODUCTION 1 - 21
2
Insert the envelopes into the paper tray with the address side
down and the leading edge (top of the envelopes) in first. Slide
the paper side guide to fit the width of the envelopes.
If you have problems when printing on envelopes, try the
following suggestions:
1
Open the envelope flap.
2
Make sure the open flap is either to the side of the envelope or
to the back edge of the envelope when printing.
3
Adjust the size and margin in your application.
To load post cards
1
Raise the paper stop and insert the post cards into the paper
tray. Slide the paper side guide to fit the width of the post cards.