
User Manual
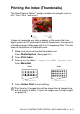
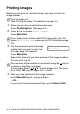
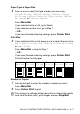
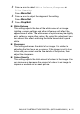
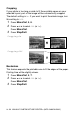
Table Of Contents
- USER’S GUIDE MFC-5440C/MFC-5840CN
- APPROVAL INFORMATION
- Compilation and Publication Notice
- Safety precautions
- Choosing a location
- Quick Reference Guide
- Table of Contents
- 1 Introduction
- 2 Getting started
- 3 Setup Send
- How to enter Fax mode
- How to dial
- How to Fax (B&W and Colour)
- Basic sending operations
- Advanced sending operations
- Broadcasting (Not available for colour faxes)
- Overseas Mode
- Delayed Fax (Not available for colour faxes)
- Delayed Batch Transmission (Not available for colour faxes)
- Setup for Polled Transmit (Standard) (Not available for colour faxes)
- Setup for Polled Transmit with Secure Code (Not available for colour faxes)
- TX Lock (Key Lock for some countries)
- Faxing letter size documents from the scanner glass
- 4 Setup Receive
- 5 Quick-Dial numbers and dialling options
- 6 Remote Fax Options (Not available for colour faxes)
- 7 Printing reports
- 8 Making copies
- 9 Walk-Up PhotoCapture Center™ (MFC-5840CN only)
- 10 Important information
- 11 Troubleshooting and routine maintenance
- Appendix A
- Telephone Service for Australia
- Telephone Service for New Zealand
- Telephone Service for Some Countries
- Advanced receiving operations
- Connecting an external device to your MFC
- Appendix B
- Glossary
- Specifications
- Index
- Remote Retrieval Access card
- brother ARL/ASA/NZ

9 - 8 WALK-UP PHOTOCAPTURE CENTER
™
(MFC-5840CN ONLY)
DPOF printing
DPOF stands for Digital Print Order Format.
Major Digital Camera manufacturers (Canon Inc., Eastman Kodak
Company, Fuji Photo Film Co. Ltd., Matsushita Electric Industrial Co.
Ltd. and Sony Corporation.) created this standard to make it easier
to print images from a digital camera.
If your digital camera supports DPOF printing, you will be able to
select on the Digital Camera display the images and number of
copies you want to print.
When the memory card (CompactFlash
®
, SmartMedia
®
, Memory
Stick
®
, SecureDigital
™
and xD-Picture Card
™
) containing DPOF
information is put into your MFC, you can print the selected image
easily.
1
Insert your media card into the
proper drive (slot).
2
Press
PhotoCapture
.
3
Press
▲
or
▼
to select
Print Images
.
Press
Menu/Set
.
4
If there is a DPOF file on the card,
the LCD shows:
5
Press
▲
or
▼
to select
DPOF Print:Yes
.
Press
Menu/Set
.
6
Press
▲
or
▼
to select
Letter Glossy
,
10x15cm Glossy
,
13x18cm Glossy
,
A4 Glossy
,
Letter Plain
,
A4 Plain
,
Letter Inkjet
,
A4 Inkjet
or
10x15cm Inkjet
.
Press
Menu/Set
.
If you chose Letter or A4, press
▲
or
▼
to choose the print size
(
10 x 8cm
,
13 x 9cm
,
15 x 10cm
,
18 x 13cm
,
20 x 15cm
or
Max. Size
).
Press
Menu/Set
.
7
Press
Colour Start
to print.
The media active message will be shown for 60 seconds and
then disappear. Even in that case, you can enter the
PhotoCapture mode by pressing
PhotoCapture
.
C.Flash Active
Press PhotoCapture key...
Select
▲▼
& Set
DPOF Print:Yes