
User Manual


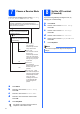


Table Of Contents
- Quick Setup Guide MFC-490CW
- Start Here
- 1 Unpack the machine and check the components
- 2 Load plain A4 paper
- 3 Connect the power cord and telephone line
- 4 Set Your Country (For Australia / New Zealand Customer Only)
- 5 Install the ink cartridges
- 6 Check the print quality
- 7 Choose a Receive Mode
- 8 Set the LCD contrast (If needed)
- 9 Set the date and time
- 10 Enter personal information (station ID)
- 11 Set tone or pulse dialling mode (Not available for New Zealand)
- 12 Choose your connection type
- For USB Interface Users (For Windows® 2000 Professional/XP/XP Professional x64 Edition/ Windows Vista®)
- For USB Interface Users (For Mac OS® X 10.2.4 or greater)
- For Wired Network Interface Users (For Windows® 2000 Professional/XP/XP Professional x64 Edition/ Windows Vista®)
- For Wired Network Interface Users (For Mac OS® X 10.2.4 or greater)
- For Wireless Network Interface Users
- 13 Before you begin
- 14 Confirm your network environment (Infrastructure Mode)
- Connecting the Brother machine to the wireless network
- Install the Drivers & Software (For Windows® 2000 Professional/XP/XP Professional x64 Edition/ Windows Vista®)
- Install the Drivers & Software (For Mac OS® X 10.2.4 or greater)
- Install Optional Applications Windows®
- For Network Users
- Consumables
- brother ARL/ASA/NZ
- Start Here

2
2
Load plain A4 paper
a Pull the paper tray a completely out of the
machine.
b Open the paper tray cover a.
c With both hands, gently press and slide the
paper side guides a and then the paper length
guide b to fit the paper size.
Make sure that the triangular marks c on the
paper side guides a and paper length guide b
line up with the mark for the paper size you are
using.
d Fan the stack of paper well to avoid paper jams
and misfeeds.
e Gently put the paper into the paper tray print
side down and top edge first. Check that the
paper is flat in the tray.
f Gently adjust the paper side guides to the
paper with both hands. Make sure that the
paper side guides touch the edges of the
paper.
Note
• The components included in the box may differ
depending on your country.
• Save all packing materials and the box in case
for any reason you must ship your machine.
• For a network connection you will need to
purchase a network interface cable. Please use
the supplied USB cable for a USB connection.
• To ensure safe operation the supplied plug
must be inserted only into a standard power
outlet that is properly grounded through the
standard electrical wiring. Non grounded
equipment may cause an electrical shock
hazard, and may cause excessive electrical
noise radiation.
USB cable
Please make sure you use a USB 2.0 cable
(Type A/B) that is no more than 2 metres long.
Network cable
Use a straight-through Category5 (or greater) twisted-
pair cable for 10BASE-T or 100BASE-TX Fast
Ethernet Network.
1
1
Important
Do not push the paper in too far.
1
3
3
2