
User Manual


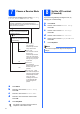


Table Of Contents
- Quick Setup Guide MFC-490CW
- Start Here
- 1 Unpack the machine and check the components
- 2 Load plain A4 paper
- 3 Connect the power cord and telephone line
- 4 Set Your Country (For Australia / New Zealand Customer Only)
- 5 Install the ink cartridges
- 6 Check the print quality
- 7 Choose a Receive Mode
- 8 Set the LCD contrast (If needed)
- 9 Set the date and time
- 10 Enter personal information (station ID)
- 11 Set tone or pulse dialling mode (Not available for New Zealand)
- 12 Choose your connection type
- For USB Interface Users (For Windows® 2000 Professional/XP/XP Professional x64 Edition/ Windows Vista®)
- For USB Interface Users (For Mac OS® X 10.2.4 or greater)
- For Wired Network Interface Users (For Windows® 2000 Professional/XP/XP Professional x64 Edition/ Windows Vista®)
- For Wired Network Interface Users (For Mac OS® X 10.2.4 or greater)
- For Wireless Network Interface Users
- 13 Before you begin
- 14 Confirm your network environment (Infrastructure Mode)
- Connecting the Brother machine to the wireless network
- Install the Drivers & Software (For Windows® 2000 Professional/XP/XP Professional x64 Edition/ Windows Vista®)
- Install the Drivers & Software (For Mac OS® X 10.2.4 or greater)
- Install Optional Applications Windows®
- For Network Users
- Consumables
- brother ARL/ASA/NZ
- Start Here

10
11
Set tone or pulse dialling
mode (Not available for
New Zealand)
Your machine comes set for Tone dialling service. If
you have Pulse dialling service (rotary), you need to
change the dialling mode.
a Press Menu.
b Press a or b to choose Initial Setup.
Press OK.
c Press a or b to choose Tone/Pulse.
d Press d or c to choose Pulse (or Tone).
Press OK.
e Press Stop/Exit.