
User Manual
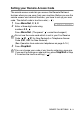
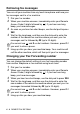
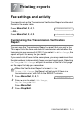

Table Of Contents
- USER’S GUIDE FAX-1840C/MFC-3240C
- APPROVAL INFORMATION
- Compilation and Publication Notice
- Safety precautions
- Choosing a location
- Quick Reference Guide
- Table of Contents
- 1 Introduction
- 2 Getting started
- 3 Setup Send
- How to enter Fax mode
- How to dial
- How to Fax (B&W and Colour)
- Basic sending operations
- Advanced sending operations
- Broadcasting (Not available for colour faxes)
- Overseas Mode
- Delayed Fax (Not available for colour faxes)
- Delayed Batch Transmission (Not available for colour faxes)
- Setup for Polled Transmit (Standard) (Not available for colour faxes)
- Setup for Polled Transmit with Secure Code (Not available for colour faxes)
- TX Lock (Key Lock for some countries)
- 4 Setup Receive
- Basic receiving operations
- Choosing the Receive Mode
- Setting the Ring Delay
- Setting the F/T Ring Time (Fax/Tel mode only)
- Fax Detect (MFC-3240C only)
- Fax Detect (FAX-1840C only)
- Printing a reduced incoming fax (Auto Reduction)
- Receiving a fax at the end of a conversation
- Printing a fax from the memory
- Reception into memory (Not available for colour fax reception)
- Polling
- Basic receiving operations
- 5 Quick-Dial numbers and dialling options
- 6 Remote Fax Options (Not available for colour faxes)
- 7 Printing reports
- 8 Making copies
- 9 Important information
- 10 Troubleshooting and routine maintenance
- Appendix A
- Telephone Service for Australia
- Telephone Service for New Zealand
- Telephone Service for Some Countries
- Advanced receiving operations
- Connecting an external device to your machine
- Appendix B
- Glossary
- Specifications
- Index
- Remote Retrieval Access card
- brother ARL/ASA/NZ

7 - 2 PRINTING REPORTS
Setting the Journal Period
You can set the machine to print a journal at specific intervals (every
50 faxes, 6, 12 or 24 hours, 2 or 7 days). If you set the interval to
Off
,
you can print the report by following the steps on the next page.
The default setting is
Every 50 Faxes
.
1
Press
Menu/Set
,
2
,
4
,
2
.
2
Press
▲
or
▼
to choose an interval.
Press
Menu/Set
.
(If you choose 7 days, the LCD will ask you to choose a day on
which to begin the 7-day countdown.)
3
Enter the time to begin printing in 24-hour format.
Press
Menu/Set
.
(For example: enter 19:45 for 7:45 PM.)
4
Press
Stop/Exit
.
If you select 6, 12, 24 hours, 2 or 7 days, the machine will print
the report at the selected time and then erase all jobs from its
memory. If the machine’s memory becomes full with 200 jobs
before the time you selected has passed, the machine will print
the Journal early and then erase all jobs from memory. If you
want an extra report before it is due to print, you can print it
without erasing the jobs from memory.
If you select
Every 50 Faxes
, the machine will print the
Journal when the machine has stored 50 jobs.
2.Journal Period