
User Manual
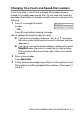
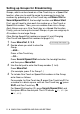
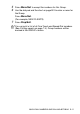
Table Of Contents
- USER’S GUIDE FAX-1840C/MFC-3240C
- APPROVAL INFORMATION
- Compilation and Publication Notice
- Safety precautions
- Choosing a location
- Quick Reference Guide
- Table of Contents
- 1 Introduction
- 2 Getting started
- 3 Setup Send
- How to enter Fax mode
- How to dial
- How to Fax (B&W and Colour)
- Basic sending operations
- Advanced sending operations
- Broadcasting (Not available for colour faxes)
- Overseas Mode
- Delayed Fax (Not available for colour faxes)
- Delayed Batch Transmission (Not available for colour faxes)
- Setup for Polled Transmit (Standard) (Not available for colour faxes)
- Setup for Polled Transmit with Secure Code (Not available for colour faxes)
- TX Lock (Key Lock for some countries)
- 4 Setup Receive
- Basic receiving operations
- Choosing the Receive Mode
- Setting the Ring Delay
- Setting the F/T Ring Time (Fax/Tel mode only)
- Fax Detect (MFC-3240C only)
- Fax Detect (FAX-1840C only)
- Printing a reduced incoming fax (Auto Reduction)
- Receiving a fax at the end of a conversation
- Printing a fax from the memory
- Reception into memory (Not available for colour fax reception)
- Polling
- Basic receiving operations
- 5 Quick-Dial numbers and dialling options
- 6 Remote Fax Options (Not available for colour faxes)
- 7 Printing reports
- 8 Making copies
- 9 Important information
- 10 Troubleshooting and routine maintenance
- Appendix A
- Telephone Service for Australia
- Telephone Service for New Zealand
- Telephone Service for Some Countries
- Advanced receiving operations
- Connecting an external device to your machine
- Appendix B
- Glossary
- Specifications
- Index
- Remote Retrieval Access card
- brother ARL/ASA/NZ

QUICK-DIAL NUMBERS AND DIALLING OPTIONS 5 - 3
Changing One-Touch and Speed-Dial numbers
If you try to store a One-Touch or Speed-Dial number where a
number has already been stored, the LCD will show the name that
has been stored there (or number) and will ask you to do one of the
following:
1
Press
1
to change the stored
number.
—OR—
Press
2
to exit without making a change.
How to change the stored number or name:
■
If you want to change a character, use or to position
the cursor under the character you want to change, and then
type over it.
■
If you want to erase the whole number or whole name, press
Stop/Exit
when the cursor is under the first digit or letter.
The characters above and to the right of the cursor will be
deleted.
2
Enter a new number.
Press
Menu/Set
.
3
Follow the directions beginning at Step 4 in Storing One-Touch
Dial numbers and Storing Speed-Dial numbers. (See page 5-1
and 5-2.)
05:Mike
1.Change 2.Exit
▲
▲