
User Manual

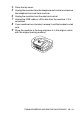
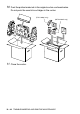

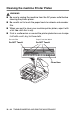
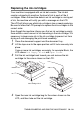
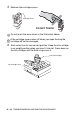
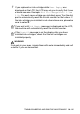

Table Of Contents
- USER’S GUIDE FAX-1840C/MFC-3240C
- APPROVAL INFORMATION
- Compilation and Publication Notice
- Safety precautions
- Choosing a location
- Quick Reference Guide
- Table of Contents
- 1 Introduction
- 2 Getting started
- 3 Setup Send
- How to enter Fax mode
- How to dial
- How to Fax (B&W and Colour)
- Basic sending operations
- Advanced sending operations
- Broadcasting (Not available for colour faxes)
- Overseas Mode
- Delayed Fax (Not available for colour faxes)
- Delayed Batch Transmission (Not available for colour faxes)
- Setup for Polled Transmit (Standard) (Not available for colour faxes)
- Setup for Polled Transmit with Secure Code (Not available for colour faxes)
- TX Lock (Key Lock for some countries)
- 4 Setup Receive
- Basic receiving operations
- Choosing the Receive Mode
- Setting the Ring Delay
- Setting the F/T Ring Time (Fax/Tel mode only)
- Fax Detect (MFC-3240C only)
- Fax Detect (FAX-1840C only)
- Printing a reduced incoming fax (Auto Reduction)
- Receiving a fax at the end of a conversation
- Printing a fax from the memory
- Reception into memory (Not available for colour fax reception)
- Polling
- Basic receiving operations
- 5 Quick-Dial numbers and dialling options
- 6 Remote Fax Options (Not available for colour faxes)
- 7 Printing reports
- 8 Making copies
- 9 Important information
- 10 Troubleshooting and routine maintenance
- Appendix A
- Telephone Service for Australia
- Telephone Service for New Zealand
- Telephone Service for Some Countries
- Advanced receiving operations
- Connecting an external device to your machine
- Appendix B
- Glossary
- Specifications
- Index
- Remote Retrieval Access card
- brother ARL/ASA/NZ

TROUBLESHOOTING AND ROUTINE MAINTENANCE 10 - 23
Replacing the ink cartridges
Your machine is equipped with an ink dot counter. The ink dot
counter automatically monitors the level of ink in each of the 4
cartridges. When the machine detects an ink cartridge is running out
of ink, the machine will notify you with a message on the LCD.
The LCD will inform you which ink cartridge is low or needs replacing.
Be sure to follow the LCD prompts to replace the ink cartridges in the
correct order.
Even though the machine informs you that an ink cartridge is empty,
there will be a small amount of ink remaining in the ink cartridge. It is
necessary to keep some ink in the ink cartridge to prevent air from
drying out and damaging the print head assembly.
1
Close the document support and the document tray.
2
Lift the top cover to the open position until it locks securely into
place.
If one or more ink cartridges are empty, for example Black, the
LCD shows
Ink Empty Black
and
Open Cover
.
3
Pull the ink cartridge hook toward you and remove the ink
cartridge for the colour shown on the LCD.
4
Open the new ink cartridge bag for the colour shown on the
LCD, and then take out the ink cartridge.
Ink Cartridge Hook