
User Manual

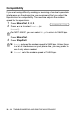
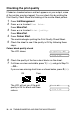
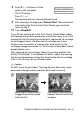

Table Of Contents
- USER’S GUIDE FAX-1840C/MFC-3240C
- APPROVAL INFORMATION
- Compilation and Publication Notice
- Safety precautions
- Choosing a location
- Quick Reference Guide
- Table of Contents
- 1 Introduction
- 2 Getting started
- 3 Setup Send
- How to enter Fax mode
- How to dial
- How to Fax (B&W and Colour)
- Basic sending operations
- Advanced sending operations
- Broadcasting (Not available for colour faxes)
- Overseas Mode
- Delayed Fax (Not available for colour faxes)
- Delayed Batch Transmission (Not available for colour faxes)
- Setup for Polled Transmit (Standard) (Not available for colour faxes)
- Setup for Polled Transmit with Secure Code (Not available for colour faxes)
- TX Lock (Key Lock for some countries)
- 4 Setup Receive
- Basic receiving operations
- Choosing the Receive Mode
- Setting the Ring Delay
- Setting the F/T Ring Time (Fax/Tel mode only)
- Fax Detect (MFC-3240C only)
- Fax Detect (FAX-1840C only)
- Printing a reduced incoming fax (Auto Reduction)
- Receiving a fax at the end of a conversation
- Printing a fax from the memory
- Reception into memory (Not available for colour fax reception)
- Polling
- Basic receiving operations
- 5 Quick-Dial numbers and dialling options
- 6 Remote Fax Options (Not available for colour faxes)
- 7 Printing reports
- 8 Making copies
- 9 Important information
- 10 Troubleshooting and routine maintenance
- Appendix A
- Telephone Service for Australia
- Telephone Service for New Zealand
- Telephone Service for Some Countries
- Advanced receiving operations
- Connecting an external device to your machine
- Appendix B
- Glossary
- Specifications
- Index
- Remote Retrieval Access card
- brother ARL/ASA/NZ

TROUBLESHOOTING AND ROUTINE MAINTENANCE 10 - 15
8
Press
2
(
No
) for black or three
colours with a problem.
The LCD shows:
Press
1
(
Yes
).
The machine will start cleaning the print head.
9
After cleaning is finished, press
Colour Start
. The machine will
start printing the Print Quality Check Sheet again and then
return to step 5.
10
Press
Stop/Exit
.
If you still see missing ink in this Print Quality Check Sheet, repeat
the cleaning and test print procedures at least five times. If ink is still
missing after the fifth cleaning and test print, replace the ink cartridge
for the clogged colour. (Perhaps the ink cartridge was in your
machine over six months or the expiration date written on the
cartridge package has passed. Or, the ink may not have been stored
properly before use.)
After replacing the ink cartridge, check it by printing another Print
Quality Check Sheet. If the problem still exists, repeat the cleaning
and test print procedures at least five times for the new ink cartridge.
If ink is still missing, call your Brother dealer.
Caution
Do NOT touch the print head. Touching the print head may cause
permanent damage and may void the print head’s warranty.
When a print head nozzle is
clogged the printed sample
looks like this.
After the print head nozzle is
cleaned, the horizontal lines
are gone.
Start Cleaning?
1.Yes 2.No