
User Manual
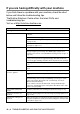
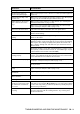


Table Of Contents
- USER’S GUIDE FAX-1840C/MFC-3240C
- APPROVAL INFORMATION
- Compilation and Publication Notice
- Safety precautions
- Choosing a location
- Quick Reference Guide
- Table of Contents
- 1 Introduction
- 2 Getting started
- 3 Setup Send
- How to enter Fax mode
- How to dial
- How to Fax (B&W and Colour)
- Basic sending operations
- Advanced sending operations
- Broadcasting (Not available for colour faxes)
- Overseas Mode
- Delayed Fax (Not available for colour faxes)
- Delayed Batch Transmission (Not available for colour faxes)
- Setup for Polled Transmit (Standard) (Not available for colour faxes)
- Setup for Polled Transmit with Secure Code (Not available for colour faxes)
- TX Lock (Key Lock for some countries)
- 4 Setup Receive
- Basic receiving operations
- Choosing the Receive Mode
- Setting the Ring Delay
- Setting the F/T Ring Time (Fax/Tel mode only)
- Fax Detect (MFC-3240C only)
- Fax Detect (FAX-1840C only)
- Printing a reduced incoming fax (Auto Reduction)
- Receiving a fax at the end of a conversation
- Printing a fax from the memory
- Reception into memory (Not available for colour fax reception)
- Polling
- Basic receiving operations
- 5 Quick-Dial numbers and dialling options
- 6 Remote Fax Options (Not available for colour faxes)
- 7 Printing reports
- 8 Making copies
- 9 Important information
- 10 Troubleshooting and routine maintenance
- Appendix A
- Telephone Service for Australia
- Telephone Service for New Zealand
- Telephone Service for Some Countries
- Advanced receiving operations
- Connecting an external device to your machine
- Appendix B
- Glossary
- Specifications
- Index
- Remote Retrieval Access card
- brother ARL/ASA/NZ

10 - 8 TROUBLESHOOTING AND ROUTINE MAINTENANCE
If you are having difficulty with your machine
If you think there is a problem with your machine, check the chart
below and follow the troubleshooting tips.
The Brother Solutions Center offers the latest FAQs and
troubleshooting tips.
Visit us at http://solutions.brother.com
.
DIFFICULTY SUGGESTIONS
Printing
No printout Check the interface cable connection on both the machine and your
computer.
Check the machine is plugged in and not in the Power Save condition.
One or more ink cartridges are empty. (See Replacing the ink cartridges
on page 10-23.)
Check to see if the LCD is showing an error message. (See Error
messages
on page 10-1.)
Poor quality print. Check the print quality. (See Checking the print quality on page 10-14.)
Make sure the Printer Driver or Paper Type setting in the menu matches
the type of paper you are using. (See
Media Type
on page 1-8 in
Software User’s Guide on the CD-ROM and Setting the Paper Type on
page 2-6.)
Make sure your ink cartridges are fresh. Cartridges remain fresh for up
to two years if kept in their original packaging, after that the ink may
become clogged. Cartridge expiration dates are printed on the package.
Try using the recommended types of paper. (See
About paper
on page
1-9.)
The recommended environment for your machine is between 20°C to
33°C.
White horizontal lines appear
in text or graphics.
Clean the print head. (See
Cleaning the print head
on page 10-13.)
Try using the recommended types of paper. (See
About paper
on page
1-9.)
If horizontal bands appear when using plain paper, use the 'Enhanced
Normal Printing' mode to help avoid banding on some types of plain
paper. In the printer driver 'Basic' tab, click 'Settings', and check
'Enhanced Normal Printing'.
If you continue to have horizontal bands, change the Media Type
selection to 'Slow Drying Paper' in the printer driver 'Basic' tab to help
enhance the print quality.
The machine prints blank
pages.
Clean the print head. (See Cleaning the print head on page 10-13.)
Characters and lines are
stacked.
Check the printing alignment. (See Checking the printing alignment on
page 10-16.)
Printed text or images are
skewed.
Make sure the paper is loaded properly in the paper tray and the paper
side guide is adjusted correctly. (See How to load paper, envelopes and
post cards on page 1-14.)