
User Manual
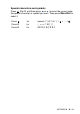

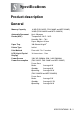
Table Of Contents
- USER'S GUIDE FAX-1840C/FAX-1940CN/MFC-3240C/MFC-3340CN
- APPROVAL INFORMATION
- Compilation and Publication Notice
- "EC" Declaration of Conformity
- Safety precautions
- Choosing a location
- Quick Reference Guide
- Table of Contents
- 1 Introduction
- 2 Getting started
- Initial Setup
- General Setup
- Setting the Mode Timer (MFC-3240C and MFC-3340CN only)
- Setting the Mode Timer (FAX-1835C, FAX-1840C and FAX-1940CN only)
- Setting the Paper Type
- Setting the Paper Size
- Setting the Ring Volume
- Setting the Beeper Volume
- Setting the Speaker Volume
- Turning on Automatic Daylight Savings Time
- Setting the LCD Contrast
- 3 Setup Send
- How to enter Fax mode
- How to dial
- How to Fax (B&W and Colour)
- Basic sending operations
- Advanced sending operations
- Broadcasting (Not available for colour faxes)
- Overseas Mode
- Delayed Fax (Not available for colour faxes)
- Delayed Batch Transmission (Not available for colour faxes)
- Setup for Polled Transmit (Standard) (Not available for colour faxes)
- Setup for Polled Transmit with Secure Code (Not available for colour faxes)
- TX Lock (FAX-1835C, FAX-1840C, MFC-3240C and MFC-3340CN only)
- Memory Security (FAX-1940CN only)
- 4 Setup Receive
- Basic receiving operations (FAX-1835C, FAX-1840C, MFC-3240C and MFC-3340CN only)
- Basic receiving operations (FAX-1940CN only)
- Choosing the Receive Mode
- Setting the Ring Delay
- Setting Toll Saver (TAD mode)
- Setting the F/T Ring Time (Fax/Tel mode only)
- Setting the Fax/Tel Announcement (FAX-1940CN only)
- Fax Detect (FAX-1835C, MFC-3240C and MFC-3340CN only)
- Fax Detect (FAX-1840C and FAX-1940CN only)
- Printing a reduced incoming fax (Auto Reduction)
- Receiving a fax at the end of a conversation
- Printing a fax from the memory
- Reception into memory (Not available for colour fax reception)
- Polling
- 5 Quick-Dial numbers and dialling options
- 6 Remote Fax Options (Not available for colour faxes)
- 7 TAD (Telephone Answering Device) (FAX-1940CN only)
- TAD mode
- Setting up the TAD
- Recording TAD Outgoing Message
- Activating TAD mode
- Message indicator
- Playing voice messages
- Printing a fax message
- Erasing incoming messages
- Setting Maximum Time for incoming messages
- Setting Toll Saver
- ICM Recording Monitor
- Recording a conversation
- Record Fax/Tel Outgoing Announcement (F/T OGM)
- TAD mode
- 8 Printing reports
- 9 Making copies
- 10 Walk-Up PhotoCapture Center™ (MFC-3340CN only)
- 11 Important information
- 12 Troubleshooting and routine maintenance
- Appendix A
- Appendix B
- Glossary
- Specifications
- Product description
- General
- Print media
- Copy
- PhotoCapture Center™ (MFC-3340CN only)
- Fax
- Scanner (MFC-3240C and MFC-3340CN only)
- Printer
- Interfaces
- Computer requirements
- Consumable items
- Network (LAN) (FAX-1940CN and MFC-3340CN only)
- Optional External Wireless Print/Scan Server (NC-2200w) (MFC-3240C and MFC-3340CN only)
- Index
- Remote Retrieval Access card (FAX-1940CN only)
- Remote Retrieval Access card (FAX-1835C, FAX-1840C, MFC-3240C and MFC-3340CN only)
- brother UK/IRE/SAF/PAN NORDIC

B - 13 APPENDIX B
Entering Text
When you are setting certain menu selections, such as the Station
ID, you may need to type text into the machine. Most number keys
have three or four letters printed above them. The keys for
0
,
#
and
do not have printed letters because they are used for special
characters.
By pressing the appropriate number key repeatedly, you can access
the character you want.
Inserting spaces
To enter a space in the fax number, press once between
numbers. To enter a space in the name, press twice between
characters.
Making corrections
If you entered a letter incorrectly and want to change it, press to
move the cursor under the incorrect character. Then press
Stop/Exit
. All letters above and to the right of the cursor will be
deleted. Re-enter the correct character. You can also back up and
type over incorrect letters.
Repeating letters
If you need to enter a character that is on the same key as the
previous character, press to move the cursor to the right before
you press the key again.
Press Key one time two times three times four times
2 ABC2
3 DEF3
4 GH I 4
5 JKL5
6 MNO6
7 PQRS
8 TUV8
9 WXY Z