
Software User's Guide
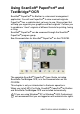
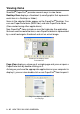
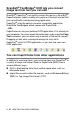

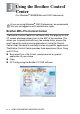
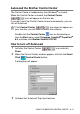
Table Of Contents
- SOFTWARE USER'S GUIDE
- Table of Contents
- 1 Using the machine as a printer
- Using the Brother MFC printer driver
- Features
- Choosing the right type of paper
- How to print your original
- Simultaneous printing and faxing
- Clearing data from the memory
- Checking the Print Quality
- Printer operation keys
- Printer driver settings (Windows® only)
- How to access the printer driver settings
- Basic tab
- Advanced tab
- 2 How to scan using Windows®
- Scanning an original (For Windows® 98/98SE/Me and 2000 Professional only)
- Scanning an original (For Windows® XP only)
- Using the Scan key (For USB cable users)
- Using ScanSoft® PaperPort® and TextBridge® OCR
- 3 Using the Brother Control Center
- 4 Using the Windows® XP-Based Brother SmartUI Control Center
- Brother SmartUI Control Center
- Brother Control Center features
- Hardware Section: Changing the Scan to button configuration
- Software Section
- Scan to File
- Scan to E-mail
- Scan to OCR (Word Processing program)
- Scan to Graphics application (example: Microsoft Paint)
- PC Fax setting (PC-FAX using the Brother Fax Driver)
- Custom: User-defined buttons
- 5 Using MFC Remote Setup
- 6 Using Brother PC-FAX software
- PC-FAX sending
- Speed-Dial setup
- The Address Book
- Setting up a Member in the Address Book
- Setting up a Group for Broadcasting
- Editing Member information
- Deleting a Member or Group
- Exporting the Address Book
- Importing to the Address Book
- Setting up a Cover Page
- Entering Coverpage Information
- Sending a file as a PC-FAX using the Facsimile style user interface
- Sending a file as a PC-FAX using the Simple style user interface
- Setting up PC-FAX receiving (Windows® 98/98SE/Me and 2000 Professional) (MFC-3320CN and MFC-3820C...
- Receiving a fax into the PC (Windows® XP only) (MFC-3320CN and MFC-3820CN only)
- Additional Information for Network PC-FAX users with MFC-3320CN and MFC-3820CN
- 7 Using the PhotoCapture Center™ from your PC
- 8 Network Scanning (MFC-3320CN and MFC-3820CN only)
- 9 Using your machine with a Macintosh®
- Setting up your USB-equipped Apple® Macintosh®
- Using the Brother printer driver with your Apple® Macintosh® (Mac OS® 8.6-9.2)
- Using the Brother Printer Driver with Your Apple® Macintosh® (Mac OS® X)
- Sending a fax from your Macintosh® application
- Scanning from a Macintosh®
- Using Presto! PageManager®
- MFC Remote Setup (Mac OS® X)
- Using the PhotoCapture Center™ from a Macintosh® (MFC-3320CN and MFC-3820CN only)
- Index

HOW TO SCAN USING WINDOWS
®
2 - 26
Organizing your items in folders
PaperPort
®
has an easy-to-use filing system for organizing your
items. The filing system consists of folders and items that you select
to view in Desktop View. An item can be a PaperPort
®
item or a
non-PaperPort
®
item:
■
Folders are arranged in a “tree” structure in the Folder View.
You use this section to select folders and view their items in
Desktop View.
■
You can simply drag and drop an item onto a folder.
When the folder is highlighted, release the mouse button and the
item is stored in that folder.
■
Folders can be “nested”
—
that is, stored in other folders.
■
When you double-click a folder, its items (both PaperPort
®
MAX
files and non PaperPort
®
files) appear on the Desktop.
■
You can also use Windows
®
Explorer to manage the folders and
items shown in Desktop View.
Quick links to other applications
ScanSoft
®
PaperPort
®
automatically recognizes many other
applications on your computer and creates a “working link” to them.
The Send To Bar at the bottom of the Desktop view shows icons of
those linked applications.
To use a link, drag an item onto one of the icons to start the
application represented by the icon. A typical use of the Send To Bar
is to select an item and then fax it.
This sample
Send To
Bar shows several applications with links to
PaperPort
®
.
If PaperPort
®
does not automatically recognize one of the
applications on your computer, you can manually create a link using
the Add to Send To Bar... command.
(See PaperPort
®
in the Documentation section on the CD-ROM for
more information about creating new links.)