
Software User's Guide
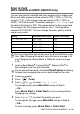
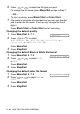
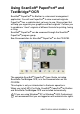
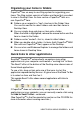
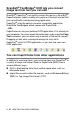

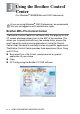
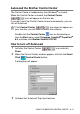
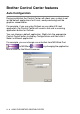
Table Of Contents
- SOFTWARE USER'S GUIDE
- Table of Contents
- 1 Using the machine as a printer
- Using the Brother MFC printer driver
- Features
- Choosing the right type of paper
- How to print your original
- Simultaneous printing and faxing
- Clearing data from the memory
- Checking the Print Quality
- Printer operation keys
- Printer driver settings (Windows® only)
- How to access the printer driver settings
- Basic tab
- Advanced tab
- 2 How to scan using Windows®
- Scanning an original (For Windows® 98/98SE/Me and 2000 Professional only)
- Scanning an original (For Windows® XP only)
- Using the Scan key (For USB cable users)
- Using ScanSoft® PaperPort® and TextBridge® OCR
- 3 Using the Brother Control Center
- 4 Using the Windows® XP-Based Brother SmartUI Control Center
- Brother SmartUI Control Center
- Brother Control Center features
- Hardware Section: Changing the Scan to button configuration
- Software Section
- Scan to File
- Scan to E-mail
- Scan to OCR (Word Processing program)
- Scan to Graphics application (example: Microsoft Paint)
- PC Fax setting (PC-FAX using the Brother Fax Driver)
- Custom: User-defined buttons
- 5 Using MFC Remote Setup
- 6 Using Brother PC-FAX software
- PC-FAX sending
- Speed-Dial setup
- The Address Book
- Setting up a Member in the Address Book
- Setting up a Group for Broadcasting
- Editing Member information
- Deleting a Member or Group
- Exporting the Address Book
- Importing to the Address Book
- Setting up a Cover Page
- Entering Coverpage Information
- Sending a file as a PC-FAX using the Facsimile style user interface
- Sending a file as a PC-FAX using the Simple style user interface
- Setting up PC-FAX receiving (Windows® 98/98SE/Me and 2000 Professional) (MFC-3320CN and MFC-3820C...
- Receiving a fax into the PC (Windows® XP only) (MFC-3320CN and MFC-3820CN only)
- Additional Information for Network PC-FAX users with MFC-3320CN and MFC-3820CN
- 7 Using the PhotoCapture Center™ from your PC
- 8 Network Scanning (MFC-3320CN and MFC-3820CN only)
- 9 Using your machine with a Macintosh®
- Setting up your USB-equipped Apple® Macintosh®
- Using the Brother printer driver with your Apple® Macintosh® (Mac OS® 8.6-9.2)
- Using the Brother Printer Driver with Your Apple® Macintosh® (Mac OS® X)
- Sending a fax from your Macintosh® application
- Scanning from a Macintosh®
- Using Presto! PageManager®
- MFC Remote Setup (Mac OS® X)
- Using the PhotoCapture Center™ from a Macintosh® (MFC-3320CN and MFC-3820CN only)
- Index

HOW TO SCAN USING WINDOWS
®
2 - 22
Scan to Card
(MFC-3320CN and MFC-3820CN only)
You can scan black and white and color originals into a media card.
Black and white originals will be stored in PDF (*.PDF) or TIFF file
formats (*.TIF). Color originals may be stored in PDF (*.PDF) or
JPEG (*.JPG) file formats. The default setting is
COLOR 150dpi
and
the default file format is PDF. File names default to the current date.
For example, the fifth image scanned on July 1, 2002 would be
named 07010205.PDF. You can change the color, quality and file
name as you want.
1
Insert a SmartMedia
®
, CompactFlash
®
, Memory Stick
®
or
SecureDigital card into your machine.
2
Load your original.
3
Press (
Scan
).
4
Press or to select
Scan to Card
.
To change quality, press
Menu/Set
and go to Step 5.
—OR—
Press
Black Start
or
Color Start
to start scanning without
Changing any settings.
5
Press or to select the quality you want.
To change the file type, press
Menu/Set
and go to Step 6.
—OR—
To start scanning, press
Black Start
or
Color Start
.
Quality Selectable File Format Default File Format
B/W 200x100 dpi
TIFF / PDF TIFF
B/W 200 dpi
TIFF / PDF TIFF
Color 150 dpi
JPEG / PDF PDF
Color 300 dpi
JPEG / PDF PDF
Color 600 dpi
JPEG / PDF PDF
You can choose the default file format for Black & White or color
files. (See Changing the default color file format on page 2-23
and Changing the default Black & White file format on page
2-23.)
Do not take out the media card while
PhotoCapture
is blinking
to keep from damaging the card or data stored on the card.