
User Guide


ASSEMBLY AND CONNECTIONS
2 - 8
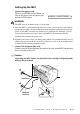
Installing the Ink Cartridges
1
Check that you turned on the power (by
plugging in the power cord). The LCD
shows:
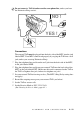
2
Open the control panel cover by pulling it toward you ( ), then lift the top cover
toward the back ( ). After a few seconds, the print head will move left to its
replacement position.
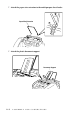
3
Remove the protective blue tape over the colored ink cartridge covers.
4
Push the four colored ink cartridge covers one at a time so they pop up. Then
remove the white shipping cover by pulling it toward you and lifting it up and out.
CHECK CARTRIDGE
1
2
Top Cover
Control Panel
Cover
PUSH
PUSH
PUSHPUSH
Ink Cartridge
Covers
Colored Ink
Cartridge Covers
White Shipping Cover