
User Manual
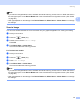

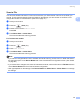


Table Of Contents
- SOFTWARE USER’S GUIDE
- Table of Contents
- Windows®
- 1 Printing
- 2 Scanning
- 3 ControlCenter3
- 4 Network Scanning (For models with built-in network support)
- 5 Remote Setup (Not available for DCP models, MFC-250C and MFC-290C)
- 6 Brother PC-FAX Software (MFC models only)
- 7 PhotoCapture Center™
- 8 Firewall settings (For Network users)
- Apple® Macintosh®
- 9 Printing and Faxing
- 10 Scanning
- 11 ControlCenter2
- 12 Network Scanning (For models with built-in network support)
- 13 Remote Setup & PhotoCapture Center™
- Index
- brother CHN-ENG

Scanning
61
2
Changing the default black & white file format 2
a Press Menu.
b Press a or b to choose PhotoCapture.
Press OK.
c Press a or b to choose Scan to Media.
Press OK.
d Press a or b to choose B/W File Type.
Press OK.
e Press a or b to choose TIFF or PDF.
Press OK.
f Press Stop/Exit.
Changing the default colour file format
2
a Press Menu.
b Press a or b to choose PhotoCapture.
Press OK.
c Press a or b to choose Scan to Media.
Press OK.
d Press a or b to choose ColorFile Type.
Press OK.
e Press a or b to choose PDF or JPEG.
Press OK.
f Press Stop/Exit.