
User Manual

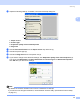
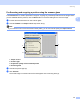
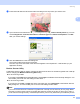
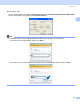
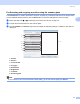
Table Of Contents
- SOFTWARE USER’S GUIDE
- Table of Contents
- Windows®
- 1 Printing
- 2 Scanning
- Scanning a document using the TWAIN driver
- Scanning a document using the WIA driver (For Windows® XP/Windows Vista®)
- Scanning a document using the WIA driver (For Windows Photo Gallery and Windows Fax and Scan users)
- Using the Scan key (For USB cable users)
- Using ScanSoft™ PaperPort™ 11SE with OCR by NUANCE™
- 3 ControlCenter3
- 4 Network Scanning (For models with built-in network support)
- 5 Remote Setup (Not available for DCP models, MFC-250C, MFC-290C and MFC-297C)
- 6 Brother PC-FAX Software (MFC models only)
- 7 PhotoCapture Center™
- 8 Firewall settings (For Network users)
- Apple® Macintosh®
- 9 Printing and Faxing
- 10 Scanning
- 11 ControlCenter2
- 12 Network Scanning (For models with built-in network support)
- 13 Remote Setup & PhotoCapture Center™
- Index
- brother UK

Scanning
46
2
Pre-Scanning and cropping a portion using the scanner glass 2
The Preview button is used to preview an image for cropping any unwanted portions from the image. When
you are satisfied with the preview, click the Scan button in the Scan dialog box to scan the image.
a Put the document face down on the scanner glass.
b Choose Flatbed in the Paper source drop-down list (1).
Note
If your machine has no Auto Document Feeder (ADF), you do not need to specify the Paper source.
1 Paper source
2 Picture type
3 Adjust the quality of the scanned picture
4 Scanning area
c Choose the picture type (2).
d Click Preview.
The whole image is scanned into the PC and appears in the scanning area (4).
1
2
4
3