
Software User's Guide
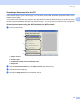
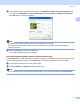
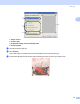
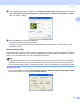
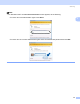
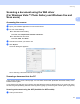
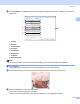
Table Of Contents
- SOFTWARE USER’S GUIDE
- Table of Contents
- Windows®
- 1 Printing
- Using the Brother printer driver
- Features
- Choosing the right type of paper
- Simultaneous printing, scanning and faxing
- Clearing data from the memory
- Status Monitor
- Printer driver settings
- Accessing the printer driver settings
- Basic tab
- Advanced tab
- Support tab
- Using FaceFilter Studio for photo printing by REALLUSION
- 2 Scanning
- Scanning a document using the TWAIN driver
- Scanning a document using the WIA driver (For Windows® XP/Windows Vista™)
- Scanning a document using the WIA driver (For Windows Vista™ Photo Gallery and Windows Fax and Scan users)
- Using the Scan key (For USB cable users)
- Using ScanSoft™ PaperPort™ 11SE with OCR by NUANCE™
- 3 ControlCenter3
- 4 Network Scanning (For models with built-in network support)
- 5 Remote Setup (Not available for DCP models and MFC-230C)
- 6 Brother PC-FAX Software (MFC models only)
- 7 PhotoCapture Center®
- 8 Firewall settings (For Network users)
- 1 Printing
- Apple® Macintosh®
- 9 Printing and Faxing
- 10 Scanning
- 11 ControlCenter2
- 12 Network Scanning (For models with built-in network support)
- 13 Remote Setup & PhotoCapture Center®
- Index
- brother USA

Scanning
43
2
b Choose Flatbed in the Source drop-down list. Adjust the following settings, if needed, in the Scanner
dialog box.
1 Profile
2 Source
3 Color format
4Filetype
5 Resolution
6 Brightness
7 Contrast
8 Scanning area
Note
If your machine has no Auto Document Feeder (ADF), you do not need to specify the Source.
c Click Preview.
The whole image is scanned into the PC and appears in the scanning area (8).
d Press and hold down the left mouse button and drag it over the portion you want to scan.
e Click the Scan button in the Scan dialog box.
The machine starts scanning the document.
This time only the chosen area of the document appears in your application window.
1
2
3
4
5
6
7
8