
Software User's Guide

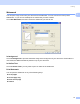
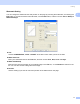
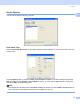
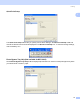
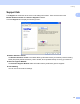
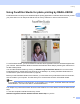

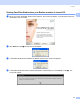
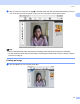
Table Of Contents
- SOFTWARE USER’S GUIDE
- Table of Contents
- Windows®
- 1 Printing
- Using the Brother printer driver
- Features
- Choosing the right type of paper
- Simultaneous printing, scanning and faxing
- Clearing data from the memory
- Status Monitor
- Printer driver settings
- Accessing the printer driver settings
- Basic tab
- Advanced tab
- Support tab
- Using FaceFilter Studio for photo printing by REALLUSION
- 2 Scanning
- Scanning a document using the TWAIN driver
- Scanning a document using the WIA driver (For Windows® XP/Windows Vista™)
- Scanning a document using the WIA driver (For Windows Vista™ Photo Gallery and Windows Fax and Scan users)
- Using the Scan key (For USB cable users)
- Using ScanSoft™ PaperPort™ 11SE with OCR by NUANCE™
- 3 ControlCenter3
- 4 Network Scanning (For models with built-in network support)
- 5 Remote Setup (Not available for DCP models and MFC-230C)
- 6 Brother PC-FAX Software (MFC models only)
- 7 PhotoCapture Center®
- 8 Firewall settings (For Network users)
- 1 Printing
- Apple® Macintosh®
- 9 Printing and Faxing
- 10 Scanning
- 11 ControlCenter2
- 12 Network Scanning (For models with built-in network support)
- 13 Remote Setup & PhotoCapture Center®
- Index
- brother USA

Printing
17
1
Watermark Setting 1
You can change the watermark size and position on the page by choosing the watermark, and clicking the
Edit button. If you want to add a new watermark, click the New button, and then choose Text or Bitmap in
Watermark Style.
Title
Choose CONFIDENTIAL, COPY or DRAFT as the title or enter a title you like in the field.
Watermark Text
Enter your watermark text into the Text Box, and then choose Font, Size, Color and Style.
Watermark Bitmap
Enter the file name and location of your bitmap image in the File box, or click Browse to search for the
file. You can also set the scaling size of the image.
Position
Use this setting if you want to control the position of the watermark on the page.