
Software User's Guide
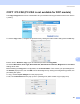
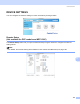

Table Of Contents
- SOFTWARE USER’S GUIDE
- Table of Contents
- Windows®
- 1 Printing
- Using the Brother printer driver
- Features
- Choosing the right type of paper
- Simultaneous printing, scanning and faxing
- Clearing data from the memory
- Status Monitor
- Printer driver settings
- Accessing the printer driver settings
- Basic tab
- Advanced tab
- Support tab
- Using FaceFilter Studio for photo printing by REALLUSION
- 2 Scanning
- Scanning a document using the TWAIN driver
- Scanning a document using the WIA driver (For Windows® XP/Windows Vista™)
- Scanning a document using the WIA driver (For Windows Vista™ Photo Gallery and Windows Fax and Scan users)
- Using the Scan key (For USB cable users)
- Using ScanSoft™ PaperPort™ 11SE with OCR by NUANCE™
- 3 ControlCenter3
- 4 Network Scanning (For models with built-in network support)
- 5 Remote Setup (Not available for DCP models and MFC-230C)
- 6 Brother PC-FAX Software (MFC models only)
- 7 PhotoCapture Center®
- 8 Firewall settings (For Network users)
- 1 Printing
- Apple® Macintosh®
- 9 Printing and Faxing
- 10 Scanning
- 11 ControlCenter2
- 12 Network Scanning (For models with built-in network support)
- 13 Remote Setup & PhotoCapture Center®
- Index
- brother USA

Network Scanning (For models with built-in network support)
154
12
Scan to OCR 12
When you choose Scan to OCR, your document will be scanned and sent directly to the Macintosh
®
you
designated on your network. ControlCenter2 will activate the OCR software installed on your Macintosh
®
(Presto!
®
PageManager
®
) and convert your document into text for viewing and editing from a word
processing application on the designated Macintosh
®
. You can change the Scan configuration. (See OCR
(word processing application) on page 139.)
a Load your document.
b Press the (Scan) key.
c Press a or b to choose Scan to OCR.
Press OK.
d Press a or b to choose the destination Macintosh
®
you want to send to.
Press OK.
If the LCD prompts you to enter a PIN number, enter the 4-digit PIN number for the destination
Macintosh
®
on the control panel.
Press OK.
Note
For DCP models, press a or b repeatedly to enter the first digit of the PIN number. Press c to move the
cursor, then use a or b to enter the second digit. Repeat until you have entered all four digit of the PIN
number. Press OK.
e Press Black Start or Color Start.
The machine starts the scanning process.
Note
•Presto!
®
PageManager
®
must be installed on your Macintosh
®
.
• You can’t choose color Scan type for this function. Black Start or Color Start do not change the settings.