
Software User's Guide
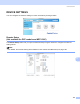

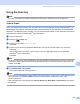
Table Of Contents
- SOFTWARE USER’S GUIDE
- Table of Contents
- Windows®
- 1 Printing
- Using the Brother printer driver
- Features
- Choosing the right type of paper
- Simultaneous printing, scanning and faxing
- Clearing data from the memory
- Status Monitor
- Printer driver settings
- Accessing the printer driver settings
- Basic tab
- Advanced tab
- Support tab
- Using FaceFilter Studio for photo printing by REALLUSION
- 2 Scanning
- Scanning a document using the TWAIN driver
- Scanning a document using the WIA driver (For Windows® XP/Windows Vista™)
- Scanning a document using the WIA driver (For Windows Vista™ Photo Gallery and Windows Fax and Scan users)
- Using the Scan key (For USB cable users)
- Using ScanSoft™ PaperPort™ 11SE with OCR by NUANCE™
- 3 ControlCenter3
- 4 Network Scanning (For models with built-in network support)
- 5 Remote Setup (Not available for DCP models and MFC-230C)
- 6 Brother PC-FAX Software (MFC models only)
- 7 PhotoCapture Center®
- 8 Firewall settings (For Network users)
- 1 Printing
- Apple® Macintosh®
- 9 Printing and Faxing
- 10 Scanning
- 11 ControlCenter2
- 12 Network Scanning (For models with built-in network support)
- 13 Remote Setup & PhotoCapture Center®
- Index
- brother USA

Network Scanning (For models with built-in network support)
153
12
Scan to Image 12
When you choose Scan to Image, your document will be scanned and sent directly to the Macintosh
®
you
designated on your network. ControlCenter2 will activate the default graphics application on the designated
Macintosh
®
. You can change the Scan configuration. (See Image (example: Apple
®
PreView) on page 137.)
a Load your document.
b Press the (Scan) key.
c Press a or b to choose Sca n to Image.
Press OK.
d Press a or b to choose the destination Macintosh
®
you want to send to.
Press OK.
If the LCD prompts you to enter a PIN number, enter the 4-digit PIN number for the destination
Macintosh
®
on the control panel.
Press OK.
Note
For DCP models, press a or b repeatedly to enter the first digit of the PIN number. Press c to move the
cursor, then use a or b to enter the second digit. Repeat until you have entered all four digit of the PIN
number. Press OK.
e Press Black Start or Color Start.
The machine starts the scanning process.
Note
• If you want to change between color and black and white scanning, choose color or black and white in the
scan type option on the Device Button tab of the ControlCenter2 configuration screen. (See
SCAN on page 135.)
• Scan type depends on the settings of the Device Button tab, Black Start or Color Start do not change
the settings.