
Quick Setup Guide

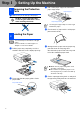


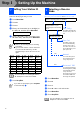

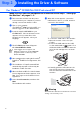
Table Of Contents
- Quick Setup Guide
- Quick Setup Guide
- Ръководство за Бързо Инсталиране
- Ghid rapid de setare

5
Setting Up
the Machine
Windows
®
Mac OS
®
XMac OS
®
8.6 - 9.2
1
After the cleaning cycle is finished, the LCD
shows:
2
Make sure the paper is loaded in the paper
tray.
Press Colour Start.
The machine starts printing the PRINT
QUALITY CHECK SHEET (only during
initial ink cartridge installation).
3
Check the quality of the four colour blocks
formed by the short lines printed on the
sheet.
(BLACK/ CYAN/ YELLOW/ MAGENTA)
Avoid touching the printed surface
of the paper immediately after
printing, the surface may not be
completely dry and may stain your
fingers.
4
The LCD shows:
5
If all lines are clear and visible, press
1
(
Yes
).
If you can see missing short lines, press 2
(
No
) to begin color cleaning process and
then follow prompts on the LCD.
1
Press Menu/Set.
2
Press 0.
3
Press 2.
4
Enter the last two digits of the year on the
dial pad, and then press Menu/Set.
(e.g. Enter 0 4 for 2004.)
5
Enter the two digits for the month on the dial
pad, and then press
Menu/Set
.
(e.g. Enter 0 3 for March.)
6
Enter the two digits for the day on the dial
pad, and then press Menu/Set.
(e.g. Enter 0 1.)
7
Enter the time in 24-hour format on the dial
pad, and then press
Menu/Set
.
(e.g. Enter 1 5, 2 5 for 3:25 P.M.)
8
Press
Stop/Exit
.
5
Print Quality Check
Set Paper and
Press Start
Is Quality OK?
1.Yes 2.No
Print Quality Check
1. Check the quality of the four-color blocks formed by the short lines.
2. If all th e short lines are clear an d visible, the quality is acceptable. the quality is acceptable.
Select (Yes). If you can see missing short li nes, select (No) to begin t he color cleaning process
and follo w the prompts on the LCD.
OK Poor
6
Setting the Date and
Time
Year:2004
Month:03
Day:01
Time:15:25
If you want to repeat input, press Stop/Exit
to start from Step
1
.