
Copier User Manual
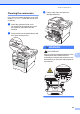
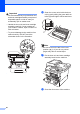
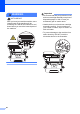
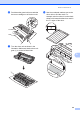


Table Of Contents
- Advanced User’s Guide MFC-8950DW/MFC-8950DWT
- User's Guides and where do I find them?
- Table of Contents
- 1 General Setup
- 2 Security features
- 3 Sending a fax
- Additional sending options
- Additional sending operations
- Sending a fax manually
- Sending a fax at the end of a conversation
- Dual access
- Broadcasting
- Real Time Transmission
- Overseas Mode
- Delayed Fax
- Delayed batch transmission
- Checking and canceling waiting jobs
- Setting your changes as the new default
- Restoring all fax settings to the factory settings
- Electronic cover page
- Destination Display
- Polling overview
- 4 Receiving a fax
- 5 Dialing and storing numbers
- 6 Printing reports
- 7 Making copies
- Copy settings
- Stop copying
- Improving copy quality
- Enlarging or reducing the image copied
- Duplex (2-sided) Copying
- Tray selection
- Adjusting Brightness and Contrast
- Sorting copies
- Making N in 1 copies (page layout)
- 2 in 1 ID Copy
- Setting your changes as the new default
- Restoring all copy settings to the factory settings
- Setting your favorites
- Copy settings
- A Routine maintenance
- B Options
- C Glossary
- Index

70
m Turn the drum unit gear toward you by
hand while checking the surface of the
suspected area.
n When you have found the mark on the
drum that matches the drum dot check
sheet, wipe the surface of the drum
gently with a cotton swab until the mark
on the surface comes off.
Important
DO NOT clean the surface of the
photosensitive drum with a sharp object or
any liquids.
o Turn the drum unit back over.
p Put the toner cartridge back into the
drum unit until you hear it lock into place.
If you put the cartridge in correctly, the
green lock lever will lift automatically.
Note
Make sure that you put in the toner
cartridge correctly or it may separate from
the drum unit.