
Quick Start Manual


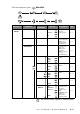
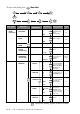


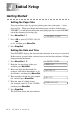
Table Of Contents
- YL4MFC_US.PDF
- Front Cover
- Inside Front Cover
- Brother Numbers
- Ordering Accessories and Supplies
- Quick Reference Guide
- How to Access the Complete Owner's Manual (For MFC-4800 Only)
- How to Access Brother Support (For MFC-4800 Only) (For Windows® Only)
- Download the Printer Driver from the Brother Web Site (For FAX-2900 and FAX-3800 Only)
- Table of Contents
- 1.Introduction
- 2.Assembly and Connections
- Packing List
- Choosing a Location
- Assembly
- Installing the Drum Unit Assembly (with Toner Cartridge)
- Setting Up the FAX/MFC
- Loading Paper
- Acceptable Paper
- Paper Capacity of Multi-purpose Sheet Feeder
- Connecting an External Telephone
- Connecting an External Telephone Answering Device (TAD)
- Special Line Considerations
- Multi-Line Connections (PBX)
- Custom Features on Your Phone Line
- 3.On-Screen Programming
- 4.Initial Setup
- Getting Started
- Setting the Paper Size
- Setting the Date and Time
- Setting the Station ID
- Setting the Ring Volume
- Setting the Beeper Volume
- Setting the Speaker Volume
- Setting the Handset Volume
- Choosing the Handset Volume (For Volume Amplify)
- Setting Volume Amplify
- Memory Storage
- Turning On Automatic Daylight Savings Time
- Toner Save
- Sleep Mode
- Setting Tone/Pulse Dialing Mode (For Canada Only)
- Getting Started
- 5.Setup Receive
- 6.Setup Send
- 7.Auto Dial Numbers and Dialing Options
- 8.Telephone Services
- 9.Remote Fax Options
- 10.Printing Reports
- 11.Making Copies
- 12.Important Information
- 13.Troubleshooting and Routine Maintenance
- Glossary
- Specifications
- Index
- Remote Retrieval Access Card
- Rear Cover
4 - 1
INITIAL SETUP
4
4
Initial Setup
Getting Started
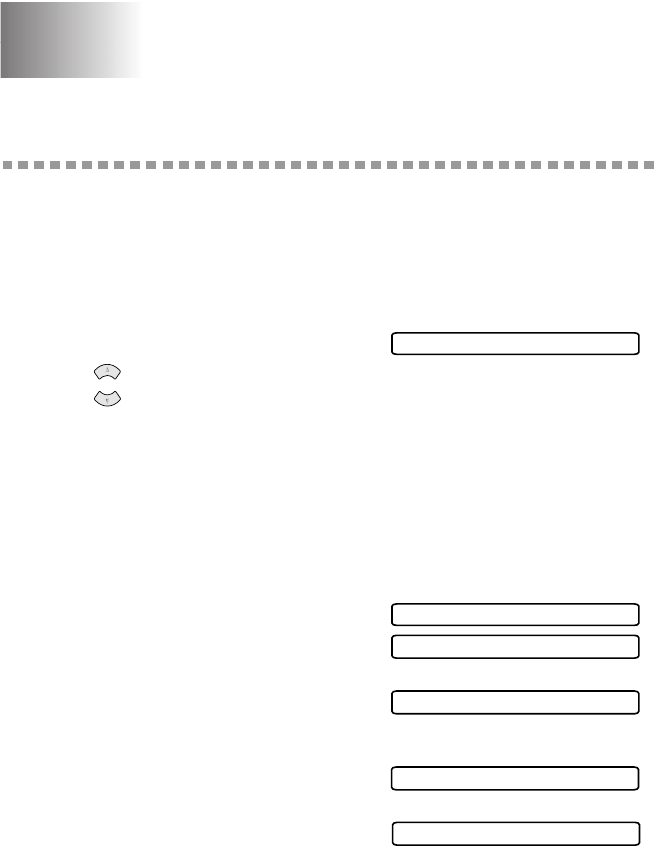
Setting the Paper Size
You can use three sizes of paper for printing your faxes and copies — letter,
legal and A4. When you change the kind of paper you have loaded in the
FAX/MFC, you will need to change the setting for paper size so your FAX/MFC
can fit the incoming fax on the page.
1
Press Menu/Set, 1,1.
2
Press to select LETTER, LEGAL
or A4, and then press Menu/Set.
3
Press Stop/Exit.
Setting the Date and Time
Your FAX/MFC displays the date and time and prints it on every fax you send.
In the event of a power failure, you may have to reset the date and time. All other
settings remain unaffected.
1
Press Menu/Set, 1, 2.
2
Enter the last two digits of the year,
and then press Menu/Set.
3
Enter two digits for the month (for
example, enter 09 for September, or 10
for October), and then press Menu/Set.
4
Enter two digits for the day (for example,
06), and then press Menu/Set.
5
Enter the time in 24-hour format
(for example, enter 15:25 for 3:25 PM),
and then press Menu/Set.
6
Press Stop/Exit.
The LCD now shows the date and time.
1.PAPER SIZE
or
2.DATE/TIME
YEAR:XX
MONTH:XX
DAY:XX
TIME:XX:XX