
Quick Start Manual


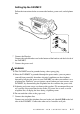

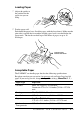


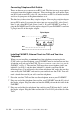
Table Of Contents
- YL4MFC_US.PDF
- Front Cover
- Inside Front Cover
- Brother Numbers
- Ordering Accessories and Supplies
- Quick Reference Guide
- How to Access the Complete Owner's Manual (For MFC-4800 Only)
- How to Access Brother Support (For MFC-4800 Only) (For Windows® Only)
- Download the Printer Driver from the Brother Web Site (For FAX-2900 and FAX-3800 Only)
- Table of Contents
- 1.Introduction
- 2.Assembly and Connections
- Packing List
- Choosing a Location
- Assembly
- Installing the Drum Unit Assembly (with Toner Cartridge)
- Setting Up the FAX/MFC
- Loading Paper
- Acceptable Paper
- Paper Capacity of Multi-purpose Sheet Feeder
- Connecting an External Telephone
- Connecting an External Telephone Answering Device (TAD)
- Special Line Considerations
- Multi-Line Connections (PBX)
- Custom Features on Your Phone Line
- 3.On-Screen Programming
- 4.Initial Setup
- Getting Started
- Setting the Paper Size
- Setting the Date and Time
- Setting the Station ID
- Setting the Ring Volume
- Setting the Beeper Volume
- Setting the Speaker Volume
- Setting the Handset Volume
- Choosing the Handset Volume (For Volume Amplify)
- Setting Volume Amplify
- Memory Storage
- Turning On Automatic Daylight Savings Time
- Toner Save
- Sleep Mode
- Setting Tone/Pulse Dialing Mode (For Canada Only)
- Getting Started
- 5.Setup Receive
- 6.Setup Send
- 7.Auto Dial Numbers and Dialing Options
- 8.Telephone Services
- 9.Remote Fax Options
- 10.Printing Reports
- 11.Making Copies
- 12.Important Information
- 13.Troubleshooting and Routine Maintenance
- Glossary
- Specifications
- Index
- Remote Retrieval Access Card
- Rear Cover

2 - 12
ASSEMBLY AND CONNECTIONS
Converting Telephone Wall Outlets
There are three ways to convert to an RJ11 jack. The first two ways may require
assistance from the telephone company. You can change the wall outlets from
one RJ14 jack to two RJ11 jacks. Or, you can have an RJ11 wall outlet installed
and slave or jump one of the phone numbers to it.
The third way is the easiest: Buy a triplex adapter. You can plug a triplex adapter
into an RJ14 outlet. It separates the wires into two separate RJ11 jacks (Line 1,
Line 2) and a third RJ14 jack (Lines 1 and 2). If your FAX/MFC is on Line 1,
plug the FAX/MFC into L1 of the triplex adapter. If your FAX/MFC is on Line
2, plug it into L2 of the triplex adapter.
Installing FAX/MFC, External Two-Line TAD and Two-Line
Telephone
When you are installing an external two-line telephone answering device
(TAD) and a two-line telephone, your FAX/MFC must be isolated on one line
at both the wall jack and at the TAD. The most common connection is to put the
FAX/MFC on Line 2. The two-line TAD must have two telephone jacks: one
labeled L1 or L1/L2, and the other labeled L2, which is explained in the
following Steps. You will need at least three telephone line cords, the one that
came with your FAX/MFC and two for your external two-line TAD. You will
need a fourth line cord if you add a two-line telephone.
1
Place the two-line TAD and the two-line telephone next to your FAX/MFC.
2
Plug one end of the telephone line cord for your FAX/MFC into the L2 jack of
the triplex adapter. Plug the other end into the LINE jack on the left side of the
FAX/MFC.
3
Plug one end of the first telephone line cord for your TAD into the L1 jack of
the triplex adapter. Plug the other end into the L1 or L1/L2 jack of the two-line
TAD.
RJ14
RJ11
Triplex Adapter
RJ14