
Quick Start Manual


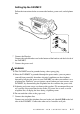

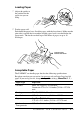


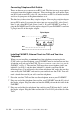
Table Of Contents
- YL4MFC_US.PDF
- Front Cover
- Inside Front Cover
- Brother Numbers
- Ordering Accessories and Supplies
- Quick Reference Guide
- How to Access the Complete Owner's Manual (For MFC-4800 Only)
- How to Access Brother Support (For MFC-4800 Only) (For Windows® Only)
- Download the Printer Driver from the Brother Web Site (For FAX-2900 and FAX-3800 Only)
- Table of Contents
- 1.Introduction
- 2.Assembly and Connections
- Packing List
- Choosing a Location
- Assembly
- Installing the Drum Unit Assembly (with Toner Cartridge)
- Setting Up the FAX/MFC
- Loading Paper
- Acceptable Paper
- Paper Capacity of Multi-purpose Sheet Feeder
- Connecting an External Telephone
- Connecting an External Telephone Answering Device (TAD)
- Special Line Considerations
- Multi-Line Connections (PBX)
- Custom Features on Your Phone Line
- 3.On-Screen Programming
- 4.Initial Setup
- Getting Started
- Setting the Paper Size
- Setting the Date and Time
- Setting the Station ID
- Setting the Ring Volume
- Setting the Beeper Volume
- Setting the Speaker Volume
- Setting the Handset Volume
- Choosing the Handset Volume (For Volume Amplify)
- Setting Volume Amplify
- Memory Storage
- Turning On Automatic Daylight Savings Time
- Toner Save
- Sleep Mode
- Setting Tone/Pulse Dialing Mode (For Canada Only)
- Getting Started
- 5.Setup Receive
- 6.Setup Send
- 7.Auto Dial Numbers and Dialing Options
- 8.Telephone Services
- 9.Remote Fax Options
- 10.Printing Reports
- 11.Making Copies
- 12.Important Information
- 13.Troubleshooting and Routine Maintenance
- Glossary
- Specifications
- Index
- Remote Retrieval Access Card
- Rear Cover

ASSEMBLY AND CONNECTIONS
2 - 9
Connecting an External Telephone
Your FAX/MFC is equipped with a handset that you can use as a regular phone.
However, you can also connect a separate telephone (or telephone answering
device) directly to your FAX/MFC.
Connect the modular plug on the telephone’s line cord to the jack labeled EXT.
on the back side of the FAX/MFC.
Whenever this phone (or TAD) is in use, the LCD shows EXT. TEL IN USE,
and, if the fax handset is lifted, an alarm sounds. To disconnect the call on the
external phone and switch to the fax, press Hook.
Connecting an External Telephone
Answering Device (TAD)
Sequence
You may choose to connect an answering system. However, when you have an
external TAD on the same telephone line as the FAX/MFC, the TAD answers
all calls. The FAX/MFC “listens” for fax calling (CNG) tones. If it hears them,
the FAX/MFC takes over the call and receives the fax. If it doesn’t hear CNG
tones, the FAX/MFC lets the TAD continue playing your outgoing message so
your caller can leave you a voice message.
The TAD must answer within four rings (the recommended setting is two rings).
The FAX/MFC cannot hear CNG tones until the TAD has answered the call, and
with four rings there are only 8–10 seconds of CNG tones left for the fax
“handshake.” Make sure you carefully follow instructions in this manual for
recording your outgoing message. Do not use a “toll-saver” ring setting on the
TAD.
If You Subscribe to your Telephone Company’s Distinctive Ring Service:
You may connect an external TAD to a separate wall jack only if you subscribe
to your telephone company’s Distinctive Ring service, have registered the
distinctive ring pattern on your machine, use that number as a fax number and
set your machine’s Receive mode to MANUAL.
The recommended setting is three or four rings on the external TAD when you
have the telephone company’s Distinctive Ring service.
If You Do Not Subscribe to Distinctive Ring Service:
You must plug your TAD into the EXT. jack of your Brother machine. If your
TAD is plugged into a wall jack, both your machine and the TAD will try to
control the phone line. (See illustration on page 2-10.)