
User's Manual

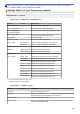
Table Of Contents
- Online User's Guide HL-L5000D/HL-L5100DN/HL-L5200DW/HL-L5200DWT/HL-L6200DW/HL-L6200DWT/HL-L6300DW
- Table of Contents
- Before You Use Your Brother Machine
- Introduction to Your Brother Machine
- Paper Handling
- Print
- Print from Your Computer (Windows®)
- Print a Document (Windows®)
- Print More Than One Page on a Single Sheet of Paper (N in 1) (Windows®)
- Print as a Poster (Windows®)
- Print on Both Sides of the Paper (Windows®)
- Print as a Booklet (Windows®)
- Secure Print (Windows®)
- Use a Macro from Your Computer (Windows®)
- Use a Preset Print Profile (Windows®)
- Change the Default Print Settings (Windows®)
- Print a Document Using the BR-Script3 Printer Driver (PostScript® 3™ Language Emulation) (Windows®)
- Monitor the Status of the Machine from Your Computer (Windows®)
- Print Settings (Windows®)
- Print from Your Computer (Macintosh)
- Print a Document (Macintosh)
- Print on Both Sides of the Paper (Macintosh)
- Print More Than One Page on a Single Sheet of Paper (N in 1) (Macintosh)
- Secure Print (Macintosh)
- Print a Document Using the BR-Script3 Printer Driver (PostScript® 3™ language emulation) (Macintosh)
- Monitor the Status of the Machine from Your Computer (Macintosh)
- Print Options (Macintosh)
- Print One Page Duplicates on Different Types of Paper
- Cancel a Print Job
- Test Print
- Print from Your Computer (Windows®)
- Network
- Get Started
- Network Management Software and Utilities
- Additional Methods of Configuring Your Brother Machine for a Wireless Network
- Before Configuring Your Brother Machine for a Wireless Network
- Configure Your Machine for a Wireless Network
- Configure Your Machine for a Wireless Network Using the One Push Method of Wi-Fi Protected Setup™ (WPS)
- Configure Your Machine for a Wireless Network Using the PIN Method of Wi-Fi Protected Setup™ (WPS)
- Configure Your Machine for a Wireless Network in Ad-Hoc Mode (For IEEE 802.11b/g/n)
- Configure Your Machine for a Wireless Network Using the Machine's Control Panel Setup Wizard
- Configure Your Machine for a Wireless Network When the SSID Is Not Broadcast
- Configure Your Machine for an Enterprise Wireless Network
- Use Wi-Fi Direct®
- Print from Your Mobile Device Using Wi-Fi Direct
- Configure Your Wi-Fi Direct Network
- Wi-Fi Direct Network Configuration Overview
- Configure Your Wi-Fi Direct Network Using the One-Push Method
- Configure Your Wi-Fi Direct Network Using the One-Push Method and Wi-Fi Protected Setup™ (WPS)
- Configure Your Wi-Fi Direct Network Using the PIN Method
- Configure Your Wi-Fi Direct Network Using the PIN Method of Wi-Fi Protected Setup™ (WPS)
- Configure Your Wi-Fi Direct Network Manually
- Advanced Network Features
- Technical Information for Advanced Users
- Security
- Lock the Machine Settings
- Network Security Features
- Before Using Network Security Features
- Secure Function Lock 3.0
- Use Active Directory® Authentication
- Use LDAP Authentication
- Manage Your Network Machine Securely Using SSL/TLS
- Introduction to SSL/TLS
- Certificates and Web Based Management
- Supported Security Certificate Features
- Create and Install a Certificate
- Manage Multiple Certificates
- Manage Your Network Machine Securely Using Web Based Management
- Manage Your Network Machine Securely Using BRAdmin Professional 3 (Windows®)
- Print Documents Securely Using SSL/TLS
- Manage Your Network Machine Securely Using IPsec
- Send an Email Securely
- Use IEEE 802.1x Authentication for a Wired or a Wireless Network
- Store Print Log to Network
- Mobile/Web Connect
- Troubleshooting
- Routine Maintenance
- Machine Settings
- Appendix
- Glossary

Level 1 Level 2 Description
Separator Tray
- Select the tray that contains the paper used as the separator paper, which is
inserted between each print job.
2-sided 2-sided
Print
Select whether to print on both sides of the paper.
Single Image
For a print job where the last page is a 1-sided image, select the 1-sided
Feed option to reduce printing time.
When you use Letterhead or Preprinted paper, you must select the 2-sided
Feed option. If you select 1-sided Feed for Letterhead or Preprinted paper,
the last page will be printed on the reverse side.
Paper Type MP Tray
Select the paper type that matches the paper in the MP tray.
Tray1
Select the paper type that matches the paper in the standard paper tray.
Tray2
1
Select the paper type that matches the paper in the Optional Tray (Tray 2).
Tray3
1
Select the paper type that matches the paper in the Optional Tray (Tray 3).
Tray4
1
Select the paper type that matches the paper in the Optional Tray (Tray 4).
Paper Size MP Tray
Select the size of paper you loaded in the MP tray.
Tray1
Select the size of paper you loaded in the standard paper tray.
Tray2
1
Select the size of paper you loaded in the Optional Tray (Tray 2).
Tray3
1
Select the size of paper you loaded in the Optional Tray (Tray 3).
Tray4
1
Select the size of paper you loaded in the Optional Tray (Tray 4).
Check Size
- Select whether to display a message telling you to check that the size of the
paper in the machine and the machine's Paper Size setting match.
1
Available if the Optional Tray(s) is installed.
[General Setup]
Level 1
Level 2 Description
Local Language
- Select the LCD language for your country.
Resolution
- Choose a print resolution.
Density
- Increase or decrease the print density.
Ecology Toner Save
Increase the page yield of the toner cartridge.
Sleep Time
Set how much time will pass before the machine enters Power Saving
Mode.
Quiet Mode
Decrease printing noise.
Auto Power Off
Set the number of hours that the machine will remain in Deep Sleep
Mode before going into Power Off Mode.
Panel Control Button Repeat
Set the time for the LCD message to change when holding a or b at
intervals.
Message Scroll
Set the time in seconds that an LCD message will scroll across the
LCD. From Level 1=0.2 sec to Level 10=2.0 sec.
LCD Contrast
Adjust the contrast of the LCD.
Auto Online
Set the machine to return to Ready Mode after it has been idle for 30
seconds.
Setting Lock
- Lock your machine’s settings using the Setting Lock password.
Interface Select
Select the interface to use.
If you select Auto, the machine changes the interface to USB or
Network depending on which interface is receiving data.
329