Brother Laser Printer USER’S GUIDE HL-5270DN HL-5280DW For visually-impaired users You can read this manual with Screen Reader ‘text-to-speech’ software. You must set up the hardware and install the driver before you can use the printer. Please use the Quick Setup Guide to set up the printer. You can find a printed copy in the box. Please read this User’s Guide thoroughly before you use the printer. Keep the CD-ROM in a convenient place so you can use it quickly if you need to.
Using this guide Symbols used in this guide We use the following icons throughout this User’s Guide: Warnings tell you what to do to prevent possible personal injury. Electrical Hazard icons alert you to a possible electrical shock. Hot Surface icons warn you not to touch machine parts that are hot. Cautions specify procedures you must follow or avoid to prevent possible damage to the printer or other objects. Improper Setup icons alert you to devices and operations that are not compatible with the printer.
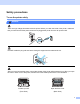
Safety precautions To use the printer safely WARNING There are high voltage electrodes inside the printer. Before you clean the inside of the printer, make sure that you have turned off the power switch and unplugged the printer from the AC power outlet. DO NOT handle the plug with wet hands. Doing this might cause an electrical shock. After you have just used the printer, some internal parts of the printer will be extremely hot.
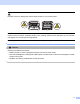
DO NOT remove or damage the caution labels located on or around the fuser. DO NOT use a vacuum cleaner to clean up scattered toner. Doing this might cause the toner dust to ignite inside the vacuum cleaner, potentially starting a fire. Carefully clean the toner dust with a dry, lint-free cloth and dispose of it according to local regulations. DO NOT use flammable substances near the printer. Doing this might cause a fire or electrical shock.
Trademarks The Brother logo is a registered trademark of Brother Industries, Ltd. Apple, the Apple Logo, Macintosh and TrueType are registered trademarks of Apple Computer, Inc in the United States and other countries. Epson is a registered trademark and FX-80 and FX-850 are trademarks of Seiko Epson Corporation. Hewlett Packard is a registered trademark and HP LaserJet 6P, 6L, 5P, 5L, 4, 4L 4P, III, IIIP, II, and IIP are trademarks of Hewlett-Packard Company.
Table of Contents 1 About this Printer What is in the box? ....................................................................................................................................1 Interface cable .....................................................................................................................................1 Front view ............................................................................................................................................2 Back view ....
Data LED .................................................................................................................................................50 LCD .........................................................................................................................................................50 Back light ...........................................................................................................................................50 LCD messages .............................
A Appendix Printer specifications..............................................................................................................................114 Engine .............................................................................................................................................114 Controller .........................................................................................................................................115 Software ...................................
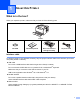
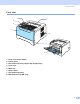
1 About this Printer What is in the box? When you unpack the printer, make sure that you have all of the following parts. Printer CD-ROM Quick Setup Guide Drum unit and toner cartridge assembly AC power cord Interface cable An interface cable is not a standard accessory. Buy the proper interface cable for the interface you want to use (USB, parallel or network). USB cable Do not use a USB interface cable that is longer than 6 feet (2.0 meters).
1.
1.
1. About this Printer Positioning the printer Read the following before you use the printer. Power supply Use the printer within the recommended power range. Power source: USA and Canada: AC 110 to 120 V, 50/60 Hz Europe and Australia: AC 220 to 240 V, 50/60 Hz The power cord, including extensions, should be no longer than 5 meters (16.5 feet). Do not share the same power circuit with other high-power appliances, such as an air conditioner, copier, shredder and so on.
1. About this Printer Network features The Brother machine can be shared on a 10/100 Mb wired Ethernet or IEEE 802.11b/802.11g wireless Ethernet network using the internal network print server in a TCP/IP environment. Note • If you want to use the wireless network, set it up referring to the Quick Setup Guide and the Network User’s Guide on the CD-ROM we have supplied. • For more information about the network, see the Network User’s Guide.
2 Printing Methods About paper Type and size of paper The printer loads paper from the installed paper tray or the multi-purpose tray. The names for the paper trays in the printer driver and this guide are as follows: Paper tray Tray 1 Multi-purpose tray MP Tray Optional lower tray unit Tray 2 / Tray 3 Duplex tray for automatic duplex printing DX When looking at this page on the CD-ROM, you can jump to the page for each printing method by clicking p in the table.
2. Printing Methods MP Tray Paper size Width: 69.9 to 215.9 mm (2.75 to 8.5 in.) Tray 1 Tray 2, Tray 3 Legal 1, Legal 1, A4, Letter, B5 (ISO), Executive, A5, A6, B6 (ISO) A4, Letter, B5 (ISO), Executive, A5, B6 (ISO) 250 sheets 250 sheets DX A4, Letter, Legal 1 Length: 116 to 406.4 mm (4.57 to 16 in.) Number of sheets (80 g/m2 / 21 lb) 1 50 sheets Legal size paper is not available in some regions outside the USA and Canada.
2. Printing Methods Types of envelopes Most envelopes will be suitable for your printer. However, some envelopes may have feed and print quality problems due to the way they have been made. A suitable envelope should have edges with straight, wellcreased folds and the leading edge should not be thicker than two pieces of paper. The envelope should lie flat and not be of baggy or flimsy construction.
2. Printing Methods Printable area When using PCL (standard driver) emulation, the edges of the paper that cannot be printed on are shown in the tables below. Note When using BR-Script emulation, the edges of the paper that cannot be printed on are 4.32 mm (0.17 in.). Portrait 1 2 4 3 A4 Letter Legal B5 (ISO) Executive A5 A6 B6 1 4.23 mm (0.16 in.) 4.23 mm (0.16 in.) 4.23 mm (0.16 in.) 4.23 mm (0.16 in.) 4.23 mm (0.16 in.) 4.23 mm (0.16 in.) 4.23 mm (0.16 in.) 4.23 mm (0.16 in.) 2 6.
2. Printing Methods Printing methods Printing on plain paper, bond paper and transparencies Printing on plain paper, bond paper or transparencies from Tray 1, 2 or 3 For the proper paper to use, see About paper on page 6. a Choose the following from the printer driver: Paper Size ............................ (1) Media Type ........................... (2) Paper Source ....................... (3) and any other settings.
2. Printing Methods b Pull the paper tray completely out of the printer. c While pressing the blue paper-guide release lever, slide the paper guides to fit the paper size. Make sure that the guides are firmly in the slots. For legal size paper 1, press in the paper-guide release lever and pull out the back of the paper tray. 1 d Legal size paper is not available in some regions outside the USA and Canada. Put paper in the tray, and make sure that the paper is below the maximum paper mark (b).
2. Printing Methods e f Put the paper tray firmly back in the printer. Make sure that it is completely inserted into the printer. g Send the print data to the printer. Lift up the support flap to prevent paper from sliding off the face-down output tray, or remove each page as soon as it comes out of the printer. Note • The side to be printed on must be face down. • When printing on transparencies, remove each transparency at once after printing.
2. Printing Methods Printing on plain paper, bond paper or transparencies from the MP tray MP Tray mode is automatically turned on when paper is put in the multi-purpose tray. For the proper paper to use, see About paper on page 6. a Choose the following from the printer driver: Paper Size ............................ (1) Media Type ........................... (2) Paper Source ....................... (3) and any other settings.
2. Printing Methods b Open the MP tray and lower it gently. c Pull out the MP tray support flap (1). 1 d Lift up the support flap to prevent paper from sliding off the face-down output tray, or remove each page as soon as it comes out of the printer.
2. Printing Methods e Put paper in the MP tray. Make sure that the paper stays under the maximum paper mark (b) on both sides of the tray. f While pressing the paper-guide release lever, slide the paper guide to fit the paper size. g Send the print data to the printer. Note • The side to be printed on must be face up with the leading edge (top of the paper) in first. • When printing on transparencies, remove each transparency at once after printing.
2. Printing Methods Printing on thick paper, labels and envelopes MP Tray mode is automatically turned on when paper is put in the multi-purpose tray. For the proper paper to use, see About paper on page 6 and Types of envelopes on page 8. a Choose the following from the printer driver: Paper Size ............................ (1) Media Type ........................... (2) Paper Source ....................... (3) and any other settings.
2. Printing Methods b Open the MP tray and lower it gently. c Pull out the MP tray support flap (1). 1 d Lift up the support flap to prevent paper from sliding off the face-down output tray, or remove each page as soon as it comes out of the printer.
2. Printing Methods e Put paper in the MP tray. Make sure that the paper stays under the maximum paper mark (b) on both sides of the tray. Note • Envelope joints that are sealed by the manufacturer should be secure. • The side to be printed on must be face up. • All sides of the envelope should be properly folded without wrinkles or creases. f While pressing the paper-guide release lever, slide the paper guide to fit the paper size. g Send the print data to the printer.
2. Printing Methods Note • If the DL size double flap envelope is creased after printing, choose DL Long Edge in Paper Size, from the Basic tab. Put a new DL size double-flap envelope in the MP tray with the longest edge of the envelope in first, then print again. • When you put paper in the MP tray, remember the following: • Put the leading edge (top of the paper) in first and push it gently into the tray. • Make sure that the paper is straight and in the proper position in the MP tray.
2. Printing Methods Duplex Printing The supplied printer drivers for Windows® 95/98/Me/2000/XP and Windows NT® 4.0, Mac OS® 9.1 to 9.2 and Mac OS® X 10.2.4 or greater all enable duplex printing. For more information about how to choose the settings, see the Help text in the printer driver. Guidelines for printing on both sides of the paper If the paper is thin, it may wrinkle. If paper is curled, straighten it and then put it back in the paper tray or the MP tray.
2. Printing Methods Note • If you choose the Paper Source to be Auto Select, put the printed even-numbered pages in the MP tray. • When you put paper in the paper tray, first empty the tray. Next, put the printed pages in the tray, with the printed side face up. (Do not add the printed pages to the top of a stack of unprinted paper.) Manual duplex printing from the MP tray Note Before putting the sheets back in the MP tray, you will have to straighten them, or you may get paper jams.
2. Printing Methods Paper orientation for manual duplex printing The printer prints the second page first. If you print 10 pages on 5 sheets of paper, it will print page 2 and then page 1 on the first sheet of paper. It will print page 4 and then page 3 on the second sheet of paper. It will print page 6 and then page 5 on the third sheet of paper, and so on.
2. Printing Methods 5 Click OK. The printer will print on both sides of the paper automatically. For the BR-Script printer driver 1 Open the Properties dialog box in the printer driver. 2 From the General tab, click the Printing Preferences icon. 3 From the Layout tab, choose Orientation, Print on Both Sides (Duplex) and Page Order. 4 Click OK. The printer will print on both sides of the paper automatically.
2. Printing Methods Booklet printing (For Windows printer driver) a b c d e Put paper in the paper tray or MP tray. Open the Properties dialog box in the printer driver. From the General tab, choose the Printing Preferences icon. From the Advanced tab, choose Duplex and Use Duplex Unit or Manual Duplex, and then choose Booklet Printing. Click OK. The printer will print a booklet automatically.
2. Printing Methods Carbon copy printing Carbon copy printing allows you to automatically print one page of data on different kinds of paper by changing the paper source. You can make copies as though you are printing on carbon paper using a dot matrix printer. For example, you can print ‘Data A’ to ‘Sheet 1’ which is blue colored paper and then to ‘Sheet 2’ which is yellow colored and has some information already printed on it.
3 Driver and Software Printer driver A printer driver is software that translates data from the format used by a computer to the format that a particular printer needs. Typically, this format is page description language (PDL). The printer drivers for the following versions of Windows® and Macintosh® are on the CD-ROM we have supplied or on the Brother Solutions Center at http://solutions.brother.com. Install the drivers by following the Quick Setup Guide.
3. Driver and Software You can change the following printer settings when you print from your computer.
3. Driver and Software Features in the printer driver (For Windows®) For more information, see the Help text in the printer driver. Note • The screens in this section are from Windows® XP. The screens on your PC will vary depending on your operating system. • If you are using Windows® 2000 or XP, you can access the Printing Preferences dialog box by clicking Printing Preferences... in the General tab of the Printer Properties dialog box. • If you are using Windows NT® 4.
3. Driver and Software Advanced tab 1 2 3 4 5 Change the tab settings by clicking one of the following icons: Print Quality (1) Duplex Printing (2) Watermark (3) Page Setting (4) Device Options (5) Print Quality Resolution You can change the resolution as follows: • 1200 dpi • HQ 1200 • 600 dpi • 300 dpi Note If you use the high quality 1200 dpi setting (1200 × 1200 dpi) the print speed will be slower.
3. Driver and Software Toner Save Mode You can save running costs by turning on the Toner Save Mode, which cuts the print density. Note • We do not recommend Toner Save for printing Photo or Gray Scale images. • Toner Save Mode is not available for 1200 dpi or HQ 1200 resolution. Print Setting You can manually change the print setting. • Auto Choosing Auto will allow automatic printing with the most suitable print settings for your print job.
3. Driver and Software Device Options You can set the following in Printer Function: (You can jump to the page for each Printer Function by choosing the function name in the list below.
3. Driver and Software Job Spooling The printer keeps the last print job sent to it in memory. You can reprint a document without sending the data again from your PC. To reprint (except for secure printing). • Last Job Reprint: Reprint the last job • Secure Print: Print data with a password For more information about the Reprint function, see Reprinting documents on page 52.
3. Driver and Software Administrator (For Windows® 95/98/Me only) Administrators have the authority to limit the number of copies, scaling setting and watermark setting functions. • Password Enter the password into this box. • Set Password Click here to change the password. • COPY LOCK Lock the copy pages selection to prevent multiple copy printing. • WATERMARK LOCK Lock the current settings of the Watermark option to prevent changes being made.
3. Driver and Software Accessories tab Note From the Start menu, select Control Panel and then Printers 1. Right-click the Brother HL5270DN/5280DW series icon and select Properties to access the Accessories tab. 1 Printers and Faxes for Windows® XP users. 1 2 4 3 Available Options (1) You can manually add and remove the options that are installed on the printer. Tray settings will match the installed options.
3. Driver and Software Support tab 3 1 2 4 5 6 Version (1) Displays the printer driver version. Web Update (2) You can check the Brother web site for updated drivers, and automatically download and update the printer driver on your PC. Brother Solutions Center (3) The Brother Solutions Center (http://solutions.brother.com) is a web site offering information about your Brother product including FAQs (Frequently Asked Questions), User’s Guides, driver updates and tips for using your printer.
3. Driver and Software Features in the BR-Script (PostScript® 3™ language emulation) printer driver (For Windows®) For more information, see the Help text in the printer driver. Note The screens in this section are based on HL-5270DN with Windows® XP. The screens on your PC may vary depending on the printer model and your operating system. Device Settings tab Choose the options you have installed.
3. Driver and Software Printing Preferences Note If you are using Windows NT® 4.0, Windows® 2000 or XP, you can access the Printing Preferences dialog box by clicking Printing Preferences... in the General tab of the Brother HL-5270DN/HL-5280DW BR-Script3 Properties dialog box. Layout tab You can change the layout setting by choosing the settings for Orientation, Print on Both Sides (Duplex), Page Order and Pages Per Sheet. Paper/Quality tab Choose the Paper Source.
3. Driver and Software Advanced options 1 2 3 a b c Choose the Paper Size and Copy Count (1). Set the Scaling and TrueType Font settings (2). You can change settings by choosing the setting in the Printer Features list (3): Print Quality Media Type Job Spooling Passwprd Job Name Toner Save You can save running costs by turning on the Toner Save, which reduces the print density. Sleep Time See Device Options on page 31.
3. Driver and Software Features in the printer driver (For Macintosh®) This printer supports Mac OS® 9.1 to 9.2 and Mac OS® X 10.2.4 or greater. Note The screens in this section are from Mac OS® X 10.4. The screens on your Macintosh® will vary depending on your operating system. Page Setup You can set the Paper Size, Orientation and Scale. Layout Set the Pages per Sheet, Layout direction and Border. Pages per Sheet Choose how many pages will appear on each side of the paper.
3. Driver and Software Print Settings You can change settings by choosing the setting in the Print Settings list: Basic tab Resolution You can change the resolution as follows: • 300 dpi • 600 dpi • HQ 1200 • 1200 dpi Note If you use the high quality 1200 dpi setting (1200 × 1200 dpi) the print speed will be slower. Media Type You can change the media type as follows: • Plain Paper • Thin Paper • Thick Paper • Thicker Paper • Bond Paper • Transparencies • Envelopes • Env.Thick • Env.
3. Driver and Software Advanced tab Print Quality You can change the print quality as follows: • Brother Photo This is a photograph mode (gradation priority). Choose this setting for printing photographs that have continuous gradation. You can represent soft contrasts between various shades of gray. • Brother Graphics This is a graphics mode (contrast priority). Choose this setting for printing text and figures, such as business and presentation documents.
3. Driver and Software Uninstalling the printer driver You can uninstall the printer driver that you installed with the following steps. Note • This is not available if you installed the printer driver from the Windows Add a printer function. • After uninstalling, we recommend that you restart your computer to remove files that were in use during the uninstall. Printer driver for Windows® For Windows® XP a b c Click the Start button, point to All Programs and then to your printer name. Click UnInstall.
3. Driver and Software Brother Laser driver for Macintosh® For Mac OS® X 10.2.4 or greater a b c d Disconnect the USB cable between the Macintosh and your printer. e Drag the HL-MFLPro folder (from the Macintosh HD (Startup Disk), choose Library, Printers, Brother) into the Trash and then empty the Trash. f Restart the Macintosh®. 1 Restart the Macintosh®. Log on as an ‘Administrator’.
3. Driver and Software Software Software for networks BRAdmin Professional (For Windows®) The BRAdmin Professional is a utility for managing your Brother network enabled printers that are running under Windows® 95/98/Me/2000/XP and Windows NT® 4.0. It allows you to easily configure and check the status of your printer on the network. BRAdmin Light (For Macintosh® ) The Brother BRAdmin Light software is a Java™ application that is designed for the Apple® Mac OS®X environment.
3. Driver and Software Windows® XP Professional About emulation modes This printer has the following emulation modes. You can change the setting by using the control panel or a Web browser. HP LaserJet Mode The HP LaserJet mode (or HP mode) is the emulation mode in which this printer supports the PCL6 language of the Hewlett-Packard® LaserJet laser printer. Many applications support this type of laser printer. Using this mode will allow your printer to run at its best with those applications.
3. Driver and Software Automatic interface selection This printer has an automatic interface selection feature that is turned on by default. This lets it automatically change the interface to IEEE 1284 parallel, USB, or Ethernet depending on which interface is receiving data. When you use the parallel interface, you can turn the high-speed and bi-directional parallel communications on or off by using the control panel buttons to access PARALLEL in the INTERFACE menu. (See Menu table on page 56.
4 Control Panel Control panel This printer has one liquid crystal display (LCD), seven buttons and one Light Emitting Diode (LED) on the control panel. The display can show various messages with up to 16 characters in one row. The LED light shows the current status of the printer.
4. Control Panel Buttons You can control the basic printer operations and change various printer settings with seven buttons (Go, Job Cancel, Reprint, +, -, Back, Set). button Operations Go Exit from the control panel menu and reprint settings. Clear error messages. Pause and continue printing. Job Cancel Stop and cancel the printing job in progress. Reprint Choose the reprint menu and the number of extra copies (1-999). + Move forward through menus. Move forward through the available options.
4. Control Panel Reprint If you want to reprint a document that has just been printed, press Reprint. You can reprint when the printer is in the READY or PAUSE state. For details, see Reprinting documents on page 52. + or - button Moving through menus on the LCD Pressing the + or - button when the printer is in the Ready state, takes it offline and the LCD will show the control panel menu. Press to scroll through the menus and options. Press or keep pressing the button until you see the setting you want.
4. Control Panel Data LED The Data LED is a light which shows the printer status. LED indication Meaning On Data is in the printer memory. Blinking Receiving or processing data. Off No remaining data in the memory. LCD The LCD shows the current printer status. When you use the control panel buttons, the LCD will change. If there are any problems, the LCD shows the proper error message, maintenance message or call service message so you will know that you need to take action.
4. Control Panel LCD messages Printer status messages The following table shows the printer status messages during normal operation: Printer Status Message Meaning IGNORE DATA Printer is ignoring data processed using PS driver. JOB CANCELLING Cancelling the job. Now Initializing The printer is setting up. PAUSE The printer has suspended its operations. Press Go to start the printer again. PRESS SET TO PRINT Press Set to start printing. PRINTING Printing. PROCESSING Busy processing data.
4. Control Panel Reprinting documents Reprinting from RAM You can reprint from random access memory (RAM). The reprint data in RAM will be deleted when the printer is turned off. When you use RAM to reprint: a b c d e Press Set on the control panel. Press the + or - button to choose SETUP. Press Set. Press the + or - button to choose RAMDISK SIZE. Press Set. The present RAM disk is 0MB. Press the + button to increase the reprint RAM size in increments of 1MB. Press Set.
4. Control Panel Reprinting the last job three times a Make sure that the REPRINT setting is ON by using the control panel buttons to enter the SETUP menu. Note If you print with the driver we have supplied with the printer, the settings for Job Spooling in the printer driver will take priority over the settings made on the control panel. For more information, see Device Options on page 31. b Press Reprint.
4. Control Panel How to print Secure data a Press Reprint. If there is no data, the LCD shows NO DATA STORED. LAST JOB b Press the + or - button to choose SECURE FILE. Press Set. SECURE FILE c Press the + or - button to choose the user name. Press Set. XXXXXX d Press the + or - button to choose the job. Press Set. XXXXXX e Enter your password. Press Set. PASS NO.=0000 Note The printer will exit this menu after a time-out period. f Press Set or Reprint.
4. Control Panel Using the control panel LCD menu When you use the Menu buttons (+, -, Set or Back), remember the following basic steps: If no control panel operations are performed for 30 seconds, the LCD automatically returns to READY. When you press Set to choose a setting, an asterisk appears at the end of the LCD for a short time. After that, the LCD returns to the previous menu level.
4. Control Panel Menu table There are eight menus. For more information about the selections available in each menu, see the tables below. Note The control panel LCD names for the paper trays are as follows. • Standard paper tray: TRAY1 • Multi-purpose tray: MP • Optional lower tray: TRAY2 or TRAY3 INFORMATION Submenu Menu Selections Descriptions PRINT SETTINGS Prints the Printer Settings page. PRINT TEST Prints the test page. PRINT DEMO Prints the demonstration sheet.
4. Control Panel PAPER Submenu Options Descriptions SOURCE AUTO*/MP/TRAY1/TRAY2/TRAY3 Chooses the tray that will be used. PRIORITY MP>T1>T2>T3*/T1>T2>T3>MP/ T1>T2>T3 When SOURCE is chosen as AUTO: Chooses the order in which the printer uses the paper trays that contain paper of the same size. MP FIRST ON/OFF* Chooses whether to feed paper from the MP tray as a priority. MP SIZE ANY*/LETTER/LEGAL/A4... Chooses the size of paper you put in the MP tray.
4. Control Panel SETUP (Continued) Submenu Menu Selections Options Descriptions PANEL CONTROL LCD DENSITY 0*/1 Adjusts the density of the LCD. AUTO ONLINE ON*/OFF BUTTON REPEAT 0.1*/0.2/0.3/0.4/0.5/1.0 Sets the time for the LCD message to /1.5/2.0 SEC change when holding the + or button at intervals. MESSAGE SCROLL LEVEL 1*/LEVEL 2.../LEVEL10 Sets the time in seconds that an LCD message will scroll across the LCD. From Level 1=0.2 to Level 10=2.0. POWER SAVE TIME 1/2/3/4/5*...
4. Control Panel PRINT MENU (Continued) Submenu Menu Selections Options Descriptions PAPER LETTER*/LEGAL/A4*/EXECU Sets the size of paper. TIVE/COM-10/DL/JIS B5/B 5/A5/B6/A6/MONARCH/C5/A4 LONG/FOLIO/DLL/POST CA RD/ORGANIZER J/ORGANIZ ER K/ORGANIZER M/ORGAN IZER L COPIES 1*/2.../999 Sets the number of printed pages. ORIENTATION PORTRAIT*/LANDSCAPE This printer can print pages in portrait or landscape orientation. X OFFSET -500/-499.../0*...
4. Control Panel PRINT MENU (Continued) Submenu Menu Selections Options HP LASERJET FONT NO. I000...#### (59)* FONT PITCH/POIN T ##.## (10.00/12.00)* SYMBOL SET PC-8*... Descriptions Sets the symbol set or the character set. Prints code table.
4. Control Panel PRINT MENU (Continued) Submenu Menu Selections Options EPSON FX-850 FONT NO. I000...####(59)* FONT PITCH/POIN T ##.##(10.00/12.00)* CHARACTER SET PC-8...(US ASCII)* Descriptions Sets the symbol set or the character set. Prints code table. TABLE PRINT ON: CR i CR+LF OFF: CR i CR AUTO LF OFF*/ON AUTO MASK OFF*/ON LEFT MARGIN #### Sets the left margin at column 0 to 70 columns at 10 cpi. RIGHT MARGIN #### Sets the right margin at column 10 to 80 columns at 10 cpi.
4. Control Panel PRINT MENU (Continued) Submenu Menu Selections Options IBM PROPRINTER FONT NO. I000...####(59)* FONT PITCH ##.##(10.00/12.00)* CHARACTER SET PC-8...* Descriptions Sets the symbol set or the character set. Prints code table. TABLE PRINT AUTO LF OFF*/ON ON: CR i CR+LF,OFF: CR i CR AUTO CR OFF*/ON ON: LFiLF+CR, FFiFF+CR, or VT i VT+CR OFF: LF i LF, FF i FF, or VT i VT AUTO MASK OFF*/ON LEFT MARGIN #### Sets the left margin at column 0 to 70 columns at 10 cpi.
4. Control Panel NETWORK for HL-5270DN users Submenu Menu Selections Options TCP/IP TCP/IP ENABLE ON*/OFF IP ADDRESS= ###.###.###.### (000.000.000.000)* 1 Enter the IP address. SUBNET MASK= ###.###.###.### (000.000.000.000)* 1 Enter the Subnet mask. GATEWAY= ###.###.###.### (000.000.000.000)* Enter the Gateway address. IP BOOT TRIES # (3) IP METHOD AUTO*/STATIC/RARP/BOOTP Chooses the IP method that best /DHCP suits your needs.
4. Control Panel NETWORK for HL-5280DW users Submenu 1 Submenu 2 WIRED WIRED ENABLE TCP/IP Options TCP/IP ENABLE ON*/OFF IP ADDRESS= ###.###.###.### (000.000.000.000)* 1 Enter the IP address. SUBNET MASK= ###.###.###.### (000.000.000.000)* 1 Enter the Subnet mask. GATEWAY= ###.###.###.### (000.000.000.000)* Enter the Gateway address. IP BOOT TRIES # (3) IP METHOD AUTO*/STATIC/RARP/BOOTP /DHCP Chooses the IP method that best suits your needs.
4. Control Panel NETWORK for HL-5280DW users (Continued) Submenu 1 Submenu 2 Menu Selections Options Descriptions WLAN (Continued) WIRELESS (Continued) COMM.MODE AD-HOC*/INFRASTRUCTURE Shows the current Communication Mode. LIST SSID (Shows a list of available names for the wireless network) SSID (Shows SSID [uses a maximum of 32 digits and characters 0-9, a-z and A-Z in ASCII values]) CHANNEL 1........11*..14 Chooses the channel you use.
4. Control Panel INTERFACE Submenu Menu Selections Options Description SELECT AUTO*/PARALLEL/USB/NETW ORK AUTO IF TIME 1/2/3/4/5*.../99 (sec) You need to set the time-out period for the auto interface selection. INPUT BUFFER Level 1/2/3*.../15 Increases or decreases the input buffer capacity. HIGH SPEED ON*/OFF Turns high-speed parallel communications ON or OFF. BI-DIR ON*/OFF Turns bi-directional parallel communications ON or OFF. INPUT PRIME ON/OFF* Turns prime signal ON or OFF.
4. Control Panel Example of changing the menu setting Setting IP Address a Press the + or - button to choose NETWORK (and to display each setting shown below). INFORMATION h NETWORK b Press Set. TCP/IP c Press Set. TCP/IP ENABLE d Press the + button. IP ADDRESS= e Press Set. The last digit in the first part of the number is blinking. 192. 0. 0. 192* f Press the + or - button to increase or decrease the number. Press Set to go to the next number. 123. 0. 0.
4. Control Panel Default Settings Printer default setting The printer settings have been set at the factory before shipment. They are called default settings (see Menu table on page 56). Although you can run the printer with these default settings unchanged, you can tailor the printer with user settings. Note Changing the user settings does not affect the default settings. You cannot modify the present default settings. The changed user settings can be restored to the default settings with the RESET MENU.
5 Options This printer has the following optional accessories. You can increase the capabilities of the printer with these items. Lower tray unit DIMM memory LT-5300 See Lower tray unit (LT-5300) on this page. See DIMM on page 70. Lower tray unit (LT-5300) Two optional lower trays (Tray 2 or Tray 3) can be installed, and each lower tray can hold up to 250 sheets of 80 g/m2 (21 lb) paper. When both optional trays are installed, the printer can hold up to 800 sheets of plain paper.
5. Options DIMM The printer has 32 MB of standard memory and one slot for optional memory expansion. You can expand the memory up to 544 MB by installing dual in-line memory modules (DIMMs).
5. Options Installing extra memory a Turn off the printer power switch, and then unplug the printer. Disconnect the interface cable from the printer. Note Be sure to turn off the printer power switch before you install or remove the DIMM. b Remove the DIMM cover. c Unpack the DIMM and hold it by its edges. CAUTION To prevent damage to the printer from static electricity, DO NOT touch the memory chips or the board surface.
5. Options e Put the DIMM cover back on. f Reconnect the interface cable to your printer. Plug the printer back in, and then turn on the power switch. Note To make sure that you have installed the DIMM properly, you can print the printer settings page that shows the current memory size. See Menu table on page 56.
6 Routine Maintenance You will need to replace certain parts and clean the printer regularly. WARNING When you replace certain parts or clean the inside of the printer, remember the following: • If your clothes are smeared with toner, wipe off the toner with a dry cloth and immediately wash the clothes in cold water to avoid stains. • Be careful not to inhale toner. • After you have just used the printer, some internal parts of the printer will be extremely hot.
6. Routine Maintenance Consumables Toner Cartridge Drum Unit See Toner cartridge on page 74. See Drum unit on page 80. Toner cartridge A new toner cartridge can print approximately 3,500 (standard cartridge) or approximately 7,000 (high yield cartridge) A4 or Letter size single-sided pages at 5% coverage. Note • The amount of toner used varies according to what is printed on the page and the print density setting.
6. Routine Maintenance Replacing the toner cartridge Note • To ensure high quality printing, we recommend that you use only genuine Brother toner cartridges. When you want to buy toner cartridges, call the dealer you bought the printer from or Brother Customer Service. • We recommend that you clean the printer when you replace the toner cartridge. See Cleaning on page 85. a Press the front cover release button and then open the front cover. b Take out the drum unit and toner cartridge assembly.
6. Routine Maintenance c Push down the blue lock lever and take the toner cartridge out of the drum unit. CAUTION DO NOT put a toner cartridge into a fire. It could explode, resulting in injuries. Handle the toner cartridge carefully. If toner scatters on your hands or clothes, wipe or wash it off with cold water at once. To avoid print quality problems, DO NOT touch the shaded parts shown in the illustrations.
6. Routine Maintenance CAUTION Wait to unpack the toner cartridge until immediately before you put it in the printer. If toner cartridges are left unpacked for a long time the toner life will be shortened. If an unpacked drum unit is put in direct sunlight or room light, the unit may be damaged. Put the toner cartridge in the drum unit immediately after you have removed the protective cover. To prevent any degradation to the print quality, DO NOT touch the shaded parts shown in the illustrations.
6. Routine Maintenance e Pull off the protective cover. f Put the new toner cartridge firmly into the drum unit until you hear it lock into place. If you put it in properly, the lock lever will lift automatically. CAUTION Make sure that you put in the toner cartridge properly or it may separate from the drum unit. g Clean the primary corona wire inside the drum unit by gently sliding the blue tab from right to left and left to right several times.
6. Routine Maintenance h Put the drum unit and toner cartridge assembly back in the printer. Close the front cover.
6. Routine Maintenance Drum unit A new drum unit can print approximately 25,000 A4 or Letter size single-sided pages at 5% coverage. Note • There are many factors that determine the actual drum life, such as the temperature, humidity, type of paper, type of toner used, number of pages per print job and so on. Under ideal conditions, the average drum life is estimated at approximately 25,000 pages. The actual number of pages that your drum will print may be significantly less than this estimate.
6. Routine Maintenance b Hold down Go until the message DRUM CLEAR is displayed on the LCD, then release Go. >>>> Improper Setup Do not reset the drum counter when you replace only the toner cartridge. c Take out the drum unit and toner cartridge assembly. CAUTION We recommend that you put the drum unit and toner cartridge assembly on a piece of disposable paper or cloth in case you accidentally spill or scatter toner.
6. Routine Maintenance d Push down the blue lock lever and take the toner cartridge out of the drum unit. CAUTION Handle the toner cartridge carefully. If toner scatters on your hands or clothes, wipe or wash it off with cold water at once. To avoid print quality problems, DO NOT touch the shaded parts shown in the illustrations. Note • Be sure to seal up the drum unit tightly in a bag so that toner powder does not spill out of the unit.
6. Routine Maintenance f Put the toner cartridge firmly into the new drum unit until you hear it lock into place. If you put the cartridge in properly, the blue lock lever will lift automatically. CAUTION Make sure that you put in the toner cartridge properly, or it may separate from the drum unit. g Put the drum unit and toner cartridge assembly back in the printer. h Close the front cover.
6. Routine Maintenance Replacing periodic maintenance parts You need to replace the periodic maintenance parts regularly to maintain print quality. You should replace the parts listed below after printing the following number of pages.
6. Routine Maintenance Cleaning Clean the outside and inside of the printer regularly with a dry, lint-free cloth. When you replace the toner cartridge or the drum unit, make sure that you clean the inside of the printer. If printed pages are stained with toner, clean the inside of the printer with a dry, lint-free cloth. Cleaning the outside of the printer CAUTION Use neutral detergents. Cleaning with volatile liquids such as thinner or benzine will damage the surface of the printer.
6. Routine Maintenance c Wipe the outside of the printer with a dry, lint-free cloth to remove dust. d e Remove anything that is stuck inside the paper tray. f g Put the paper tray back in the printer. Wipe the inside of the paper tray with a dry, lint-free cloth to remove dust. Plug the printer back in, and then turn on the power switch. Cleaning the inside of the printer a Turn off the printer power switch and then unplug the printer.
6. Routine Maintenance b Press the front cover release button and then open the front cover. c Take out the drum unit and toner cartridge assembly. HOT SURFACE After you have just used the printer, some internal parts of the printer will be extremely hot. Wait for the printer to cool down before you touch the internal parts of the printer.
6. Routine Maintenance Handle the toner cartridge carefully. If toner scatters on your hands or clothes, wipe or wash it off with cold water at once. To prevent damage to the printer from static electricity, DO NOT touch the electrodes shown in the illustration. d Wipe the scanner window with a dry, lint-free cloth. e f g Put the drum unit and toner cartridge assembly back in the printer. Close the front cover. Plug the printer back in, and then turn on the power switch.
6. Routine Maintenance Cleaning the corona wire If you have print quality problems, clean the corona wire as follows: a Press the front cover release button and then open the front cover. b Take out the drum unit and toner cartridge assembly. CAUTION We recommend that you put the drum unit and toner cartridge assembly on a piece of disposable paper or cloth in case you accidentally spill or scatter toner.
6. Routine Maintenance c Clean the primary corona wire inside the drum unit by gently sliding the blue tab from right to left and left to right several times. 1 CAUTION Be sure to return the tab to the home position (a) (1). If you do not, printed pages may have a vertical stripe. d Put the drum unit and toner cartridge assembly back in the printer. Close the front cover.
7 Troubleshooting You can correct most problems by yourself. If you need additional help, the Brother Solutions Center offers the latest FAQs and troubleshooting tips. Visit us at http://solutions.brother.com. Identifying your problem First, check the following: The AC power cord is connected properly and the printer is turned on. All of the protective parts have been removed. The toner cartridge and drum unit are installed properly. The front and back covers are fully closed.
7. Troubleshooting LCD messages If any problems occur, the printer automatically stops printing, diagnoses the problem, and displays the resulting message on the LCD to alert you. Use the table below to identify and clear the error message. If you cannot clear the problem, call the dealer you bought the printer from or Brother Customer Service. Note The LCD names for the paper trays are as follows.
7. Troubleshooting Error message (Continued) Error message Action NO PAPER XXX Put paper in the empty tray. NO TRAY XXX Put the paper tray in the printer. PRINT OVERRUN Cut the resolution or add the optional memory. See Installing extra memory on page 71 and Solving print problems on page 111. Set Page Protection to the correct size. See Device Options on page 31 and Menu table on page 56. SIZE ERROR DX You can only use A4, Letter and Legal size for duplex printing.
7. Troubleshooting Error message printout The printer can also report problems by printing an error message. Use the table below to identify and clear the error message. The default setting for the the error message printout is off. If you want to turn the error message printout on, from the Advanced tab of the Windows printer driver click the Device Options icon, and then choose Error Message Printout. Error message MEMORY FULL Action Press Go to print the remaining data in the printer memory.
7. Troubleshooting Paper handling First, make sure that you are using paper that meets Brother recommended paper specifications. See About paper on page 6. Problem The printer does not feed paper. Recommendation If there is paper in the paper tray, make sure it is straight. If the paper is curled, straighten it before printing. Sometimes it is helpful to remove the paper. Turn the stack over and put it back in the paper tray. Cut the amount of paper in the paper tray, and then try again.
7. Troubleshooting Paper jams and how to clear them If paper jams inside the printer, the printer will stop. One of the following LCD messages will appear to tell you where to find the jammed paper. 7 6 1 2 5 3 4 JAM MP TRAY (1) Paper jam in the MP tray. JAM TRAY1 (2) Paper jam in the standard paper tray (TRAY 1). JAM TRAY2 (3) Paper jam in the lower tray (TRAY 2). JAM TRAY3 (4) Paper jam in the lower tray (TRAY 3). JAM DUPLEX (5) Paper jam in the duplex tray.
7. Troubleshooting JAM MP TRAY (Paper jam in the MP tray) JAM MP TRAY If a paper jam occurs inside the MP tray, follow these steps: a b c d Remove the paper from the MP tray. e Fan the paper stack, and then put it back in the MP tray. f When loading paper in the MP tray, make sure that it touches the back of the tray and stays under the maximum paper height guides on both sides of the tray.
7. Troubleshooting a Pull the paper tray completely out of the printer. b Use both hands to slowly pull out the jammed paper. c Put paper below the maximum paper mark (b). While pressing the blue paper-guide release lever, slide the paper guides to fit the paper size. Make sure that the guides are firmly in the slots. d e Put the paper tray firmly back in the printer. Open the front cover and close it to resume printing.
7. Troubleshooting JAM INSIDE (Paper jam inside the printer) JAM INSIDE HOT SURFACE After you have just used the printer, some internal parts of the printer will be extremely hot. When you open the front cover or back cover of the printer, DO NOT touch the shaded parts shown in the illustrations. If a paper jam occurs inside the printer, follow these steps: a Press the front cover release button and then open the front cover. b Slowly take out the drum unit and toner cartridge assembly.
7. Troubleshooting CAUTION After you have removed the jammed paper, print a few test pages. This is to make sure that the printed pages have no toner stains on them before you restart the print job. Remove the jammed paper carefully so you do not spread toner. Take care not to stain your hands and clothes with toner. Wash toner stains at once with cold water.
7. Troubleshooting d Put the toner cartridge back into the drum unit until you hear it lock into place. If you put the cartridge in properly, the blue lock lever will lift automatically. e Close the front cover. JAM REAR (Paper jam behind the back cover) JAM REAR HOT SURFACE After you have just used the printer, some internal parts of the printer will be extremely hot. When you open the front cover or back cover of the printer, DO NOT touch the shaded parts shown in the illustrations.
7. Troubleshooting b Slowly take out the drum unit and toner cartridge assembly. The jammed paper will be pulled out with the drum unit and toner cartridge assembly. CAUTION We recommend that you put the drum unit and toner cartridge assembly on a piece of disposable paper or cloth in case you accidentally spill or scatter toner. To prevent damage to the printer from static electricity, DO NOT touch the electrodes shown in the illustration. c Open the back cover.
7. Troubleshooting d Pull the tabs at the left and right hand sides toward you to open the fuser cover (1). 1 e Using both hands, gently pull the jammed paper out of the fuser unit. HOT SURFACE After you have just used the printer, some internal parts of the printer will be extremely hot. Wait for the printer to cool down before you touch the internal parts of the printer. f g Put the drum unit and toner cartridge assembly back in the printer (press firmly). Fully close the front and back covers.
7. Troubleshooting JAM DUPLEX (Paper jam in the duplex tray) JAM DUPLEX If a paper jam occurs inside the duplex tray, follow these steps: a Pull the duplex tray completely out of the printer. b Pull the the jammed paper out of the printer or the duplex tray. c Put the duplex tray back in the printer.
7. Troubleshooting Improving the print quality If you have a print quality problem, print a test page first (see Menu table on page 56). If the printout looks good, the problem is probably not the printer. Check the interface cable or try the printer on another PC. This section gives information on the following topics. Examples of poor print quality ABCDEFGH CDEF abcdefghijk defg ABCD abcde 01234 Faint Recommendation Check the printer’s environment.
7. Troubleshooting Examples of poor print quality Recommendation Make sure that you use paper that meets our specifications. See About paper on page 6. Choose Thick paper mode in the printer driver, or use thinner paper than what you are now using. Check the printer’s environment. Conditions such as high humidity can cause hollow print. See Positioning the printer on page 4. Hollow print Clean the primary corona wire inside the drum unit by sliding the blue tab.
7. Troubleshooting Examples of poor print quality Recommendation If the problem is not solved after printing a few pages, the drum unit may have glue from the label stuck on the OPC drum surface. 94 mm (3.7 in.) 94 mm (3.7 in.) Clean the drum unit as follows: a Put the print sample in front of the drum unit, and find the exact position of the poor print. b Turn the drum unit gear by hand while looking at the surface of the OPC drum (1). White Spots on black text and graphics at 94 mm (3.7 in.
7. Troubleshooting Examples of poor print quality Recommendation The drum unit may be damaged. Put in a new drum unit. See Replacing the drum unit on page 80. ABCDEFGH abcdefghijk Make sure that you use paper that meets our specifications. See About paper on page 6. ABCD abcde 01234 If you use label sheets for laser printers, the glue from the sheets may sometimes stick to the OPC drum surface. Clean the drum unit. See on Clean the drum unit as follows: on page 107.
7. Troubleshooting Examples of poor print quality Recommendation Check the paper type and quality. High temperatures and high humidity will cause paper to curl. See About paper on page 6. If you do not use the printer often, the paper may have been in the paper tray too long. Turn over the stack of paper in the paper tray. Also, fan the paper stack and then rotate the paper 180° in the paper tray. Curled or wavy Make sure that the paper is loaded properly.
7. Troubleshooting Examples of poor print quality Recommendation Open the back cover and make sure that the two blue levers on the left and right hand sides are in the down position.
7. Troubleshooting Solving print problems Problem The printer prints unexpectedly or it prints garbage data. Recommendation Make sure that the printer cable is not too long. We recommend that you use a parallel or USB cable that is no longer than 2 meters (6.5 feet). Make sure that the printer cable is not damaged or broken. If you are using an interface-switching device, remove it. Connect your computer directly to your printer, and then try again.
7. Troubleshooting Network problems For problems concerning using your printer on a Network, see the Network User’s Guide on the CD-ROM we have supplied. Other problems Problem Recommendation Make sure that the printer cable is not damaged or broken. The printer cannot print. The ‘There was an error writing to LPT1: (or BRUSB) for the printer’ error message occurs on your PC. If you have an interface-switching device, make sure that you chose the correct printer.
7. Troubleshooting BR-Script 3 Problem Recommendation The print speed slows down. Add optional memory. See Installing extra memory on page 71. The printer cannot print EPS data that includes binary. You need the following settings to print EPS data: a From the Start menu, select Control Panel and then Printer 1. 1 Printers and Faxes for Windows® XP users. b Right-click the Brother HL-5270DN/5280DW BR_Script3 series icon and select Properties.
A Appendix Printer specifications Engine Model HL-5270DN Technology Electrophotographic Print speed Up to 30 ppm (Letter size) 1, Up to 28 ppm (A4 size) 1 First print time Less than 8.5 sec Resolution Windows® 95/98/Me, Windows NT® 4.
A. Appendix Controller Model HL-5270DN Processor 266MHz Memory HL-5280DW Standard 32 MB Option 1 DIMM slot; expandable up to 544 MB Interface Standard Hi-Speed USB 2.0 1, IEEE 1284 Parallel, 10/100BASE-TX Ethernet Network Connectivity Protocols TCP/IP (Standard 10/100BASE-TX Ethernet) Management tool BRAdmin Professional 2 Hi-Speed USB 2.0 1, IEEE 1284 Parallel, 10/100BASE-TX Ethernet, Wireless LAN IEEE 802.
A. Appendix Software Model Printer driver HL-5270DN Windows® HL-5280DW PCL Driver for Windows® 95/98/Me/2000/XP 1, Windows NT® 4.0 Generic PCL Driver for Windows NT® 4.0, Windows® 2000/XP BR-Script 3 (PPD file) for Windows® 95/98/Me/2000/XP 1, Windows NT® 4.0. Macintosh® Brother Laser Driver for Mac OS® 9.1 to 9.2 and Mac OS® × 10.2.4 or greater BR-Script 3 (PPD file) for Mac OS® 9.1 to 9.2 and Mac OS® × 10.2.
A.
A. Appendix Other Model Power consumption Noise level Sound Pressure Sound power Ecology 1 HL-5270DN HL-5280DW Printing Average 610 W at 25 °C (77 °F) Average 620 W at 25 °C (77 °F) Standby Average 80 W at 25 °C (77 °F) Average 80 W at 25 °C (77 °F) Sleep Average 9 W Average 12 W Printing 53 dB (A) Standby 27 dB (A) Printing LWAd = 6.7 Bell (A) Standby LWAd = 4.3 Bell (A) Power save Yes Toner save 1 Yes We do not recommend Toner Save for printing Photo or Gray Scale images.
A. Appendix Important information for choosing your paper This section gives information to help you choose paper to use with this printer. Note If you use paper that is not recommended, a paper jam or misfeed may occur in the printer. See Recommended paper on page 7. Before you buy a large quantity of paper Make sure that the paper is suitable for the printer. Paper for plain paper copies Paper is divided by usage, such as paper for printing and paper for copying.
A. Appendix Moisture content Moisture content is the amount of water left in the paper after manufacture. It is one of the important characteristics of the paper. This can change greatly depending on the storage environment, although usually paper contains about 5% water by weight. Because paper often absorbs water, the amount of water can sometimes be about 10% in a high humidity environment. When the amount of water increases, the characteristics of the paper changes greatly.
A. Appendix Paper size Paper size mm in. Letter 8.5 × 11 in. Legal 8.5 × 14 in. Executive 7.25 × 10.5 in. A4 210 × 297 mm A5 148 × 210 mm A6 105 × 148 mm Envelope Monarch 3.875 × 7.5 in. Envelope #9 3.875 × 8.9 in. Envelope #10 4.12 × 9.5 in. Envelope #11 4.5 × 10.375 in. Envelope DL 110 × 220 mm Envelope C5 162 × 229 mm Envelope C6 114 × 162 mm B5 (JIS) 182 × 257 mm B5 (ISO) 176 × 250 mm B6 125 × 176 mm Folio 8.5 × 13 in.
A. Appendix Symbol and character sets For the HP LaserJet, IBM Proprinter XL, and EPSON FX-850 emulation modes, you can choose the symbol and character sets using a web browser or the control panel buttons. How to use the web browser To use the web browser, follow the steps below. a Enter [http://printer’s IP address/] into your browser. For example: [http://192.168.1.2/] (if the printer’s IP address is 192.168.1.2) b c Click Printer Settings. d e Click OK. Enter a user name and a password.
A. Appendix Symbol and character sets list OCR symbol sets When you choose the OCR-A or OCR-B font, the matching symbol set is always used.
A. Appendix HP LaserJet mode (Continued) Roman9 (4U) Roman Extension (0E) Russian-GOST (12R) Symbol (19M) Turkish8 (8T) Ukrainian (14R) Ventura Math (6M) Ventura Intl (13J) Ventura US (14J) Windows 3.
A. Appendix Quick reference for bar code control commands The printer can print bar codes in the HP LaserJet, EPSON FX-850, and IBM Proprinter XL emulation modes. Print bar codes or expanded characters Code ESC i Dec 27 105 Hex 1B 69 Format: ESC i n ... n \ Creates bar codes or expanded characters according to the segment of parameters ‘n ... n’. For more information about parameters, see the following Definition of Parameters. This command must end with the ‘ \ ’ code (5CH).
A. Appendix Bar Code, expanded character, line block drawing and box drawing n = ‘s0’ or ‘S0’ 3: 1 (default) n = ‘s1’ or ‘S1’ 2: 1 n = ‘s3’ or ‘S3’ 2.5: 1 This parameter chooses the bar code style as above. When the EAN 8, EAN 13, UPC-A, Code 128 or EAN 128 bar code mode is chosen, this bar code style parameter is ignored.
A. Appendix Bar code human readable line ON or OFF n = ‘r0’ or ‘R0 Human readable line OFF n = ‘r1’ or ‘R1 Human readable line ON Preset: Human readable line ON (1) ‘T5’ or ‘t5’ (2) ‘T6’ or ‘t6’ (3) ‘T130’ or ‘t130’ (4) ‘T131’ or ‘t131’ Preset: Human readable line OFF All others This parameter shows whether the printer prints the human readable line below the bar code.
A. Appendix Bar code, expanded character, line block drawing and box drawing height n = ‘hnnn’, ‘Hnnn’, ‘dnnn’, or ‘Dnnn’ 1 EAN13, EAN8, UPC-A, ISBN (EAN13, EAN8, UPC-A), ISBN (UPC-E): 22 mm 2 UPC-E: 18 mm 3 Others: 12 mm Expanded characters i 2.2 mm (preset) Line block drawing and box drawing i 1 dot This parameter shows the height of bar codes or expanded characters as shown above. It can start with ‘h’, ‘H’, ‘d’, or ‘D’. The height of bar codes is shown in the ‘u’- or ‘U’-specified unit.
A. Appendix When FIM (US-Post Net) is selected with the parameter ‘t3’ or ‘T3’ Characters ‘A’ to ‘D’ are valid and one digit of data can be printed. Upper-case and lower-case alphabet characters can be accepted. When Post Net (US-Post Net) is selected with the parameter ‘t4’ or ‘T4’ Numbers ‘0’ to ‘9' can be data and it must end with a check digit. ‘?’ can be used instead of the check digit.
A. Appendix When EAN 128 set A, set B or set C is selected with the parameter ‘t132’ or ‘T132’, ‘t133’ or ‘T133’ or ‘t134’ or ‘T134’ The same rules apply as for ‘t12’ or ‘T12’, ‘t13’ or ‘T13’, or ‘t14’ or ‘T14’. Box drawing ESC i ... E (or e) ‘E’ or ‘e’ is a terminator. Line block drawing ESC i ... V (or v) ‘V’ or ‘v’ is a terminator. Expanded character data start n = ‘l’ or ‘L’ Data that follows ‘l’ or ‘L’ is read as expanded character data (or labeling data).
A.
B Appendix (For Europe and Other Countries) Brother Numbers IMPORTANT For technical and operational help, you must call the country where you bought the printer. Calls must be made from within that country. Register your product By registering your Brother product, you will be recorded as the original owner of the product.
B. Appendix (For Europe and Other Countries) Important information: Regulations Radio interference (220 to 240 volt model only) This printer follows EN55022 (CISPR Publication 22)/Class B. Before you use this product, make sure that you use one of the following interface cables. 1 A shielded parallel interface cable with twisted-pair conductors and that it is marked IEEE 1284 compliant. 2 A USB cable. The cable must not be more than 2 meters long.
B.
B. Appendix (For Europe and Other Countries) IMPORTANT - For Your Safety To ensure safe operation, the supplied three-pin plug must be inserted only into a standard three-pin power outlet that is properly grounded through the standard electrical wiring. Extension cords used with this printer must be three-pin plug type and correctly wired to provide proper grounding. Incorrectly wired extension cords may cause personal injury and equipment damage.
B.
C Appendix (For USA and Canada) Brother Numbers IMPORTANT For technical and operational help, you must call the country where you bought the printer. Calls must be made from within that country. Register your product By registering your product with Brother International Corporation, you will be recorded as the original owner of the product.
C. Appendix (For USA and Canada) Customer Service In USA: 1-800-276-7746 In Canada: 1-877-BROTHER If you have comments or suggestions, please write us at: In USA: Printer Customer Support Brother International Corporation 15 Musick Irvine, CA 92618 In Canada: Brother International Corporation (Canada), Ltd. - Marketing Dept. 1, rue Hotel de Ville Dollard-des-Ormeaux, PQ, Canada H9B 3H6 Service center locator (USA only) For the location of a Brother authorized service center, call 1-800-284-4357.
C. Appendix (For USA and Canada) Important information: Regulations Federal Communications Commission (FCC) Declaration of Conformity (For USA) Responsible Party: Brother International Corporation 100 Somerset Corporate Boulevard P.O. Box 6911 Bridgewater, NJ 08807-0911 USA Telephone: (908) 704-1700 declares, that the products Product name: Laser Printer HL-5280DW Model number: HL-52 Product option: Lower Tray Unit LT-5300 complies with Part 15 of the FCC Rules.
C. Appendix (For USA and Canada) Industry Canada Compliance Statement (For Canada) This Class B digital apparatus complies with Canadian ICES-003. Cet appareil numérique de la classe B est conforme à la norme NMB-003 du Canada.
C. Appendix (For USA and Canada) Laser Notices Laser Safety (110 to 120 volt model only) This printer is certified as a Class 1 laser product under the U.S. Department of Health and Human Services (DHHS) Radiation Performance Standard according to the Radiation Control for Health and Safety Act of 1968. This means that the printer does not produce hazardous laser radiation.
C. Appendix (For USA and Canada) IMPORTANT - For Your Safety To ensure safe operation, the supplied three-pin plug must be inserted only into a standard three-pin power outlet that is properly grounded through the standard electrical wiring. Extension cords used with this printer must be three-pin plug type and correctly wired to provide proper grounding. Incorrectly wired extension cords may cause personal injury and equipment damage.
D Index Symbols Duplex printing .......................................................... 20 + or - buttons ............................................................. 49 E A Emulation ................................................................ 115 Emulation modes ...................................................... 45 Envelopes ............................................................. 8, 16 EPSON FX-850 mode ............................................... 45 Error messages ............
D. Index Media specifications ................................................ 117 Media type .................................................................. 6 Memory ............................................................. 70, 115 Multi-purpose tray .........................................13, 16, 21 N Network ..................................................................... 44 Network connectivity ............................................... 115 Network default setting ...................