Quick Setup Guide Laser Printer HL-5280DW Before you can use the printer, you must set up the hardware and install the driver. Please read this ‘Quick Setup Guide’ for proper set up and installation instructions. STEP 1 Setting Up the Machine STEP 2 Installing the Printer Driver Setup is Complete! How to use the printer, see the User’s Guide in the CD-ROM. Keep this ‘Quick Setup Guide’ and the supplied CD-ROM in a convenient place for quick and easy reference at all times.
1 Symbols used in this guide Warning Warnings tell you what to do to prevent possible personal injury. Improper Setup Improper Setup icons alert you to devices and operations that are not compatible with the printer. Electrical Hazard Electrical Hazard icons alert you to a possible electrical shock. Hot Surface Caution Hot Surface icons warn you not to touch machine parts that are hot. Cautions specify procedures you must follow or avoid to prevent possible damage to the printer or other objects.
Safety Precautions ....................................................................................................................................... 2 Regulations ............................................................................................................................................. 3 Getting Started What is in the box?....................................................................................................................................... 6 Control panel............
Safety Precautions To Use the Printer Safely Warning There are high voltage electrodes inside the printer. Before you clean the inside of the printer, make sure that you have turned off the power switch and unplugged the printer from the AC power outlet. DO NOT handle the plug with wet hands. Doing this might cause an electrical shock. After you have just used the printer, some internal parts of the printer will be extremely hot.
Safety Precautions Regulations Federal Communications Commission (FCC) Declaration of Conformity (For USA) Responsible Party: Brother International Corporation 100 Somerset Corporate Boulevard P.O. Box 6911 Bridgewater, NJ 08807-0911 USA Telephone: (908) 704-1700 declares, that the products Product name: Laser Printer HL-5280DW Model number: HL-52 Product option: Lower Tray Unit LT-5300 Cet appareil numérique de la classe B est conforme à la norme NMB-003 du Canada.
Safety Precautions Laser Safety (110 to 120 volt Model Only) This printer is certified as a Class 1 laser product under the U.S. Department of Health and Human Services (DHHS) Radiation Performance Standard according to the Radiation Control for Health and Safety Act of 1968. This means that the printer does not produce hazardous laser radiation.
Safety Precautions Disconnect device You must install this printer near a power outlet that is easily accessible. In case of an emergency, you must disconnect the power cord from the power outlet to shut off the power completely. Caution for LAN connection Connect this product to a LAN connection that is not subjected to over voltages. IT power system (For Norway only) This product is also designed for an IT power system with phase-to-phase voltage 230V.
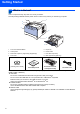
Getting Started 1 1 What is in the box? Carton components may vary from one country to another. Save all packing materials and the printer carton in case for any reason you must ship your printer.
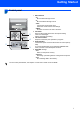
Getting Started 2 1 Control panel 5 4 2 3 1 Menu buttons + Move forward through menus. Move backward through menus. Set Choose the control panel menu. Select the chosen menus and settings. Back Go back one level in the menu structure. 2 Go button Exit from the control panel menu and reprint setting. Clear error messages. Pause and Continue printing. 3 Job Cancel button Stop and cancel the print operation in progress. 4 Reprint button Choose the reprint menu and the number of extra copies (1999).
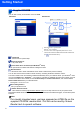
Getting Started 3 Supplied CD-ROM You can find a variety of information on the CD-ROM. Windows® Macintosh® 1 2 3 1 Mac OS® X 10.2.4 or greater Users 2 Mac OS® 9.1 to 9.2 Users The menu screen is not supported by Mac OS® 9.1 to 9.2. 3 View the User’s Guide and Network User’s Guide in PDF format. (See Documentation below.) Initial Setup Instructional movie for printer setup. Install Printer Driver Install the printer driver.
STEP 1 Setting Up the Machine 1 1 Put the CD-ROM into the CD-ROM drive For Windows® users For Macintosh® users Improper Setup Improper Setup DO NOT connect the interface cable. Connecting the interface cable is done when installing the driver. 1 2 Put the supplied CD-ROM into your CD-ROM drive. The opening screen will appear automatically. Choose your printer model and the language. DO NOT connect the interface cable. Connecting the interface cable is done when installing the driver.
STEP 1 2 Setting Up the Machine Install the drum unit and toner cartridge assembly 4 Put the drum unit and toner cartridge assembly into the printer until it clicks into place. Improper Setup DO NOT connect the interface cable yet. 1 5 Press the front cover release button and open the front cover (1). 1 2 3 10 Unpack the drum unit and toner cartridge assembly. Rock it from side to side several times to distribute the toner evenly inside the assembly. Close the front cover of the printer.
Setting Up the Machine 3 Load paper in the paper tray 1 Pull the paper tray completely out of the printer. 3 4 2 Fan the stack of paper well to avoid paper jams and misfeeds. Put paper in the paper tray. Make sure that the paper is flat in the tray and below the maximum paper mark (1). 1 While pressing the blue paper-guide release lever (1), slide the paper guides to fit the paper size. Make sure that the guides are firmly in the slots. 5 Put the paper tray firmly back in the printer.
STEP 1 4 Setting Up the Machine Print a test page 4 Press Go. The printer prints a test page. Check that the test page has printed correctly. Improper Setup DO NOT connect the interface cable yet. 1 Make sure that the printer power switch is off. Connect the AC power cord to the printer. Note This function will not be available after the first print job you send from your PC. 5 2 3 Setting your language on the control panel Plug the AC power cord into an AC power outlet.
STEP 2 Installing the Printer Driver Follow the instructions on this page for your operating system and interface cable. For the latest driver and to find the best solution for your problem or question, access the Brother Solutions Center directly from the CD-ROM / Driver or visit http://solutions.brother.com. Windows® For Windows® XP Professional x64 Edition users, visit http://solutions.brother.com for driver downloads and installation steps.
STEP 2 Installing the Printer Driver Windows® 1 1 For USB interface cable users (Windows® 98/Me/2000/XP only) Note 4 If the Found New Hardware Wizard appears on your PC, click Cancel. Windows® USB L E C N A C Installing the driver and connecting the printer to your PC 1 2 5 Make sure the USB interface cable is NOT connected to the printer, and then begin installing the driver. If you have already connected the cable, remove it.
Installing the Printer Driver Note If you want to register your product on-line, check On-Line Registration. Windows® Setting your printer as the default printer (For Windows® 2000/XP only) 1 Click the Start button and then Printers and Faxes. For Windows® 98/Me users, the setup is now complete. Now go to Windows® USB For Windows® 2000/XP users, go to ‘Setting Your Printer as the Default Printer’. 2 Choose the Brother Printer icon. 3 Click File, and then Set as Default printer.
STEP 2 2 Installing the Printer Driver Windows® For parallel interface cable users 4 Note Click Finish. If the Found New Hardware Wizard appears on your PC, click Cancel. Windows® Parallel L E C N A C Connecting the printer to your PC and installing the driver 1 Click Install Printer Driver on the Menu screen. Note If you want to register your product on-line, check On-Line Registration. 5 6 2 Turn off the printer power switch.
Installing the Printer Driver 3 Windows® For wired network interface cable users For Brother Peer-to-Peer network printer users (LPR/NetBIOS) • If you are going to connect the printer to your network, we recommend that you contact your system administrator prior to installation or see the Network User’s Guide. • Before installation, if you are using Personal Firewall software (e.g. the Internet Connection Firewall available in Windows XP), disable it.
STEP 2 8 Installing the Printer Driver For LPR Users: Choose Search the network for devices and choose from a list of discovered devices (Recommended). Or enter your printer's IP address or its node name. Click Next. Windows® 10 Click Finish. For NetBIOS Users: Choose Search the network for devices and choose from a list of discovered devices (Recommended). Click Next. Note If you want to register your product on-line, check On-Line Registration. For Windows NT® 4.
Installing the Printer Driver Windows® For shared network printer users Note 4 If you are going to connect to a shared printer on your network, we recommend that you ask your system administrator about the queue or share name printer prior to installation. Choose Network Shared Printer, and then click Next. Installing the driver and choosing the proper printer queue or share name 1 Click Install Printer Driver on the menu screen. 2 Choose your printer's queue, and then click OK.
STEP 2 4 Installing the Printer Driver Windows® For wireless network users (Windows® 98/Me/2000/XP and Windows NT® 4.0 only) Connect your wireless printer and wireless network together: install the printer driver in infrastructure mode First you must configure the wireless network settings of your printer to communicate with your network access point (router). After the printer is configured to communicate with your access point (router) computers on your network will have access to the printer.
Installing the Printer Driver Windows® Confirm your network environment The setup process will be different depending on your network environment. Installation using SecureEasySetup™. A If your wireless access point (A) supports SecureEasySetup™, you do not need to use a computer to configure the printer. The access point (router) and your printer can automatically negotiate using the SecureEasySetup™ procedure. For instructions, see Chapter 3 in the Network User’s Guide on the CD-ROM.
STEP 2 Installing the Printer Driver Windows® Installation temporarily using a network cable Improper Setup 5 Choose Automatic (Recommended) and then click Next. If you have previously configured the wireless settings of the printer, you must reset the NETWORK menu settings before you can configure the wireless settings again. 1 2 1 Press the + or - button to choose NETWORK. Press Set. 2 Press the + or - button to choose FACTORY RESET. Press Set. 3 Press Set again.
Installing the Printer Driver If more than one wireless printer is available on the network, a list of them will appear. If the list is blank, check that the access point and the printer are switched on, and then click Refresh. Choose the printer you wish to configure, and click Next. Note • The Default Node name of the printers network card is "BRN_XXXXXX" (where "XXXXXX" is the last six digits of the Ethernet address). • If you are using Personal Firewall software (e.g.
STEP 2 Installing the Printer Driver 12 Click Next. The settings will be sent to your printer. The settings will remain unchanged if you click Cancel. Note If you want to manually enter the IP address settings of your printer, click Change IP Address and enter the necessary IP address settings for your network. After making your selection, click Next and the Wizard will search for available wireless networks. Windows® 14 The driver installation starts.
Installing the Printer Driver 17 For LPR Users: Choose your printer and choose LPR (Recommended), and then click Next. Windows® For Windows NT® 4.0 and Windows® 2000/XP users, the setup is now complete. For Windows® 98/Me users, the setup will be complete after your PC has restarted. Note If your printer takes a long time (about 1 minute) to appear on the list, click Refresh. Windows® Wireless Network For NetBIOS Users: Choose your printer and NetBIOS, and then click Next.
STEP 2 Installing the Printer Driver Windows® Installation using a wireless computer Improper Setup 5 Choose Automatic (Recommended) and then click Next. If you have previously configured the wireless settings of the printer, you must reset the NETWORK menu settings before you can configure the wireless settings again. 1 2 1 Press the + or - button to choose NETWORK. Press Set. 2 Press the + or - button to choose FACTORY RESET. Press Set. 3 Press Set again.
Installing the Printer Driver 8 You need to temporarily change your PC’s wireless settings. Please follow the on-screen instructions. Please make sure you take notes on all the settings such as SSID or channel of your PC. You will need them to return your PC back to its original wireless settings. Click Next.
STEP 2 Installing the Printer Driver 10 If more than one wireless printer is available on the network, the following list appears. If the list is blank, check if the access point and the printer are powered on, and then click Refresh. Choose the printer you wish to configure, and click Next. Note Windows® Wireless Network • The Default Node name of the printers network card is "BRW_XXXXXX" (where "XXXXXX" is the last six digits of the Ethernet address).
Installing the Printer Driver • If you do not know the Authentication or Encryption settings for your network contact your network administrator. Windows® 16 The driver installation starts. When the License Agreement window appears, click Yes if you agree to the License Agreement. 14 Click Next. The settings will be sent to your printer. The settings will remain unchanged if you click Cancel. 17 Choose Standard Installation, and then click Next.
STEP 2 Installing the Printer Driver 19 For LPR Users: Choose your printer and choose LPR (Recommended), and then click Next. Note If your printer takes a long time (about 1 minute) to appear on the list, click Refresh. Windows® Wireless Network For NetBIOS Users: Choose your printer and NetBIOS, and then click Next. Note If your printer takes a long time (about 1 minute) to appear on the list, click Refresh. 20 Click Finish.
Installing the Printer Driver 5 Macintosh® For USB interface cable users For Mac OS® X 10.2.4 or greater users Connecting the printer to your Macintosh® and installing the driver 2 3 Click Go, then Applications. 6 Double-click the Utilities folder. 7 Double-click the Printer Setup Utility icon. Click Install Printer Driver on the menu screen. Click USB cable users and follow the on-screen instructions. Then, restart your Macintosh®.
STEP 2 9 Installing the Printer Driver Choose USB. Macintosh® 11 Click Printer Setup Utility, then Quit Printer Setup Utility. 10 Choose the proper printer, and then click Add. For Mac OS® 10.2 users: The setup is now complete. Macintosh® USB For Mac OS® 10.3 users: For Mac OS® 10.
Installing the Printer Driver Macintosh® For Mac OS® 9.1 to 9.2 users Connecting the printer to your Macintosh® and installing the driver 2 Put the supplied CD-ROM into your CD-ROM drive. Double-click the Mac OS 9 folder. Make sure the printer power switch is on. 6 From the Apple® menu, click Chooser. Double-click your language folder. 7 3 Click the Brother Laser icon. On the right side of the Chooser, choose the printer to which you want to print. Close the Chooser.
STEP 2 6 Installing the Printer Driver Macintosh® For wired network interface cable users For Mac OS® X 10.2.4 or greater users Connecting the printer to your Macintosh® and installing the driver 1 2 3 Macintosh® Wired Network 4 5 34 6 Click Go, then Applications. 7 Double-click the Utilities folder. 8 Double-click the Printer Setup Utility icon. Click Install Printer Driver on the menu screen. Click Network cable users and follow the on-screen instructions. Then, restart your Macintosh®.
Installing the Printer Driver 9 Click Add. Macintosh® Note If there is more than one of the same model printer (HL-5280DW) connected on your network, the Ethernet address (MAC address) will be displayed after the model name. Network User's Guide Chapter 6 . For Mac OS® 10.2.4 to 10.3 users: Go to the next step. 13 Click Printer Setup Utility, then Quit Printer Setup Utility. For Mac OS® 10.4 or greater users: Go to Step 12. 10 Make the following selection.
STEP 2 Installing the Printer Driver Macintosh® For Mac OS® 9.1 to 9.2 users Connecting the printer to your Macintosh® and installing the driver 1 2 3 4 7 From the Apple® menu, click Chooser. Turn off the printer power switch. Connect the network interface cable to the printer, and then connect it to a free port on your hub. 8 Turn on the printer power switch. Click the Brother Laser (IP) icon, and then choose BRN_xxxxxx (where xxxxxx are the last six digits of the Ethernet address). Click Setup.
Installing the Printer Driver 7 Macintosh® For wireless network users (Mac OS® X 10.2.4 or greater users) Connect your wireless printer and wireless network together: install the printer driver in infrastructure mode First you must configure the wireless network settings of your printer to communicate with your network access point (router). After the printer is configured to communicate with your access point (router) computers on your network will have access to the printer.
STEP 2 Installing the Printer Driver Macintosh® Confirm your network environment The setup process will be different depending on your network environment. Installation using SecureEasySetup™. A If your wireless access point (A) supports SecureEasySetup™, you do not need to use a computer to configure the printer. The access point (router) and your printer can automatically negotiate using the SecureEasySetup™ procedure. For instructions, see Chapter 3 in the Network User’s Guide on the CD-ROM.
Installing the Printer Driver Macintosh® Installation temporarily using a network cable Improper Setup 5 Choose Automatic (Recommended) and then click Next. If you have previously configured the wireless settings of the printer, you must reset the NETWORK menu settings before you can configure the wireless settings again. 2 Press the + or - button to choose NETWORK. Press Set. 2 Press the + or - button to choose FACTORY RESET. Press Set. 3 Press Set again.
STEP 2 8 Installing the Printer Driver If more than one wireless printer is available on the network, a list of them will appear. If the list is blank, check that the access point and the printer are switched on, and then click Refresh. Choose the printer you wish to configure, and click Next. Note • The Default Node name of the printers network card is "BRN_XXXXXX" (where "XXXXXX" is the last six digits of the Ethernet address). • If you are using Personal Firewall software, temporarily disable it.
Installing the Printer Driver 12 Click Next. The settings will be sent to your printer. The settings will remain unchanged if you click Cancel. Macintosh® 15 Click Go, then Applications. 16 Double-click the Utilities folder. Note If you want to manually enter the IP address settings of your printer, click Change IP Address and enter the necessary IP address settings for your network. After making your selection, click Next and the Wizard will search for available wireless networks.
STEP 2 Installing the Printer Driver 20 Choose Brother HL-5280DW series, and then click Add. Go to Step 22. 21 Choose Brother HL-5280DW series, and then click Add. Note If there is more than one of the same model printer (HL-5280DW) connected on your network, the Ethernet address (MAC address) will be displayed after the model name. Network User's Guide Chapter 6 . 22 Click Printer Setup Utility, then Macintosh® Wireless Network Quit Printer Setup Utility. The setup is now complete.
Installing the Printer Driver Macintosh® Installtion using a wireless computer Improper Setup 5 Choose Automatic (Recommended) and then click Next. If you have previously configured the wireless settings of the printer, you must reset the NETWORK menu settings before you can configure the wireless settings again. 2 Press the + or - button to choose NETWORK. Press Set. 2 Press the + or - button to choose FACTORY RESET. Press Set. 3 Press Set again.
STEP 2 8 Installing the Printer Driver You need to temporarily change your computer’s wireless settings. Please follow the on-screen instructions. Please make sure you take notes on all the settings such as SSID or channel of your computer. You will need them to return your computer back to its original wireless settings. Click Next. Item Macintosh® Note • See the User’s Guide of your Network Interface or your computer for how to change the wireless settings.
Installing the Printer Driver 10 If more than one wireless printer is available on the network, the following list appears. If the list is blank, check if the access point and the printer are powered on, and then click Refresh. Choose the printer you wish to configure, and click Next. Note • The Default Node name of the printers network card is "BRW_XXXXXX" (where "XXXXXX" is the last six digits of the Ethernet address). • If you are using Personal Firewall software, temporarily disable it.
STEP 2 Installing the Printer Driver 14 Click Next. The settings will be sent to your printer. The settings will remain unchanged if you click Cancel. Macintosh® 17 Click Go, then Applications. 18 Double-click the Utilities folder. Note If you want to manually enter the IP address settings of your printer, click Change IP Address and enter the necessary IP address settings for your network. After making your selection, click Next and the Wizard will search for available wireless networks.
Installing the Printer Driver Macintosh® 22 Choose Brother HL-5280DW series, and then click Add. Go to Step 24. 23 Choose Brother HL-5280DW series, and then click Add. Note If there is more than one of the same model printer (HL-5280DW) connected on your network, the Ethernet address (MAC address) will be displayed after the model name. Network User's Guide Chapter 6 . 24 Click Printer Setup Utility, then Macintosh® Wireless Network Quit Printer Setup Utility. The setup is now complete.
For Network Users 1 BRAdmin Professional configuration utility (For Windows® users) The BRAdmin Professional utility for Windows® is designed to manage your Brother network connected devices in a Local Area Network (LAN) environment. For more information on BRAdmin Professional, visit us at http://solutions.brother.com. Installing the BRAdmin Professional configuration utility 1 1 Click Install Other Drivers or Utilities on the menu screen. 2 2 Start BRAdmin Professional, and choose TCP/IP.
For Network Users 2 BRAdmin Light configuration utility (For Mac OS® X users) The Brother BRAdmin Light software is a Java™ application that is designed for the Apple Mac OS® X environment. It supports some of the features of the Windows BRAdmin Professional software. For example, using the BRAdmin Light software, you can change some network settings on Brother’s network ready printers and multifunction devices.
For Network Users 3 Web browser The Brother print server is equipped with a web server that allows you to monitor its status or change some of its configuration settings, using HTTP (Hyper Text Transfer Protocol). Note The User Name is ‘admin’ and the default password is ‘access’. You can use a web browser to change this password. See Chapter 2 of the Network User's Guide. 4 Network default settings To restore all network settings of the internal print server to default, follow the steps below.
Consumables and Options 1 1 Options The printer has the following optional accessories. You can expand the capabilities of the printer by adding these items. See Chapter 5 of the User's Guide. Lower Tray Unit DIMM Memory LT-5300 Second or third lower paper tray unit can hold up to 250 sheets of paper. When both trays are installed, the printer expands total input capacity up to 800 sheets. 2 You can expand the memory by installing the (144-pin DIMM) memory module.
Repacking Information 1 Shipment of the printer If for any reason you must ship your printer, carefully package the printer to avoid any damage during transit. We recommend that you save and use the original packaging. The printer should also be adequately insured with the carrier. Caution When shipping the printer, the DRUM UNIT and TONER CARTRIDGE assembly must be removed from the printer and put in a plastic bag.
Trademarks The Brother logo is a registered trademark of Brother Industries, Ltd. Apple, the Apple Logo, Macintosh and TrueType are registered trademarks of Apple Computer, Inc in the United States and other countries. Epson is a registered trademark and FX-80 and FX-850 are trademarks of Seiko Epson Corporation. Hewlett Packard is a registered trademark and HP LaserJet 6P, 6L, 5P, 5L, 4, 4L 4P, III, IIIP, II, and IIP are trademarks of Hewlett-Packard Company.
LM64750012 EN Printed in China © 2005 Brother Industries, Ltd. © 1998-2005 TROY Group, Inc. © 1983-2005 PACIFIC SOFTWORKS INC. This product includes the "KASAGO TCP/IP" software developed by Elmic Systems, Inc. © 2005 Devicescape Software, Inc. ALL RIGHTS RESERVED.