
User`s guide

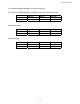


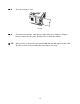


Table Of Contents
- TABLE OF CONTENTS
- CHAPTER 1 ABOUT THIS PRINTER
- CHAPTER 2 DRIVER AND SOFTWARE
- Printer Driver
- Features in the PCL printer driver (Windows users only)
- Features in the PS printer driver (Windows users only)
- Features in the bonus software (Windows users only)
- Software for networks
- Software installation for Windows computers
- Software installation for Macintosh computers
- Installing the printer driver for Macintosh
- Automatic Emulation Selection
- Automatic Interface Selection
- Printer Settings
- Printer Driver
- CHAPTER 3 CONTROL PANEL
- CHAPTER 4 OPTIONS
- CHAPTER 5 ROUTINE MAINTENANCE
- CHAPTER 6 TROUBLESHOOTING
- APPENDIX
- INDEX

4-14
☛
☛☛
☛ 3.
Unscrew the two screws that secure the PCB access plate. Slide the plate
toward you and remove it.
Fig. 4-10
☛
☛☛
☛ 4.
Unpack the DIMM and hold it by the edges.
!
Caution
DIMM boards can be damaged by even a small amount of static electricity.
Do not touch the memory chips or the board surface. Wear an antistatic
wrist strap when you install or remove the board. If you do not have an
antistatic wrist strap, frequently touch the bare metal on the printer.
☛
☛☛
☛ 5.
Holding the DIMM by the edges, align the notches on the DIMM with the DIMM
slot.