
Network Card User's Manual
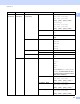


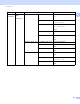
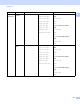
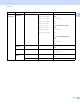
Table Of Contents
- NETWORK USER’S GUIDE MFC-9125CN MFC-9325CW
- Table of Contents
- 1 Introduction
- 2 Configuring your machine for a network
- Overview
- IP addresses, subnet masks and gateways
- Step by step chart
- Setting the IP address and subnet mask
- Changing the print server settings
- Using the BRAdmin Light utility to change the print server settings
- Using the BRAdmin Professional 3 utility to change print server settings (Windows®)
- Using the control panel to change the print server settings
- Using Web Based Management (web browser) to change the print/scan server settings
- Using Remote Setup to change the print server settings (Not available for Windows Server® 2003/2008)
- Using other methods to change print server settings
- 3 Configuring your machine for a wireless network (For MFC-9325CW)
- Overview
- Wireless network terms and concepts
- Step by step chart for wireless network configuration
- Confirm your network environment
- Confirm your wireless network setup method
- Configuration using the Brother installer application on the CD-ROM to configure your wireless network machine (Recommended)
- Configuration using the WPS or AOSS control panel menu (Automatic Wireless mode) (Infrastructure mode only)
- Configuration using the machine’s control panel Setup Wizard to configure your machine for a wireless network
- Configuration using the PIN Method of Wi-Fi Protected Setup (Infrastructure mode only)
- Configure your machine for a wireless network
- Using the Brother installer application on the CD-ROM to configure your machine for a wireless network
- Using the WPS or AOSS control panel menu to configure your machine for a wireless network (Automatic Wireless mode)
- Using the Setup Wizard from the control panel
- Using the PIN Method of Wi-Fi Protected Setup
- 4 Wireless configuration for Windows® using the Brother installer application (For MFC-9325CW)
- 5 Wireless configuration for Macintosh using the Brother installer application (MFC-9325CW only)
- 6 Control panel setup
- Network menu
- TCP/IP
- Ethernet (wired network only)
- Setup Wizard (MFC-9325CW wireless network only)
- WPS/AOSS (MFC-9325CW wireless network only)
- WPS w/PIN Code (MFC-9325CW wireless network only)
- WLAN Status (MFC-9325CW wireless network only)
- Set to Default (MFC-9325CW only)
- Wired Enable (MFC-9325CW wired network only)
- WLAN Enable (MFC-9325CW wireless network only)
- E-mail / IFAX (available as a download)
- How to set a new default for Scan to E-mail (E-mail server) (available as a download)
- How to set a new default for Scan to FTP
- How to set a new default for Scan to Network
- Fax to Server (available as a download)
- Time Zone
- Restoring the network settings to factory default
- Printing the Network Configuration List
- Network menu
- 7 Driver Deployment Wizard (Windows® only)
- 8 Network printing from Windows®: basic TCP/IP Peer-to-Peer printing
- 9 Internet printing for Windows®
- 10 Network printing from Macintosh using the BR-Script 3 driver
- 11 Web Based Management
- 12 Internet fax and Scan to E-mail (E-mail server)
- Internet fax overview
- Getting connected
- Control panel key functions
- Sending an Internet fax
- Manually entering text
- Receiving E-mail or Internet fax
- Receiving an Internet fax to your computer
- Forwarding received E-mail and fax messages
- Relay broadcasting
- TX Verification Mail
- Setup Mail TX
- Setup Mail RX
- Error mail
- Important information on Internet fax
- Scan to E-mail (E-mail server) overview
- Internet fax overview
- 13 Security features
- Overview
- Configuring the protocol settings
- Managing your network printer securely
- Printing documents securely using IPPS
- Using E-mail notification with user authentication
- Creating and installing a certificate
- 14 Troubleshooting
- Appendix A
- Using services
- Other ways to set the IP address (for advanced users and administrators)
- Using DHCP to configure the IP address
- Using BOOTP to configure the IP address
- Using RARP to configure the IP address
- Using APIPA to configure the IP address
- Using ARP to configure the IP address
- Using the TELNET console to configure the IP address
- Using the Brother Web BRAdmin server software for IIS to configure the IP address
- Installation when using web services (For Windows Vista® and Windows® 7 users)
- Installation when using a Network Print Queue or Share (printer driver only)
- Appendix B
- Index

Appendix B
178
B
Entering Text B
When setting certain menu selections, such as the E-mail address, you will need to type text characters. The
dial pad keys have letters printed on them. The keys: 0, # and l do not have printed letters because they are
used for special characters.
Press the appropriate dial pad key the required number of times to access the characters below:
For setting an E-mail address, Scan To FTP menu options and E-mail/IFAX menu options
For setting other menu selections
Inserting spaces
B
To enter a space in a fax number, press c once between numbers. To enter a space in a name, press c twice
between characters.
Making corrections
B
If you entered a letter incorrectly and want to change it, press d to move the cursor to the incorrect character,
and then press Clear/Back.
Press
Key
one
time
two
times
three
times
four
times
five
times
six
times
seven
times
eight
times
nine
times
1 @. / 1@. / 1@
2 abcABC2ab
3 de fDEF3de
4 ghiGHI4gh
5 jklJKL5jk
6 mn oMNO6mn
7 pqrsPQRS7
8 tuvTUV8tu
9 wxyzWXYZ9
Press
Key
one
time
two
times
three
times
four
times
five
times
2 ABC2A
3 DEF3D
4 GH I 4G
5 JKL5J
6 MNO6M
7 PQRS7
8 TUV8T
9 WXYZ 9