
User Manual


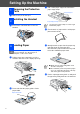

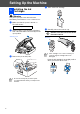


Table Of Contents
- Quick Setup Guide
- Getting Started
- Table of Contents
- Setting Up the Machine
- 1 Removing the Protective Parts
- 2 Installing the Handset
- 3 Loading Paper
- 4 Installing the Phone Line and Power Cord
- 5 Installing the Ink Cartridges
- 6 Print Quality Check
- 7 Setting the Date and Time
- 8 Setting Your Station ID
- 9 Selecting a Receive Mode
- 10 Setting Up the Message Center
- 11 Selecting Your Language (Canada only)
- 12 Sending in the Product Registration and Test Sheet (USA only)
- 13 Using the FAX as a Printer or for PC-FAX Send
- Replacement Consumables

6
Setting Up the Machine
Warning
If ink gets in your eyes wash them with water
immediately, and if irritation occurs consult a doctor.
1
Make sure that the power is turned on.
The LCD shows:
2
Lift the scanner cover from the right-hand
side of the FAX until it locks securely into the
open position.
3
Remove the protective parts.
4
Take out the ink cartridge.
5
Carefully remove the bottom cap.
DO NOT touch the area shown in the
illustration below.
Keep the ink cartridge in an upright position
when you insert it into the slot.
5
Installing the Ink
Cartridges
No Cartridge
Do not throw away the protective parts.
You will need them when you transport the
machine.
Scanner Cover
If the cartridge cover comes off when you
open the bag the cartridge will not be
damaged.
Opening
OK
OK
OK