
Quick Setup Guide

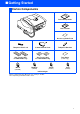
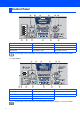

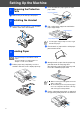

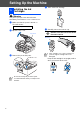
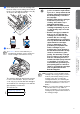
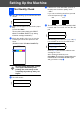
Table Of Contents
- Quick Setup Guide
- Getting Started
- Table of Contents
- Setting Up the Machine
- 1 Removing the Protective Parts
- 2 Installing the Handset
- 3 Loading Paper
- 4 Installing the Phone Line and Power Cord
- 5 Installing the Ink Cartridges
- 6 Print Quality Check
- 7 Setting the Date and Time
- 8 Setting Your Station ID
- 9 Selecting a Receive Mode (FAX-1840C only)
- 10 Selecting a Receive Mode (FAX-1940CN only)
- 11 Setting Up the Message Center (FAX-1940CN only)
- 12 Selecting Your Language (Canada only)
- 13 Sending in the Product Registration and Test Sheet (USA only)
- 14 Using the FAX as a Printer or for PC-FAX Send
- 15 Using the Network features of the FAX-1940CN
- Replacement Consumables

2
(For FAX-1840C)
(For FAX-1940CN)
Control Panel
1. One Touch keys 5. Stop/Exit key 9. Mode keys
2. Shift 6. Start keys 10. Liquid Crystal Display (LCD)
3. Fax and telephone keys 7. On/Off key 11. Copy keys
4. Dial Pad 8. Navigation keys 12. Ink/Reports key
For the details of the control panel, see "Control panel overview" in Chapter 1 of the User’s Guide.
1. One Touch keys 6. Stop/Exit key 11. Liquid Crystal Display (LCD)
2. Shift 7. Start keys 12. Copy keys
3. Message Center keys 8. On/Off key 13. Ink/Reports key
4. Fax and telephone keys 9. Navigation keys
5. Dial Pad 10. Mode keys
For the details of the control panel, see "Control panel overview" in Chapter 1 of the User’s Guide.
1 2 3 4 5 6
78101112 9
1 2 3 4 5 6 7
89111213 10