
Quick Setup Guide
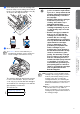
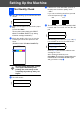

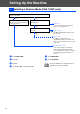
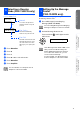
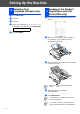

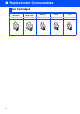
Table Of Contents
- Quick Setup Guide
- Getting Started
- Table of Contents
- Setting Up the Machine
- 1 Removing the Protective Parts
- 2 Installing the Handset
- 3 Loading Paper
- 4 Installing the Phone Line and Power Cord
- 5 Installing the Ink Cartridges
- 6 Print Quality Check
- 7 Setting the Date and Time
- 8 Setting Your Station ID
- 9 Selecting a Receive Mode (FAX-1840C only)
- 10 Selecting a Receive Mode (FAX-1940CN only)
- 11 Setting Up the Message Center (FAX-1940CN only)
- 12 Selecting Your Language (Canada only)
- 13 Sending in the Product Registration and Test Sheet (USA only)
- 14 Using the FAX as a Printer or for PC-FAX Send
- 15 Using the Network features of the FAX-1940CN
- Replacement Consumables

10
Setting Up the Machine
There are four possible receive modes: Fax Only, Fax/Tel, Manual and External TAD.
1
Press Menu/Set.
2
Press 0.
3
Press 1.
4
Press
▲
or
▼
to select the mode.
5
Press Menu/Set.
6
Press Stop/Exit.
9 Selecting a Receive Mode (FAX-1840C only)
Are you connecting an external telephone or external telephone answering
device to the FAX?
Are you using the voice message
function of your external telephone
answering device?
Do you want to receive a fax
automatically?
Manual
You control the phone line and must
answer every call yourself.
Do you use the MFC for the fax
use only?
Fax Only
The MFC automatically answers every
call as a fax.
Fax/Tel
The MFC controls the line and
automatically answers every call. If the
call is not a fax, it will ring for you to pick
up the call.
External TAD
Your external telephone answering
device (TAD) automatically answers
every call. Voice messages are stored on
the external TAD. Fax messages are
printed.
Yes No
Yes
Yes
Yes
No
For more details, see “Setup Receive” in
Chapter 4 of the User’s Guide.
No