
Quick Setup Guide


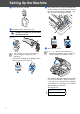
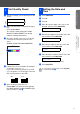


Table Of Contents
- Quick Setup Guide
- Quick Setup Guide
- Ръководство за Бързо Инсталиране
- Инсталация на устройството
- 1 Отстраняване на предпазните елементи
- 2 Инсталиране на слушалката
- 3 Зареждане на хартия
- 4 Свързване на телефонна линия и захранващ кабел
- 5 Поставяне на касетите с мастило
- 6 Проверка на качеството на печат
- 7 Настройка на датата и часа
- 8 Настройка на ID
- 9 Избор на режим за получаване
- 10 Използване на факса като принтер или за изпращане на факс чрез компютър
- Инсталация на устройството
- Ghid rapid de setare
- Instalarea şi configurarea echipamentului
- 1 Îndepărtarea părţilor cu rol de protecţie
- 2 Instalarea receptorului telefonic
- 3 Încărcarea hârtiei
- 4 Instalarea liniei telefonice si a cablului de alimentare
- 5 Instalarea cartuşelor de cerneală
- 6 Controlul calităţii tipăririi
- 7 Setarea datei şi orei
- 8 Setarea ID-ului staţiei
- 9 Selectarea unui mod de primire
- 10 Utilizarea FAX-ului ca Printer (Imprimantă) sau ca PC-FAX Send (Trimitere FAX-uri de pe PC)
- Instalarea şi configurarea echipamentului

4
Setting Up the Machine
4
Take out the ink cartridge.
5
Carefully remove the bottom cap.
DO NOT touch the area shown in the
illustration below.
Keep the ink cartridge in an upright position
when you insert it into the slot.
6
Press firmly down on the ink cartridge until
the hook snaps over it, taking care to match
the slot colour (A) with the cartridge colour
(B), as shown in the diagram below.
7
Close the top cover.
The machine will clean the ink tube system
for use for the first time. This process will
occur only once, the first time ink cartridges
are installed. The cleaning process will last
approximately four minutes.
The LCD shows:
If the cartridge cover comes off when you
open the bag the cartridge will not be
damaged.
Opening
OK
OK
OK
If Install shows on the LCD after you
install the ink cartridges, check to make sure
the ink cartridges are installed correctly.
Preparing System
Approx 4 Minutes
(B)
(A)
OK
OK
OK