
User Manual
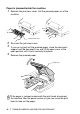


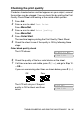
Table Of Contents
- USER'S GUIDE FAX-1840C/FAX-1940CN/MFC-3240C/MFC-3340CN
- Brother numbers
- Ordering accessories and supplies
- Safety precautions
- Choosing a location
- Quick Reference Guide
- Table of Contents
- 1 Introduction
- 2 Getting started
- Initial Setup
- General Setup
- Setting the Mode Timer (MFC-3240C and MFC-3340CN only)
- Setting the Mode Timer (FAX-1840C and FAX-1940CN only)
- Setting the Paper Type
- Setting the Paper Size
- Setting the Ring Volume
- Setting the Beeper Volume
- Setting the Speaker Volume
- Setting the Handset Volume (FAX-1840C and FAX-1940CN only)
- Choosing the Handset Volume (For Volume Amplify) (FAX-1840C and FAX-1940CN only)
- Setting Volume Amplify (FAX-1840C and FAX-1940CN only)
- Turning on Automatic Daylight Savings Time
- Setting the LCD Contrast
- 3 Setup Send
- 4 Setup Receive
- Basic receiving operations (FAX-1840C, MFC-3240C and MFC-3340CN only)
- Basic receiving operations (FAX-1940CN only)
- Choosing the Receive Mode
- Setting the Ring Delay
- Setting Toll Saver (Msg Ctr mode)
- Setting the F/T Ring Time (Fax/Tel mode only)
- Setting the Fax/Tel Announcement (FAX-1940CN only)
- Easy Receive (MFC-3240C and MFC-3340CN only)
- Easy Receive (FAX-1840C and FAX-1940CN only)
- Printing a reduced incoming fax (Auto Reduction)
- Receiving a fax at the end of a conversation
- Printing a fax from the memory
- Polling
- 5 Quick-Dial numbers and dialing options
- 6 Remote Fax Options (Not available for color faxes)
- 7 Message Center (FAX-1940CN only)
- Message Center mode
- Setting up the Message Center
- Recording Message Center Outgoing Message
- Activating Message Center mode
- Message indicator
- Playing voice messages
- Printing a fax message
- Erasing incoming messages
- Setting Maximum Time for incoming messages
- Setting Toll Saver
- ICM Recording Monitor
- Recording a conversation
- Record Fax/Tel Outgoing Announcement (F/T OGM)
- Message Center mode
- 8 Printing reports
- 9 Making copies
- 10 Walk-Up PhotoCapture Center™ (MFC-3340CN only)
- 11 Important information
- Standard telephone and FCC Notices These notices are in effect on models sold and used in the United States only.
- Federal Communications Commission (FCC) Declaration of Conformity (USA only)
- Industry Canada Compliance Statement (Canada only)
- For your safety
- LAN connection (FAX-1940CN and MFC-3340CN only)
- Important safety instructions
- Trademarks
- 12 Troubleshooting and routine maintenance
- Appendix A
- Appendix B
- Glossary
- Specifications
- Product description
- General
- Print media
- Copy
- PhotoCapture Center™ (MFC-3340CN only)
- Fax
- Scanner (MFC-3240C and MFC-3340CN only)
- Printer
- Interfaces
- Computer requirements
- Consumable items
- Network (LAN) (FAX-1940CN and MFC-3340CN only)
- Optional External Wireless Print/Scan Server (NC-2200w) (MFC-3240C and MFC-3340CN only)
- Index
- Remote Retrieval Access card (FAX-1940CN only)
- Remote Retrieval Access card (FAX-1840C, MFC-3240C and MFC-3340CN only)
- brother USA/CAN

12 - 13 TROUBLESHOOTING AND ROUTINE MAINTENANCE
PhotoCapture Center
™
Difficulties (MFC-3340CN only)
Removable Disk does not
work properly.
a)Have you installed the Windows
®
2000 update?
If not, do the following:
1. Disconnect the USB cable.
2. Install the Windows
®
2000
update. Please see the Quick Setup
Guide. After the installation the PC will be automatically restarted.
3. Wait about 1 minute after you reboot the PC, and then connect the
USB cable.
b)Take out the media card and put it back in again.
c) If you have tried "Eject" from within Windows
®
, you must take out the
media card before you continue.
d)If an error message appears when you try to eject the media card, it
means the card is being accessed.
Wait a while and then try again.
e)If all of the above do not work, please turn off your PC and machine,
and then turn them on again.
(You will have to unplug the power cord of the machine to turn it off.)
Cannot access Removable
Disk from Desktop icon.
Make sure you have inserted the media card into the media slot.
Network Difficulties (MFC-3340CN only)
I cannot print over the Network Make sure that your machine is powered on and is On Line and in
Ready mode. Print Network Configuration list. (See Printing reports on
page 8-1.) Then the current settings of the network are printed.
Reconnect the LAN cable to the hub to verify that the cabling and
network connections are good. If possible, try connecting the machine
to a different port on your hub using a different cable. If the connections
are good, the machine shows LAN Active for 2 seconds.
DIFFICULTY SUGGESTIONS