
User Manual
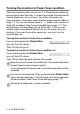


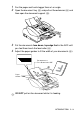
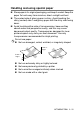
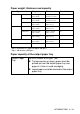
Table Of Contents
- USER'S GUIDE FAX-1840C/FAX-1940CN/MFC-3240C/MFC-3340CN
- APPROVAL INFORMATION
- Compilation and Publication Notice
- "EC" Declaration of Conformity
- Safety precautions
- Choosing a location
- Quick Reference Guide
- Table of Contents
- 1 Introduction
- 2 Getting started
- Initial Setup
- General Setup
- Setting the Mode Timer (MFC-3240C and MFC-3340CN only)
- Setting the Mode Timer (FAX-1835C, FAX-1840C and FAX-1940CN only)
- Setting the Paper Type
- Setting the Paper Size
- Setting the Ring Volume
- Setting the Beeper Volume
- Setting the Speaker Volume
- Turning on Automatic Daylight Savings Time
- Setting the LCD Contrast
- 3 Setup Send
- How to enter Fax mode
- How to dial
- How to Fax (B&W and Colour)
- Basic sending operations
- Advanced sending operations
- Broadcasting (Not available for colour faxes)
- Overseas Mode
- Delayed Fax (Not available for colour faxes)
- Delayed Batch Transmission (Not available for colour faxes)
- Setup for Polled Transmit (Standard) (Not available for colour faxes)
- Setup for Polled Transmit with Secure Code (Not available for colour faxes)
- TX Lock (FAX-1835C, FAX-1840C, MFC-3240C and MFC-3340CN only)
- Memory Security (FAX-1940CN only)
- 4 Setup Receive
- Basic receiving operations (FAX-1835C, FAX-1840C, MFC-3240C and MFC-3340CN only)
- Basic receiving operations (FAX-1940CN only)
- Choosing the Receive Mode
- Setting the Ring Delay
- Setting Toll Saver (TAD mode)
- Setting the F/T Ring Time (Fax/Tel mode only)
- Setting the Fax/Tel Announcement (FAX-1940CN only)
- Fax Detect (FAX-1835C, MFC-3240C and MFC-3340CN only)
- Fax Detect (FAX-1840C and FAX-1940CN only)
- Printing a reduced incoming fax (Auto Reduction)
- Receiving a fax at the end of a conversation
- Printing a fax from the memory
- Reception into memory (Not available for colour fax reception)
- Polling
- 5 Quick-Dial numbers and dialling options
- 6 Remote Fax Options (Not available for colour faxes)
- 7 TAD (Telephone Answering Device) (FAX-1940CN only)
- TAD mode
- Setting up the TAD
- Recording TAD Outgoing Message
- Activating TAD mode
- Message indicator
- Playing voice messages
- Printing a fax message
- Erasing incoming messages
- Setting Maximum Time for incoming messages
- Setting Toll Saver
- ICM Recording Monitor
- Recording a conversation
- Record Fax/Tel Outgoing Announcement (F/T OGM)
- TAD mode
- 8 Printing reports
- 9 Making copies
- 10 Walk-Up PhotoCapture Center™ (MFC-3340CN only)
- 11 Important information
- 12 Troubleshooting and routine maintenance
- Appendix A
- Appendix B
- Glossary
- Specifications
- Product description
- General
- Print media
- Copy
- PhotoCapture Center™ (MFC-3340CN only)
- Fax
- Scanner (MFC-3240C and MFC-3340CN only)
- Printer
- Interfaces
- Computer requirements
- Consumable items
- Network (LAN) (FAX-1940CN and MFC-3340CN only)
- Optional External Wireless Print/Scan Server (NC-2200w) (MFC-3240C and MFC-3340CN only)
- Index
- Remote Retrieval Access card (FAX-1940CN only)
- Remote Retrieval Access card (FAX-1835C, FAX-1840C, MFC-3240C and MFC-3340CN only)
- brother UK/IRE/SAF/PAN NORDIC

1 - 10 INTRODUCTION
About paper
The print quality can be affected by the type of paper you use in the
machine.
To get the best print quality for the settings you’ve chosen, always
set the Paper Type to match the type of paper you load.
You can use plain paper, inkjet paper (coated paper), glossy paper,
transparencies and envelopes.
We recommend testing various paper types before purchasing large
quantities.
For best results, use the recommended paper.
Recommended Paper
To get the best print quality, we suggest using Brother paper.
(See table below.)
If Brother paper is not available in your country, we recommend
testing various papers before purchasing large quantities.
We recommend using “3M Transparency Film” when you print on
transparencies.
Brother Paper
■
When you print on inkjet paper (coated paper),
transparencies and glossy paper, be sure to select the
proper media in the “Basic” tab of the printer driver or in the
Paper Type setting of the menu (
Menu/Set
,
1
,
2
).
■
When you print on Brother glossy paper, load the instruction
sheet included with the glossy paper in the paper tray first,
and then place the glossy paper on the instruction sheet.
■
When you use transparencies or glossy paper, remove each
sheet immediately to prevent smudging or paper jams.
■
Avoid touching the printed surface of the paper immediately
after printing; the surface may not be completely dry and
may stain your fingers.
Paper Type Item
A4 Plain BP60PA
A4 Glossy BP60GLA
A4 Inkjet (Photo Matte) BP60MA