
Printer/Fax/Scanner/Copier Quick Setup Guide FAX-1820C, FAX-1920CN


Table Of Contents
- Quick Setup Guide
- Getting Started
- Table of Contents
- Setting Up the Machine
- 1 Removing the Protective Parts
- 2 Install Handset
- 3 Attaching the Paper Tray and Supports
- 4 Loading Paper
- 5 Install Phone Line and Power Cord
- 6 Installing the Ink Cartridges
- 7 Color Block Quality and Alignment Check
- 8 Setting the Date and Time
- 9 Setting Your Station ID
- 10 Selecting a Receive Mode (FAX-1820C only)
- 11 Selecting a Receive Mode (FAX-1920CN only)
- 12 Setting Up the Message Center (FAX-1920CN only)
- 13 Selecting Your Language (Canada Only)
- 14 Sending in the Product Registration and Test Sheet (USA Only)
- 15 Using the FAX as a Printer or for PC-FAX Send
- 16 Using the Network features of the FAX-1920CN
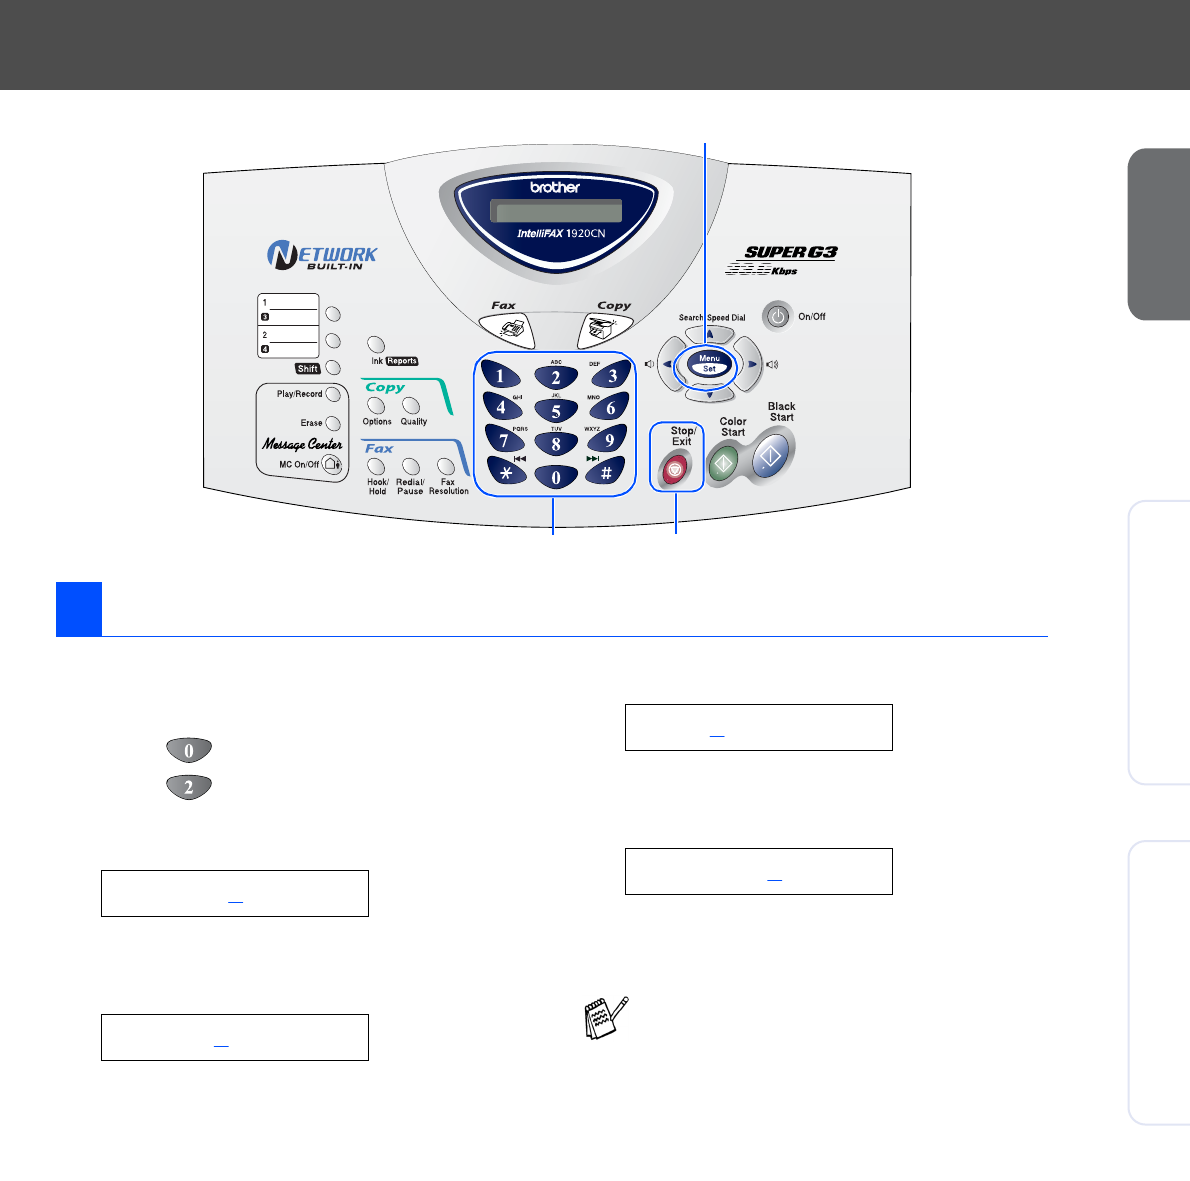
11
The machine displays the date and time, and prints it
on every fax you send.
1
Press Menu/Set.
2
Press .
3
Press .
4
Enter the last two digits of the year on the
dial pad, and then press Menu/Set.
(e.g. Enter 0, 4 for 2004.)
5
Enter the two digits for the month on the dial
pad, and then press Menu/Set.
(e.g. Enter 0, 3 for March.)
6
Enter the two digits for the day on the dial
pad, and then press Menu/Set.
(e.g. Enter 0, 1.)
7
Enter the time in 24-hour format on the dial
pad, and then press Menu/Set.
(e.g. Enter 1, 5, 2, 5 for 3:25 P.M.)
8
Press Stop/Exit.
8 Setting the Date and Time
Menu/Set
Stop/ExitDial pad
(FAX-1920CN)
Year:2004
Month:03
Day:01
Time:15:25
If you want to repeat from step1, press
Stop/Exit.
Setting Up
the Machine
Using the FAX as a Printer or
for PC-FAX Send
Using the Network features of
the FAX-1920CN