
Printer/Fax/Scanner/Copier Quick Setup Guide FAX-1820C, FAX-1920CN


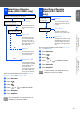
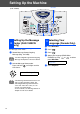


Table Of Contents
- Quick Setup Guide
- Getting Started
- Table of Contents
- Setting Up the Machine
- 1 Removing the Protective Parts
- 2 Install Handset
- 3 Attaching the Paper Tray and Supports
- 4 Loading Paper
- 5 Install Phone Line and Power Cord
- 6 Installing the Ink Cartridges
- 7 Color Block Quality and Alignment Check
- 8 Setting the Date and Time
- 9 Setting Your Station ID
- 10 Selecting a Receive Mode (FAX-1820C only)
- 11 Selecting a Receive Mode (FAX-1920CN only)
- 12 Setting Up the Message Center (FAX-1920CN only)
- 13 Selecting Your Language (Canada Only)
- 14 Sending in the Product Registration and Test Sheet (USA Only)
- 15 Using the FAX as a Printer or for PC-FAX Send
- 16 Using the Network features of the FAX-1920CN

10
Setting Up the Machine
Step B: Alignment Check
1
The LCD shows:
Check the 600 dpi and 1200 dpi test print to
see if No.5 most closely matches the OK
sample (No.0). Press if No.5 matches
it.
If another test print number is a better match
for either 600 dpi or 1200 dpi, press to
select NO and go to
2
.
2
For 600 dpi, select the number from 1 to 8
that most closely matches the No.0 sample
and enter it using the dial pad.
3
For 1200 dpi, enter the number from 1 to 8
that most closely matches the No.0 sample.
The Quality check is now complete.
Is Step "B" OK?
1.Yes 2.No
Select Best #
Select Best #
600 DPI
1200 DPI
No.5