
User Manual
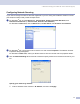
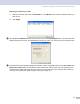
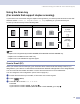

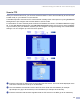
Table Of Contents
- SOFTWARE USER’S GUIDE
- Table of Contents
- Section I: Windows®
- 1 Printing
- Using the Brother printer driver
- Printing a document
- Duplex (two-sided) printing
- Simultaneous scanning, printing and faxing
- Printer operation key
- Status Monitor
- Printer driver settings (For Windows®)
- How to access the printer driver settings (For Windows®)
- Features in the Windows® printer driver
- Features in BR-Script3 (Post Script® 3™ language emulation) Printer compatible driver
- 2 Scanning
- Scanning a document using the TWAIN driver
- Scanning a document using the WIA driver (For Windows® XP only)
- Using the Scan key (For USB or Parallel cable users)
- Using ScanSoft® PaperPort® SE with OCR
- 3 ControlCenter2
- 4 Network Scanning (For models with built-in network support)
- 5 Remote Setup (Not available for DCP models)
- 6 Brother PC-FAX Software (Not available for DCP models)
- PC-FAX sending
- Speed Dial setup
- Brother Address Book
- Setting up a member in the Address Book
- Setting up a group for broadcasting
- Editing member information
- Deleting a member or group
- Exporting the Address Book
- Importing to the Address Book
- Sending a file as a PC-FAX using the Facsimile style user interface
- Sending a file as a PC-FAX using the Simple style user interface
- PC-FAX receiving
- 1 Printing
- Section II: Apple® Macintosh®
- 7 Printing and Faxing
- Setting up your USB-equipped Apple® Macintosh®
- Printer operation key
- Status Monitor
- Using the Brother Laser driver for Macintosh® (Mac OS® X)
- Using the Brother Laser driver for Macintosh® (Mac OS® 9.1 to 9.2)
- Using the BR-Script3 (Post Script® 3™ language emulation printer driver)
- Sending a fax (Not available for DCP models)
- 8 Scanning
- 9 ControlCenter2 (For Mac OS® 10.2.4. or greater)
- 10 Network Scanning (Not available for DCP- 8060)
- 11 Remote Setup (Not available for DCP models)
- 7 Printing and Faxing
- Index
- brother ARL/ASA/NZ

4. Network Scanning (For models with built-in network support)
77
Configuring Network Scanning 4
If you need to change the machine that was registered to your PC during the installation of MFL-Pro Suite
(see the Quick Setup Guide), follow the steps below.
a For Windows
®
XP, click the Start button, Control Panel, Printers and Other Hardware, then
Scanners and Cameras (or Control Panel, Scanners and Cameras).
For Windows
®
98/Me/2000, click the Start button, Control Panel, then Scanners and Cameras.
b For Windows
®
XP, right click the scanner device icon and choose Properties. The Network Scanner
Properties dialog box appears.
For Windows
®
98/ME/2000, select your Brother machine from the list and click the properties button.
c Click the Network Setting tab and choose a method to specify a machine as a network scanner for your
PC.
Specifyyourmachinebyaddress 4
1 Enter IP address of the machine in IP Address, and then click Apply.