
Software User's Guide
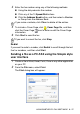
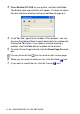
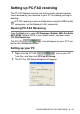

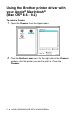
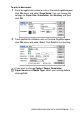
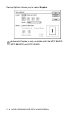
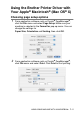
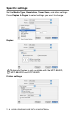
Table Of Contents
- SOFTWARE USER’S GUIDE
- Table of contents
- 1 Using the machine as a printer
- 2 Printer driver settings (Windows® Only)
- 3 How to scan using Windows®
- Scanning a document (For Windows® XP only)
- Scanning a document
- Using the scan key (For USB or Parallel interface cable users)
- Using ScanSoft® PaperPort® 9.0SE and OmniPage® OCR
- 4 Using ControlCenter2.0 (For Windows®)
- 5 Using MFC Remote Setup (For Windows®) (For MFC-8440, MFC-8840D and MFC-8840DN only)
- 6 Using Brother PC-FAX software (For Windows®) (For MFC-8440, MFC-8840D and MFC-8840DN only)
- PC-FAX sending
- Speed-Dial setup
- Brother Address Book
- Setting up a Member in the Address Book
- Setting up a Group for Broadcasting
- Editing Member information
- Deleting a Member or Group
- Exporting the Address Book
- Importing to the Address Book
- Setting up a Cover Page
- Entering Cover Page Information
- Sending a file as a PC-FAX using the Facsimile style user interface
- Sending a file as a PC-FAX using the Simple style user interface
- Setting up PC-FAX receiving
- 7 Using your machine with a Macintosh®
- Setting up your USB-equipped Apple® Macintosh®
- Using the Brother printer driver with your Apple® Macintosh® (Mac OS® 8.6 - 9.2)
- Using the Brother Printer Driver with Your Apple® Macintosh® (Mac OS® X)
- Using the PS driver with your Apple® Macintosh®
- Sending a fax from your Macintosh® application (For MFC-8440, MFC-8840D and MFC-8840DN only)
- Using the Brother TWAIN scanner driver with your Macintosh®
- Using Presto!® PageManager®
- Using ControlCenter2.0 (For Mac OS® X 10.2.1 or greater)
- MFC Remote Setup (Mac OS® X) (For MFC-8440, MFC-8840D and MFC-8840DN only)
- 8 Network Scanning (Windows® 98/98SE/Me/2000 Professional and XP only)
- 9 Brother Network PC-FAX software (For MFC-8440, MFC-8840D and MFC-8840DN only)
- Index
- brother USA/CANADA

6 - 20 USING BROTHER PC-FAX SOFTWARE
3
In Ring Delay, select the number of rings before you want your
PC to answer incoming calls.
4
In Save file to, use the Browse button if you want to change the
path where PC-FAX files will be saved.
5
In File Format, select .tif or .max for the format the received
document will be saved in. The default format is .tif.
6
If you want to, you can check the Play wave file when
receiving FAX check box, and then enter the path of the wave
file.
7
To load PC FAX receiving automatically when you start up
Windows
®
, select the Add to Startup folder check box.
Viewing new PC-FAX messages
Each time you start to receive a PC-FAX, the icon will flash
blue and red. Once the fax has been received the icon will remain
red. The red icon will change to green once the received fax has
been viewed.
1
Run PaperPort
®
.
2
Open the Fax Received folder.
3
Double-click any of the new faxes to open and view them.
The title of your unread PC message will be the date and time
until you assign a file name.
For example “Fax 2-20-2002 16:40:21.tif”