BASIC USER’S GUIDE DCP-7055 DCP-7060D Version A CHN-ENG
To create a better environment Please cooperate Firstly, thank you very much indeed for using our Brother products! Brother focuses on the earth environment concerned. And make a basic policy which is to concern about the earth environment, including any workflow from product development to discard. The local citizen should be responsible for local society and its environment during these environment protection activities.
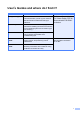
User’s Guides and where do I find it? Which manual? What’s in it? Safety and Legal Read this Guide first. Please read the Safety Instructions before you set up your machine. See this Guide for trademarks and legal limitations. Quick Setup Guide Follow the instructions for setting up your machine and installing the drivers and software for the operating system and connection type you are using. Basic User's Guide Learn the basic Copy and Scan operations and how to replace consumables.
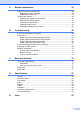
Table of Contents (BASIC USER'S GUIDE) 1 General information 1 Using the documentation .......................................................................................1 Symbols and conventions used in the documentation ....................................1 Accessing the Advanced User’s Guide, Software User’s Guide and Network User’s Guide ............................................................1 Viewing Documentation..............................................................................
A Routine maintenance 28 Replacing the consumable items......................................................................... 28 Replacing the toner cartridge ........................................................................ 29 Replacing the drum unit................................................................................. 35 Cleaning the machine .......................................................................................... 40 Cleaning the outside of the machine ............
Table of Contents (ADVANCED USER’S GUIDE) The Advanced User's Guide explains the following features and operations. You can view the Advanced User's Guide on the Documentation CD-ROM.
1 General information Using the documentation 1 Thank you for buying a Brother machine! Reading the documentation will help you make the most of your machine. Symbols and conventions used in the documentation The following symbols and conventions are used throughout the documentation. Bold Italics Courier New Bold style identifies keys on the machine control panel or computer screen. Italicized style emphasizes an important point or refers you to a related topic.
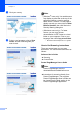
Chapter 1 c Click your country. Note • (Windows® users only) Your web browser may display a yellow bar at the top of the page that contains a security warning about Active X controls. For the page to display correctly you must click on Allow Blocked Content, then click Yes in the Security Warning dialog box. d • (Windows® users only) 1 For faster access, you can copy all user documentation in PDF format to a local folder on your computer. Point to your language, then click Copy to local disk.
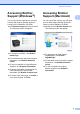
General information Accessing Brother Support (Windows®) You can find all the contacts you will need, such as Web support (Brother Solutions Center) on the Installation CD-ROM. 1 Accessing Brother Support (Macintosh) You can find all the contacts you will need, such as Web support (Brother Solutions Center) on the Installation CD-ROM. Click Brother Support on the main menu. The following screen will appear: Double-click the Brother Support icon.
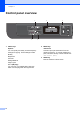
Chapter 1 Control panel overview 1 1 4 5 Stack Copies:01 100% Auto 2 1 4 COPY keys: Options You can quickly and easily choose temporary settings for copying. These settings include: Quality Brightness Contrast Enlarge/Reduce Page Layout 2 in 1 (ID) Copy You can copy your Identification card both sides onto one page with the original size. 3 2 PRINT key: Job Cancel Cancels a print job and clears it from the machine’s memory.
General information 1 1 4 5 6 Stack Copies:01 100% Auto 2 3 4 LCD Displays messages to help you set up and use your machine. 5 Menu keys: Menu Lets you access the Menu to program your settings in this machine. Clear Deletes entered data or lets you cancel the current setting. a + or b Press to scroll through the menus and options. OK Lets you store your settings in the machine. 6 Stop/Exit Stops an operation or exits from a menu. 7 Start Lets you start making copies or scanning.
Chapter 1 Changing LCD language You can change the LCD language. a b Press Menu. c Press a or b to choose 0.Local Language. Press OK. d Press a or b to choose your language. Press OK. e Press Stop/Exit. 6 Press a or b to choose 1.General Setup. Press OK.
2 Loading paper Loading paper and print media The machine can feed paper from the standard paper tray or manual feed slot. When you put paper into the paper tray, note the following: If your application software supports paper size selection on the print menu, you can select it through the software. If your application software does not support it, you can set the paper size in the printer driver or by using the control panel buttons.
Chapter 2 b While pressing the green paper-guide release lever (1), slide the paper guides to fit the paper size you are loading in the tray. Make sure that the guides are firmly in the slots. d Put paper in the tray and make sure: The paper is below the maximum paper mark (b b b) (1). Overfilling the paper tray will cause paper jams. The side to be printed on must be face down. 1 The paper guides touch the sides of the paper so it will feed correctly.
Loading paper f Printing on plain paper or recycled paper from the manual feed slot Unfold the support flap (1) to prevent paper from sliding off the face-down output tray. a 2 Unfold the support flap (1) to prevent paper from sliding off the face-down output tray, or remove each page as soon as it comes out of the machine. 2 1 1 1 Loading paper in the manual feed slot You can load envelopes and special print media one at a time into this slot.
Chapter 2 c d Using both hands, slide the manual feed slot paper guides to the width of the paper that you are going to use. Remove each printed sheet or envelope immediately to prevent a paper jam. Using both hands, put one sheet of paper in the manual feed slot until the front edge of the paper or transparency touches the paper feed roller. When you feel the machine pull in the paper, let go.
Loading paper c d (For DCP-7060D) Open the manual feed slot cover. e Using both hands, put one sheet of paper or one envelope in the manual feed slot until the front edge of the paper or envelope touches the paper feed roller. When you feel the machine pull in the paper, let go. Using both hands, slide the manual feed slot paper guides to the width of the paper that you are going to use. Note • Put the paper into the manual feed slot with the side to be printed face up.
Chapter 2 • If you put any print media in the manual feed slot before the machine is in Ready mode, the print media may be ejected without being printed on. • To easily remove a small printout from the output tray, lift up the scanner cover by using both hands as shown in the illustration. • You can still use the machine while the scanner cover is up. To close the scanner cover, push it down with both hands.
Loading paper Unscannable and unprintable areas 2 The figures below show maximum unscannable and unprintable areas. The unscannable and unprintable areas may vary depending on the paper size or settings in the application you are using. Usage 2 Document Size Top (1) Left (2) Bottom (1) Right (2) Letter 3 mm 4 mm *a single copy A4 or a 1 in 1 copy 3 mm 3 mm Scan Letter 3 mm 3 mm A4 3 mm 3 mm Letter 6 mm 6.35 mm A4 6 mm 6.
Chapter 2 Paper settings Paper Type Press Menu. c Press a or b to choose 1.Paper. Press OK. d Press a or b to choose 1.Paper Type. Press OK. e Press a or b to choose Thin, Plain, Thick, Thicker, Recycled Paper or Label. Press OK. f Press Stop/Exit. Press a or b to choose 1.General Setup. Press OK. Paper Size You can use several different sizes of paper for printing copies: A4, Letter, Executive, A5, A5 L, A6, B5, B6, 16K(195x270mm), 16K(184x260mm) or 16K(197x273mm).
Loading paper Acceptable paper and other print media Recommended paper and print media 2 2 Print quality may vary according to the type of paper you are using. You can use the following types of print media: thin paper, plain paper, thick paper, bond paper, recycled paper, labels or envelopes. To get the best print quality, we suggest using the following paper.
Chapter 2 Recommended paper specifications 2 The following paper specifications are suitable for this machine. Basis weight 70-90 g/m2 Thickness 80-110 m Roughness Higher than 20 sec. Stiffness 90-150 cm3/100 Grain direction Long grain Volume resistivity 10e9-10e11 ohm Surface resistivity 10e9-10e12 ohm-cm Filler CaCO3 (Neutral) Ash content Below 23 wt% Brightness Higher than 80% Opacity Higher than 85% Use paper made for plain paper copying. Use paper that is 70 to 90 g/m2.
Loading paper Types of envelopes to avoid • that is curled or warped 2 IMPORTANT 1 DO NOT use envelopes: • that are damaged, curled, wrinkled or an unusual shape 1 • that are extremely shiny or textured 1 A curl of 2 mm or greater may cause jams to occur.
Chapter 2 • with double flaps Types of labels to avoid • with each side folded as shown in figure below Do not use labels that are damaged, curled, wrinkled or an unusual shape. IMPORTANT • DO NOT feed part used label sheets. The exposed carrier sheet will damage your machine. If you use any of the types of envelopes listed above, they may damage your machine. This damage may not be covered under any Brother warranty or service agreement.
3 Loading documents How to load documents b 3 3 Using the document guidelines on the left and top, place the document face down in the upper left corner of the scanner glass. You can make copies and scan from the scanner glass. Using the scanner glass 3 3 You can use the scanner glass to copy or scan pages of a book one page at a time. Document Sizes Supported Length: Up to 297.0 mm Width: Up to 215.9 mm Weight: Up to 2.0 kg How to load documents a 3 3 Lift the document cover.
4 Making copies How to copy 4 The following steps show the basic copy operation. For details about each option, see the Advanced User's Guide on the CD-ROM. Stack Copies:01 100% Auto a b Press Menu, Options or 2 in 1 (ID) Copy and then press a or b to scroll through the copy settings. When the setting you want is displayed, press OK. Text & Graph Enlarge/Reduce Quality Brightness Press or hold a or b to increase or decrease the number of copies and press Start.
5 How to print from a computer Printing a document 5 5 The machine can receive data from your computer and print it. To print from a computer, install the printer driver. (See Printing for Windows® or Printing and Faxing for Macintosh in the Software User's Guide for the details about the print settings.) a Install the Brother printer driver on the Installation CD-ROM. (See the Quick Setup Guide.) b From your application, choose the Print command.
6 How to scan to a computer Scanning a document as PDF file using ControlCenter4 (Windows®) 6 6 (For Macintosh users) See Scanning in the Software User's Guide. Note • The screens on your PC may vary depending on your model. • The illustrations in this chapter are based on "Advanced Mode" interface. ControlCenter4 is a software utility that lets you quickly and easily access the applications you use most often. Using ControlCenter4 eliminates the need to manually launch specific applications.
How to scan to a computer e Set the file type for saving to a folder. By default, the scanned data is saved as JPEG (*.jpg). Click Configuration, and then select Button settings, Scan and File. The configuration dialog box appears. You can change the default settings. 6 1 2 3 4 5 1 Choose PDF (*.pdf) from the File Type pull-down list. 2 You can enter the file name you want to use for the document.
Chapter 6 g 24 Click File. The machine starts the scanning process. The folder where the scanned data is saved will open automatically.
How to scan to a computer Changing the SCAN key settings Before scanning 6 6 To use the machine as a scanner, install a scanner driver. If the machine is on a network, configure it with a TCP/IP address. Install the MFL-Pro Suit (including scanner drivers) on the Installation CD-ROM. (See the Quick Setup Guide.) Configure the machine with a TCP/IP address if network scanning does not work. (See Configuring Network Scanning in the Software User's Guide.
Chapter 6 e Choose the File tab. You can change the default settings. 1 2 3 4 5 1 You can choose the file type from the pull-down list. 2 You can enter the file name you want to use for the document. 3 You can save the file to the default folder, or choose your preferred folder by clicking the Browse button. 4 You can choose a scanning resolution from the Resolution pull-down list. 5 You can choose the document size from the pull-down list. f 26 Click OK.
How to scan to a computer Scanning using the SCAN key a b c Load your document. (See How to load documents on page 19.) d Press a or b to choose File. Press OK. e (For Network users) Press a or b to choose the destination computer you want to send to. Press OK. If the LCD prompts you to enter a PIN number, enter the 4-digit PIN number for the destination computer using the dial pad on the control panel. Press OK. f Press 6 (SCAN). Press a or b to choose scan to PC. Press OK. 6 Press Start.
A Routine maintenance Replacing the consumable items The machine will indicate when it is time to replace the consumable items. (See Replacing the toner cartridge on page 29 and Replacing the drum unit on page 35.) To avoid any inconvenience, you may want to buy spare consumable items before the machine stops printing.
Routine maintenance Replacing the toner cartridge Model Name: For the model name of toner cartridges, see Replacing the consumable items on page 28. The Standard toner cartridge can print approximately 700 pages (TN-2015) or 1,200 pages (TN-2215) 1. The High Yield toner cartridge (For DCP-7060D) can print approximately 2,600 pages 1. Actual page count will vary depending on your average type of document. When a toner cartridge is running low, the LCD shows Toner Low.
Toner Low A Toner Ended Toner Low Toner Ended If the LCD shows Toner Low, buy a new toner cartridge and have it ready before you get a Replace Toner message. Replace Toner The machine stops printing until you replace the toner cartridge with a new one. (See Replacing the toner cartridge on page 30.) A When the following message appears on the LCD, you need to replace the toner cartridge: Replace Toner The machine will stop printing until you replace the toner cartridge.
Routine maintenance CAUTION c Take out the drum unit and toner cartridge assembly. d Push down the green lock lever and take the toner cartridge out of the drum unit. HOT SURFACE After you have just used the machine, some internal parts of the machine will be extremely hot. When you open the front or back cover (back output tray) of the machine, DO NOT touch the shaded parts shown in the illustration. If you do this, you may burn yourself.
WARNING DO NOT put a toner cartridge into a fire. It could explode, resulting in injuries. DO NOT use cleaning materials that contain ammonia, alcohol, any type of spray or any type of flammable substance to clean the inside or outside of the machine. Doing this may cause a fire or electrical shock. See To use the product safely in the Safety and Legal booklet for how to clean the machine. Be careful not to inhale toner.
Routine maintenance Note f Pull off the protective cover. • Be sure to seal up the toner cartridge tightly in a suitable bag so that toner powder does not spill out of the cartridge. • Discard the used consumable according to local regulations, keeping it separate from domestic waste. If you have questions, call your local waste disposal office. Be sure to reseal the consumable items tightly so that the material inside does not spill. e Unpack the new toner cartridge.
g Put the new toner cartridge firmly into the drum unit so that it locks into place. If you put it in correctly, the green lock lever will lift automatically. h Clean the primary corona wire inside the drum unit by gently sliding the green tab from left to right and right to left several times. 1 Note Be sure to return the tab to the home position (a) (1). If you do not, printed pages may have a vertical stripe. i 34 Put the drum unit and toner cartridge assembly back into the machine.
Routine maintenance After replacement, reset the drum counter by following the instructions included with the new drum unit. Note After replacing the toner cartridge, DO NOT turn off the machine's power switch or open the front cover until the LCD returns to Ready mode. Drum Stop A Drum Stop Replacing the drum unit A We cannot guarantee the print quality. Please replace the drum unit with a new one. We recommend a genuine Brother Original drum unit be installed at this time.
CAUTION c Take out the drum unit and toner cartridge assembly. d Push down the green lock lever and take the toner cartridge out of the drum unit. HOT SURFACE After you have just used the machine, some internal parts of the machine will be extremely hot. When you open the front or back cover (back output tray) of the machine, DO NOT touch the shaded parts shown in the illustration. If you do this, you may burn yourself.
Routine maintenance WARNING DO NOT put a toner cartridge into a fire. It could explode, resulting in injuries. DO NOT use cleaning materials that contain ammonia, alcohol, any type of spray, or any type of flammable substance to clean the outside or inside of the machine. Doing this may cause a fire or electrical shock. See To use the product safely in the Safety and Legal booklet for how to clean the machine. Be careful not to inhale toner.
Note If you choose not to return your used consumable, please discard the used consumable according to local regulations, keeping it separate from domestic waste. If you have questions, call your local waste disposal office. Be sure to reseal the consumable items tightly so that the material inside does not spill. e f Put the toner cartridge firmly into the new drum unit until you hear it lock into place. If you put the cartridge in correctly, the green lock lever will lift automatically.
Routine maintenance g Clean the corona wire of the drum unit by gently sliding the green tab from left to right and right to left several times. CAUTION Be sure to return the green tab to the home position (a) (1). If you do not, printed pages may have a vertical stripe. 1 A h Put the new drum unit and toner cartridge assembly in the machine.
Cleaning the machine Clean the outside and inside of the machine regularly with a dry, lint-free soft cloth. When you replace the toner cartridge or the drum unit, make sure that you clean the inside of the machine. WARNING A Cleaning the outside of the machine a Turn off the machine. Disconnect all cables, and then unplug the power cord from the electrical socket. b Pull the paper tray completely out of the machine. c Wipe the outside of the machine with a dry, lint-free soft cloth to remove dust.
Routine maintenance e Wipe the inside and the outside of the paper tray with a dry, lint-free soft cloth to remove dust. Cleaning the scanner glass A a Turn off the machine. Disconnect all cables, and then unplug the power cord from the electrical socket. b Lift the document cover (1). Clean the white plastic surface (2) and scanner glass (3) underneath it with a soft lint-free cloth moistened with water. 1 2 f Re-load the paper and put the paper tray firmly back in the machine.
Cleaning the corona wire A b Slowly take out the drum unit and toner cartridge assembly. If you have print quality problems, clean the corona wire as follows: a Open the front cover and leave the machine turned on for 10 minutes to cool down. WARNING HOT SURFACE After you have just used the machine, some internal parts of the machine will be extremely hot. Wait for the machine to cool down before you touch the internal parts of the machine.
Routine maintenance c Clean the corona wire inside the drum unit by gently sliding the green tab from right to left and left to right several times. Cleaning the drum unit A If you have print quality problems, the drum may have foreign material, such as glue from a label stuck on the drum surface. Follow the steps below to solve the problem. a b Prepare blank A4 or Letter size paper. c Open the back cover (face-up output tray). Make sure the machine is in Ready mode.
f Using both hands, slide the manual feed paper guides to the width of the paper that you are going to use. • If the paper in the manual feed slot is other than A4 or Letter size, the machine will stop the Drum Cleaning process and eject the paper. • Make sure that the paper is straight and in the correct position in the manual feed slot. If it is not, it may not be fed correctly, resulting in a paper jam. • DO NOT close the back cover (face-up output tray) during the Drum Cleaning process.
Routine maintenance If the problem is not solved yet, follow the steps below. a b Slowly take out the drum unit and toner cartridge assembly. Open the front cover and leave the machine turned on for 10 minutes to cool down. WARNING HOT SURFACE After you have just used the machine, some internal parts of the machine will be extremely hot. Wait for the machine to cool down before you touch the internal parts of the machine.
c Push down the green lock lever and take the toner cartridge out of the drum unit. • To prevent damage to the machine from static electricity, DO NOT touch the electrodes shown in the illustration. IMPORTANT • To avoid print quality problems, DO NOT touch the shaded parts shown in the illustrations below. 46 d Put the print sample in front of the drum unit, and find the exact position of the poor print.
Routine maintenance e Turn the drum unit gear by hand while looking at the surface of the OPC drum (1). g Put the toner cartridge back into the drum unit until you hear it lock into place. If you put the cartridge in correctly, the green lock lever will lift automatically. 1 A f When you have found the mark on the drum that matches the print sample, wipe the surface of the OPC drum with a dry cotton swab until the dust or glue on the surface comes off.
Cleaning the paper pick-up rollers d Wipe the two pick-up rollers (1) inside of the machine to remove dust. A If you have paper feed problems, clean the pick-up rollers as follows: a Turn off the machine. Unplug the power cord from the electrical socket. b Pull the paper tray completely out of the machine. c Tightly wring out a lint-free cloth soaked in lukewarm water, and then wipe the separator pad (1) of the paper tray with it to remove dust.
B Troubleshooting B Error and maintenance messages B As with any sophisticated office product, errors may occur and consumable items may need to be replaced. If this happens, your machine identifies the error or required routine maintenance and shows the appropriate message. The most common error and maintenance messages are shown below. You can clear most errors and perform routine maintenance messages by yourself.
Error Message Cause Action Fuser Error The temperature of the fuser unit does not rise to a specified temperature within the specified time. Turn the power switch off, wait a few seconds, and then turn it on again. Leave the machine for 15 minutes with the power turned on. The fuser unit is too hot. Init Unable XX (XX = Error Code) The machine has a mechanical problem. Disconnect the machine from the power for several minutes and then reconnect it.
Troubleshooting Error Message Cause Action Print Unable XX The machine has a mechanical problem. Do one of the following: (XX = Error Code) Disconnect the machine from the AC power outlet for several minutes, then reconnect it. If the problem continues, call your Brother dealer. Replace Drum It is time to replace the drum unit. Replace the drum unit. (See Replacing the drum unit on page 35.) Replace Toner The drum unit counter was not reset when a new drum was installed.
Paper Jams Paper is jammed in the standard paper tray IMPORTANT B B If the paper cannot easily be removed in this direction, stop and follow the instructions for Paper is jammed inside the machine on page 55. If the LCD shows Jam Tray, follow these steps: a Pull the paper tray completely out of the machine. Note Pulling out the jammed paper downwards allows you to remove the paper more easily. c Make sure the paper is below the maximum paper mark (b b b) (1) of the paper tray.
Troubleshooting Paper is jammed at the back of the machine B If the LCD shows Jam Rear, a paper jam occurred behind the back cover. Follow these steps: a Open the front cover. Leave the machine turned on for 10 minutes to cool down. b Slowly take out the drum unit and toner cartridge assembly. CAUTION HOT SURFACE B After you have just used the machine, some internal parts of the machine will be extremely hot.
IMPORTANT d Pull down the tabs at the left and right hand sides to open the fuser cover (1). • We recommend that you place the drum unit and the toner cartridges on a clean, flat surface with a sheet of disposable paper or cloth underneath it in case you accidentally spill or scatter toner. • To prevent damage to the machine caused by static electricity, DO NOT touch the electrodes shown in the illustration. c 54 Open the back cover (face-up output tray).
Troubleshooting e Using both hands, gently pull the jammed paper out of the fuser unit. Paper is jammed inside the machine B If the LCD shows Jam Inside, follow these steps: f Close the fuser cover and the back cover (face-up output tray). g Put the drum unit and toner cartridge assembly back into the machine. h a Leave the machine turned on for 10 minutes to cool down. b Open the front cover.
c Slowly take out the drum unit and toner cartridge assembly. The jammed paper may be pulled out with the drum unit and toner cartridge assembly, or this may release the paper so you can pull it out of the inside of the machine. If you cannot remove the drum unit and toner cartridge assembly easily, do not use extra force. Instead, go to step g.
Troubleshooting g e Lift the scanner cover. Use both hands to carefully pull the jammed paper up and out of the output tray opening. Put the toner cartridge back into the drum unit until you hear it lock into place. If you put the cartridge in correctly, the green lock lever will lift automatically. B f If you were able to remove the drum unit and toner cartridge assembly and the jammed paper, you have cleared the paper jam.
i If you could not pull the jammed paper out of the output tray opening as shown in step g, take the paper tray completely out of the machine. j Pull the jammed paper out of the paper tray opening. k Put the paper tray back into the machine. If you have removed the jammed paper, you have cleared the paper jam. Note • If the LCD shows a Jam Inside message, check if there is a torn piece of paper inside the machine and drum unit by following the instructions in steps c to f.
Troubleshooting Paper is jammed in the Duplex Tray b Pull the duplex tray completely out of the machine. B If the LCD shows Jam Duplex, follow these steps: a Leave the machine turned on for 10 minutes to cool down. CAUTION HOT SURFACE After you have just used the machine, some internal parts of the machine will be extremely hot. When you open the front or back cover (back output tray) of the machine, DO NOT touch the shaded parts shown in the illustration. If you do this, you may burn yourself.
c 60 Pull the jammed paper out of the machine or the duplex tray. d Make sure that no paper remains under the machine. e Put the duplex tray back in the machine.
Troubleshooting If you are having difficulty with your machine B If you think there is a problem with your machine, check the chart below and follow the troubleshooting tips. Most problems can be easily resolved by yourself. If you need additional help, the Brother Solutions Center offers the latest FAQs and troubleshooting tips. Visit us at http://solutions.brother.com/. Check the chart below and follow the troubleshooting tips.
Printing difficulties (continued) Difficulties The machine prints unexpectedly or it prints garbage. Suggestions Press Job Cancel to cancel print jobs. Check the settings in your application to make sure it is set up to work with your machine. Pull out the paper tray and wait until the machine stops printing. Then turn off the machine’s power switch and disconnect from the power for several minutes. The machine prints the first couple of pages correctly, then some pages have text missing.
Troubleshooting Paper handling difficulties Difficulties Suggestions The machine does not feed paper. If there is no paper, load a new stack of paper into the paper tray. The LCD shows No Paper or a Paper Jam message. If there is paper in the paper tray, make sure it is straight. If the paper is curled, you should straighten it. Sometimes it is helpful to remove the paper, turn the stack over and put it back into the paper tray. Reduce the amount of paper in the paper tray, and then try again.
Improving the print quality If you have a print quality problem, make a copy first (put a document on the scanner glass and press Start). If the printout looks good, the problem is probably not the machine. Check the interface cable connections or try printing a different document. If the printout or test page printed from the machine has a quality problem, check the following steps first. And then, if you still have a print quality problem, check the chart below and follow the recommendations.
Troubleshooting Examples of poor print quality Recommendation Make sure that you use paper that meets our specifications. See Acceptable paper and other print media on page 15. ABCDEFGH abcdefghijk ABCD abcde 01234 Check the machine’s environment. Conditions such as high temperatures and high humidity can increase the amount of background shading. See the Safety and Legal booklet. Put in a new toner cartridge. See Replacing the toner cartridge on page 29. Put in a new drum unit.
Examples of poor print quality Recommendation Make sure that you use paper that meets our specifications. See Acceptable paper and other print media on page 15. Choose Thick Paper mode in the printer driver, choose Thick in the machine’s Paper Type menu setting or use thinner paper than you are currently using. See Paper Type on page 14 and Basic tab in the Software User's Guide. Check the machine’s environment. Conditions such as high humidity can cause hollow print.
Troubleshooting Examples of poor print quality Recommendation Check the machine's environment. Conditions such as high humidity and high temperatures may cause this print quality problem. If the problem is not solved after printing a few pages, put in a new drum unit. (See Replacing the drum unit on page 35.) White lines, bands or ribbing across the page 94 mm 94 mm Make ten copies of a blank, white sheet of paper. See How to copy on page 20.
Examples of poor print quality Recommendation Clean the corona wire inside the drum unit by sliding the green tab. See Cleaning the corona wire on page 42. ABCDEFGH abcdefghijk Make sure the green tab of the corona wire is at the home position (a). ABCD abcde 01234 The drum unit may be damaged. Put in a new drum unit. See Replacing the drum unit on page 35. Black lines down the page The fuser unit may be contaminated. Call your Brother dealer. The toner cartridge may be damaged.
Troubleshooting Examples of poor print quality Recommendation Check the paper type and quality. High temperatures and high humidity will cause paper to curl. See Acceptable paper and other print media on page 15. If you do not use the machine often, the paper may have been in the paper tray too long. Turn over the stack of paper in the paper tray. Also, fan the paper stack and then rotate the paper 180 in the paper tray.
Examples of poor print quality Recommendation Make sure that the two green envelope levers inside the back cover are pulled down when you print the envelope. Envelope creases Note When you have finished printing, open the back cover and reset the two green levers back to their original position.
Troubleshooting Examples of poor print quality ABCDEFGHIJKLMNOPQRSTUVWXYZ. 0123456789. abcdefghijklmnopqrstuvwxyz. ABCDEFGHIJKLMNOPQRSTUVWXYZ. 0123456789. abcdefghijklmnopqrstuvwxyz. ABCDEFGHIJKLMNOPQRSTUVWXYZ. 0123456789. abcdefghijklmnopqrstuvwxyz. ABCDEFGHIJKLMNOPQRSTUVWXYZ. 0123456789. abcdefghijklmnopqrstuvwxyz. Recommendation Open the back cover and make sure that the two green envelope levers on the left and right hand sides are in the up position.
Examples of poor print quality Recommendation Choose Reduce Paper Curl mode in the printer driver when you do not use our recommended paper. See Other Print Options (for Windows®) or Print Settings (For Macintosh) in the Software User's Guide. Turn the paper over in the paper tray, and print again. (Excluding letterhead paper) If the problems remains, switch the Anti-Curl Levers as follows: Curled a b Open the back cover.
Troubleshooting Examples of poor print quality Recommendation Lift up the output tray support flap (1).
Machine Information Checking the Serial Number B B You can see the machine’s Serial Number on the LCD. a b Press Menu. Press a or b to choose 3.Machine Info.. Press OK. c Press a or b to choose 1.Serial No.. Press OK. d Press Stop/Exit. Reset functions The following reset function is available: How to reset the machine a b Press Menu. c Press a or b to choose 5.Reset. Press OK. d e Press OK. Press a or b to choose 1.General Setup. Press OK.
C Menu and features On-screen programming C How to access the menu mode C C Your machine has been designed to be easy to use. The LCD provides on-screen programming using the menu keys. a b Press Menu. We have created step by step on-screen instructions to help you program your machine. Simply follow the steps as they guide you through the menu selections and programming options. c Press OK when the option you want appears on the LCD. The LCD will then show the next menu level.
Menu keys Access the menu. Go to the next menu level. Accept an option. Exit the menu by pressing repeatedly. Go back to the previous menu level. Scroll through the current menu level. Exit the menu.
Menu and features Menu table C The factory settings are shown in Bold with an asterisk. Choose & OK Choose & OK to accept Level 1 Level 2 Level 3 Level 4 Options Descriptions 1.General Setup 1.Paper 1.Paper Type — Thin Sets the type of paper in the paper tray. Plain* to exit Page 14 Thick Thicker Recycled Paper C Label 2.Paper Size — A4* Letter Sets the size of the paper in the paper tray. Executive A5 A5 L A6 B5 B6 16K(195x270mm) 16K(184x260mm) 16K(197x273mm) 2.Ecology 1 1.
Level 1 Level 2 Level 3 Level 4 Options Descriptions Page 1.General Setup 2.Ecology 2.Sleep Time — Range varies depending on models. Conserves power. See 1. (Continued) (Continued) 003Min* 3.LCD Contrast — — -nnnno+ -nnnon+ Adjusts the contrast of the LCD. -nnonn+* -nonnn+ -onnnn+ 4.Replace Toner — 5.Reset 1.All Settings — — (Choose your language) 0.Local Language 1 — Continue Stop* a Reset b Exit — See Advanced User's Guide.
Menu and features Level 1 Level 2 Level 3 Options Descriptions Page 2.Copy 1.Quality — Auto* You can choose the Copy resolution for your type of document. See 1. (Continued) Text Photo Graph 2.Brightness — -nnnno+ -nnnon+ Adjust the brightness for copies. -nnonn+* -nonnn+ -onnnn+ 3.Contrast — -nnnno+ -nnnon+ Adjusts the contrast for copies. -nnonn+* -nonnn+ -onnnn+ 1 See Advanced User's Guide. The factory settings are shown in Bold with an asterisk.
D Specifications D General D Note This chapter provides a summary of the machines’ specifications. For additional specifications visit http://www.brother-cn.net/ for details. Printer Type Laser Print Method Electrophotography by semiconductor laser beam scanning Memory Capacity (For DCP-7055) 16 MB (For DCP-7060D) 32 MB LCD (liquid crystal display) 10 characters 2 lines Power Source 220 - 240 V AC 50/60Hz Power Consumption 1 Peak: 1080 W Copying (Average): Approx.
Specifications Dimensions D 268 mm Weight 405 mm 398.5 mm With Consumables: (For DCP-7055) 9.8 kg (For DCP-7060D) 10.
Noise level Sound power 1 Operating (Copying): (For DCP-7055) LWAd = 6.60 B (A) (For DCP-7060D) LWAd=6.74 B (A) Standby: LWAd = 4.30 B (A) Sound pressure 1 LPAm = 53 dB (A) Standby: LPAm = 30 dB (A) Measured in accordance with ISO 9296. Temperature Humidity 82 Operating (Printing): Operating: 10 to 32.
Specifications Document Size Document Size (Single-sided) D Scanner Glass Width: Max. 215.9 mm Scanner Glass Length: Max.
Print media Paper Input D Paper Tray Paper Type: Plain paper, Thin paper or Recycled paper Paper Size: Letter, A4, B5 (ISO/JIS), A5, A5 (Long Edge), B6 (ISO), A6, Executive, 16K(195x270mm), 16K(184x260mm), 16K(197x273mm) Paper Weight: 60 to 105 g/m2 Maximum Paper Tray Capacity: Up to 250 sheets of 80 g/m2 Plain paper Manual Feed Slot (Manual) Paper Type: Envelopes, Labels 1, Thin paper, Thick paper, Thicker paper, Recycled paper, Bond paper or Plain paper Paper Size: Width: 76.
Specifications Copy D Color/Monochrome Monochrome Copy Width Max.
Scanner D Colour/Black Yes/Yes TWAIN Compliant Yes (Windows® 2000 Professional/Windows® XP/ Windows® XP Professional x64 Edition/Windows Vista®/ Windows® 7) Mac OS X 10.4.11, 10.5.x, 10.6.x 1 WIA Compliant Yes (Windows® XP/Windows Vista®/Windows® 7) Colour Depth 48 bit internal / 24 bit external colour Resolution Up to 19200 19200 dpi (interpolated) 2 Up to 600 2400 dpi (optical) 2 (from Scanner Glass) Scanning Width Max.
Specifications Printer Automatic 2-sided (Duplex) Print D Yes (For DCP-7060D) Resolution 600 dpi 600 dpi, HQ1200 (2400 600 dpi) quality Print Speed (Duplex) Up to 5 pages/minute (A4 size) 1 Print Speed (For DCP-7055) Up to 20 pages/minute (A4 size) 1 (For DCP-7060D) Up to 24 pages/minute (A4 size) 1 First Print Out Time (For DCP-7055) Less than 10.0 seconds (from the READY mode and standard tray) (For DCP-7060D) Less than 8.
Interfaces USB D We recommend to use a USB cable (Type A/B) that is no more than 2 metres long. 1 2 1 Your machine has a Hi-Speed USB 2.0 interface. The machine can also be connected to a computer that has a USB 1.1 interface. 2 Third-party USB ports are not supported.
Specifications Computer requirements D Minimum System Requirements and Supported PC Software Functions Computer Platform & Operating System Version Windows® Operating System 1 Processor Minimum Speed Minimum Recommended RAM RAM Windows® Intel® 2000 Pentium® II 4 or equivalent Professional 64 MB Windows® XP Home 2 4 Windows® XP Professional 2 4 128 MB 256 MB Windows® XP Professional x64 Edition 2 4 64-bit (Intel®64 or AMD64) supported CPU 256 MB 512 MB Windows Vista® 2 4 Intel® Pentium® 4 or
Minimum System Requirements and Supported PC Software Functions Computer Platform & Operating System Version Windows® Operating System 1 Processor Minimum Speed Minimum Recommended RAM RAM Windows Server® 2003 (print only via network) Intel® Pentium® III or equivalent 256 MB 512 MB Windows Server® 2003 x64 Edition (print only via network) 64-bit (Intel®64 or AMD64) supported CPU Windows Server® 2008 (print only via network) Intel® Pentium® 4 or equivalent 64-bit (Intel®64 or AMD64) supported CPU
Specifications Consumable items Toner Cartridge D Standard Toner Cartridge: TN-2015 (For DCP-7055) Approx. 700 pages (A4) 1 TN-2215 (For DCP-7060D) Approx. 1,200 pages (A4) 1 High-Yield Toner Cartridge: Approx. 2,600 pages (A4) 1 TN-2225 (For DCP-7060D) Drum Unit DR-2245 (For DCP-7055) DR-2250 (For DCP-7060D) 1 Approx. cartridge yield is declared in accordance with ISO/IEC 19752. 2 Drum yield is approximate, and may vary by type of use. Approx.
E Index C H Cleaning Cleaning:paper pick-up rollers ..............48 corona wire ...........................................42 drum unit ...............................................43 scanner .................................................41 Consumable items ...................................28 disposal .................................................33 replacing ...............................................49 Control panel overview ..............................4 Copy .........................
P T Paper ................................................ 15, 84 how to load .............................................7 in manual feed slot ...............................9 in paper tray .........................................7 jams ............................................... 50, 52 recommended .......................................16 size ................................................ 14, 15 tray capacity ..........................................15 type ....................................
These machines are approved for use in the country of purchase only. Local Brother companies or their dealers will only support machines purchased in their own countries.