
Software User's Guide
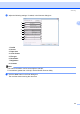
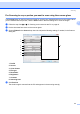


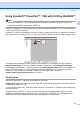

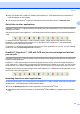
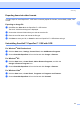
Table Of Contents
- SOFTWARE USER'S GUIDE MFC-7840W MFC-7440N MFC-7340 MFC-7345N DCP-7040 DCP-7030
- Table of Contents
- Section I Windows®
- 1 Printing
- Using the Brother printer driver
- Printing a document
- Duplex printing
- Simultaneous scanning, printing and faxing
- Printer operation keys
- Status Monitor
- Printer driver settings
- Features in the Windows® printer driver
- Features in the BR-Script (PostScript® 3 ™ language emulation) printer driver (MFC-7840W only)
- 2 Scanning
- Scanning a document using the TWAIN driver
- Scanning a document using the WIA driver (For Windows® XP/ Windows Vista®)
- Scanning a document using the WIA driver (For Windows Photo Gallery and Windows Fax and Scan users)
- Using the Scan key (For USB users)
- Using ScanSoft™ PaperPort™ 11SE with OCR by NUANCE™
- 3 ControlCenter3
- 4 Network Scanning (For models with built-in network)
- 5 Remote Setup (MFC models only)
- 6 Brother PC-FAX Software (MFC models only)
- 7 Firewall settings (For Network users)
- 1 Printing
- Section II Apple® Macintosh®
- 8 Printing and Faxing
- Printer operation key
- Status Monitor
- Features in the printer driver (For Macintosh®)
- Removing the Printer driver for Macintosh®
- Using the BR-Script3 Driver (MFC-7840W only) (Post Script® 3 ™ language emulation printer driver)
- Features in the BR-Script (PostScript® 3 ™ language emulation) printer driver (MFC-7840W only)
- Sending a fax (MFC models only)
- 9 Scanning
- 10 ControlCenter2
- 11 Network Scanning
- 12 Remote Setup
- 8 Printing and Faxing
- Index
- brother USA

Scanning
48
2
a Put the document face up in the ADF, or face down on the scanner glass.
b Press (Scan).
c Press a or b to choose Scan to Image.
Press OK.
d Press Start.
The machine starts the scanning process.
Note
If you want the scanned data in color, choose color in scan type on the Device Button tab of the
ControlCenter3 configuration. If you want the scanned data in black and white, choose black and white in
scan type on the Device Button tab of the ControlCenter3 configuration. (See SCAN on page 57.)
Scan to OCR 2
If your document is text, you can have it converted by ScanSoft™ PaperPort™ 11SE OCR to an editable text
file and then have the result displayed in your word processing application for viewing and editing. You can
change the (Scan) configuration. (See OCR (Word Processing program) on page 60.)
a Put the document face up in the ADF, or face down on the scanner glass.
b Press (Scan).
c Press a or b to choose Scan to OCR.
Press OK.
d Press Start.
The machine starts the scanning process.
Note
If you want the scanned data in color, choose color in scan type on the Device Button tab of the
ControlCenter3 configuration. If you want the scanned data in black and white, choose black and white in
scan type on the Device Button tab of the ControlCenter3 configuration. (See SCAN on page 57.)
Scan to File 2
You can scan a black and white or a color document into your PC and save it as a file in a folder of your
choice. The file type and specific folder are based on the settings you have chosen in the Scan to File screen
of ControlCenter3. (See File on page 62.)
a Put the document face up in the ADF, or face down on the scanner glass.
b Press (Scan).
c Press a or b to choose Scan to File.
Press OK.