
Software User's Guide
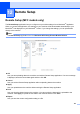


Table Of Contents
- SOFTWARE USER'S GUIDE MFC-7840W MFC-7440N MFC-7340 MFC-7345N DCP-7040 DCP-7030
- Table of Contents
- Section I Windows®
- 1 Printing
- Using the Brother printer driver
- Printing a document
- Duplex printing
- Simultaneous scanning, printing and faxing
- Printer operation keys
- Status Monitor
- Printer driver settings
- Features in the Windows® printer driver
- Features in the BR-Script (PostScript® 3 ™ language emulation) printer driver (MFC-7840W only)
- 2 Scanning
- Scanning a document using the TWAIN driver
- Scanning a document using the WIA driver (For Windows® XP/ Windows Vista®)
- Scanning a document using the WIA driver (For Windows Photo Gallery and Windows Fax and Scan users)
- Using the Scan key (For USB users)
- Using ScanSoft™ PaperPort™ 11SE with OCR by NUANCE™
- 3 ControlCenter3
- 4 Network Scanning (For models with built-in network)
- 5 Remote Setup (MFC models only)
- 6 Brother PC-FAX Software (MFC models only)
- 7 Firewall settings (For Network users)
- 1 Printing
- Section II Apple® Macintosh®
- 8 Printing and Faxing
- Printer operation key
- Status Monitor
- Features in the printer driver (For Macintosh®)
- Removing the Printer driver for Macintosh®
- Using the BR-Script3 Driver (MFC-7840W only) (Post Script® 3 ™ language emulation printer driver)
- Features in the BR-Script (PostScript® 3 ™ language emulation) printer driver (MFC-7840W only)
- Sending a fax (MFC models only)
- 9 Scanning
- 10 ControlCenter2
- 11 Network Scanning
- 12 Remote Setup
- 8 Printing and Faxing
- Index
- brother USA

Network Scanning
187
11
j Do one of the following:
If you want to start scanning, press Start and go to Step m.
If you want to change the file name, go to Step k.
k Press a or b to choose a file name you want to use and press OK. Press Start and go to Step m.
Note
If you want to change the file name manually, go to step l.
l Press a or b to choose <Manual>. Press OK.
Enter the file name you want to use (up to 15 characters) and press OK.
Press Start.
m The LCD shows Connecting. When the connection to the FTP server is successful the machine starts
the scanning process.
Scan to FTP Manual Method 11
a Put the document face up in the ADF, or face down on the scanner glass.
b Press (Scan).
c Press a or b to choose Scan to FTP.
Press OK.
d Press a or b to choose <Manual>. Press OK.
Note
If there is no FTP Profile configured, skip Step d and go to Step e.
e Use the dial pad to enter the FTP host address (for example ftp.example.com), (up to 60 characters) or
the IP address (for example 192.23.56.189).
Press OK.
f Use the dial pad to enter the destination folder (for example /brother/abc/, up to 60 characters).
Press OK.
g Press a or b to choose Enter Username or Change Setting. Press OK.
If you choose Enter Username, go to Step k.
If you choose Change Setting, go to Step h.
h Choose one of the options below.
Press a or b to choose Color 150 dpi, Color 300 dpi, Color 600 dpi, Gray 300 dpi,
Gray 200 dpi or Gray 100 dpi. Press OK and go to i.
Press a or b to choose B&W 200 dpi or B&W 200x100 dpi. Press OK and go to j.
i Press a or b to choose PDF or JPEG. Press OK and go to Step k.