
Software User's Guide
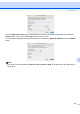
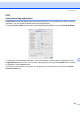
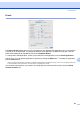
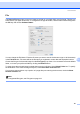


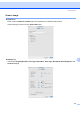
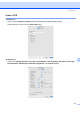
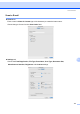

Table Of Contents
- SOFTWARE USER'S GUIDE MFC-7840W MFC-7440N MFC-7340 MFC-7345N DCP-7040 DCP-7030
- Table of Contents
- Section I Windows®
- 1 Printing
- Using the Brother printer driver
- Printing a document
- Duplex printing
- Simultaneous scanning, printing and faxing
- Printer operation keys
- Status Monitor
- Printer driver settings
- Features in the Windows® printer driver
- Features in the BR-Script (PostScript® 3 ™ language emulation) printer driver (MFC-7840W only)
- 2 Scanning
- Scanning a document using the TWAIN driver
- Scanning a document using the WIA driver (For Windows® XP/ Windows Vista®)
- Scanning a document using the WIA driver (For Windows Photo Gallery and Windows Fax and Scan users)
- Using the Scan key (For USB users)
- Using ScanSoft™ PaperPort™ 11SE with OCR by NUANCE™
- 3 ControlCenter3
- 4 Network Scanning (For models with built-in network)
- 5 Remote Setup (MFC models only)
- 6 Brother PC-FAX Software (MFC models only)
- 7 Firewall settings (For Network users)
- 1 Printing
- Section II Apple® Macintosh®
- 8 Printing and Faxing
- Printer operation key
- Status Monitor
- Features in the printer driver (For Macintosh®)
- Removing the Printer driver for Macintosh®
- Using the BR-Script3 Driver (MFC-7840W only) (Post Script® 3 ™ language emulation printer driver)
- Features in the BR-Script (PostScript® 3 ™ language emulation) printer driver (MFC-7840W only)
- Sending a fax (MFC models only)
- 9 Scanning
- 10 ControlCenter2
- 11 Network Scanning
- 12 Remote Setup
- 8 Printing and Faxing
- Index
- brother USA

ControlCenter2
167
10
File 10
The Scan to File button lets you scan an image to a folder on your hard disk in any file format. This lets you
easily archive your paper documents. To configure the file type and folder, click the button while holding down
the Ctrl key and choose Software Button.
You can change the File Name. Enter the file name you want to use for the document (up to 100 characters)
in the File Name box. File name will be the file name you registered, current date and sequential number.
Choose the file type for the saved image from the File Type pop-up menu. You can save the file to the default
folder, or choose your preferred folder by clicking the Browse button.
To show where the scanned image is saved when scanning is finished, check Show Folder box. To specify
the destination of the scanned image everytime, check Show Save As window box.
If you want to scan and then crop a portion of a page after pre-scanning the document, check the Show
Scanner Interface box.
Note
For supported file types, see File types on page 163.