
User Manual


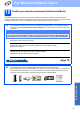


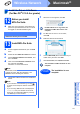

Table Of Contents
- Quick Setup Guide DCP-585CW
- Start Here
- For USB Interface Users (For Windows® 2000 Professional/XP/XP Professional x64 Edition/ Windows Vista®)
- For USB Interface Users (For Mac OS® X 10.2.4 or greater)
- For Wired Network Interface Users (For Windows® 2000 Professional/XP/XP Professional x64 Edition/ Windows Vista®)
- For Wired Network Interface Users (For Mac OS® X 10.2.4 or greater)
- For Wireless Network Interface Users
- 9 Before you begin
- 10 Confirm your network environment (Infrastructure Mode)
- Connecting the Brother machine to the wireless network
- Install the Drivers & Software (For Windows® 2000 Professional/XP/XP Professional x64 Edition/ Windows Vista®)
- Install the Drivers & Software (For Mac OS® X 10.2.4 or greater)
- Install Optional Applications Windows®
- For Wireless Network Users
- Safety and Legal
- brother EEU-ENG

11
Windows
®
Wired Network
Windows
®
Macintosh
®
Wired Network
12
Install MFL-Pro Suite
a Put the supplied CD-ROM into your CD-ROM
drive. Follow the on-screen instructions.
b The CD-ROM main menu will appear. Click
Install MFL-Pro Suite.
c Follow the on-screen instructions.
d Choose Wired Network Connection, and
then click Next.
e For Windows
®
XP SP2/Windows Vista
®
users,
when Firewall detected screen appears,
choose Change the Firewall port settings to
enable network connection and continue
with the installation. (Recommended) and
click Next.
If you are using a firewall other than Windows
®
Firewall see the instructions provided with your
firewall software for information on how to add
the following network ports.
For network scanning, add UDP port 54925.
If you still have trouble with your network
connection, add UDP port 137.
f The installation of the Brother drivers will
automatically start. The installation screens
appear one after another.
g When the On-Line Registration screen is
displayed, make your selection and follow the
on-screen instructions.
13
Finish and restart
a Click Finish to restart your computer. After
restarting the computer, you must be logged on
with Administrator rights.
Now go to
Proceed to Install Optional Applications on
page 20.
Note
• If the machine is configured for your network,
choose the machine from the list, and then click
Next.
If your machine shows APIPA in the IP
Address field, click Configure IP Address
and enter an IP address for your machine that
is suitable for your network.
• If the machine is not yet configured for use on
your network, the screen prompts you to click
OK, and then the Configure IP Address
window will appear. Enter an IP address for
your machine that is suitable for your network
by following the on-screen instructions.
Finish
The installation is now
complete.