
User Manual

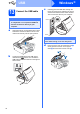


Table Of Contents
- Quick Setup Guide DCP-585CW
- Start Here
- 1 Unpack the machine and check the components
- 2 Load plain A4 paper
- 3 Connect the power cord
- 4 Choose your language (not available for Hong Kong users)
- 5 Install the ink cartridges
- 6 Check the print quality
- 7 Choose your language (For Hong Kong users only)
- 8 Set the LCD contrast (If needed)
- 9 Set the date and time
- 10 Choose your connection type
- For USB Interface Users (For Windows® 2000 Professional/XP/XP Professional x64 Edition/ Windows Vista®)
- For USB Interface Users (For Mac OS® X 10.2.4 or greater)
- For Wired Network Interface Users (For Windows® 2000 Professional/XP/XP Professional x64 Edition/ Windows Vista®)
- For Wired Network Interface Users (For Mac OS® X 10.2.4 or greater)
- For Wireless Network Interface Users
- 11 Before you begin
- 12 Confirm your network environment (Infrastructure Mode)
- Connecting the Brother machine to the wireless network
- Install the Drivers & Software (For Windows® 2000 Professional/XP/XP Professional x64 Edition/ Windows Vista®)
- Install the Drivers & Software (For Mac OS® X 10.2.4 or greater)
- Install Optional Applications Windows®
- For Network Users
- Consumables
- brother ARL/ASA/NZ
- Start Here

13
Windows
®
USB
Windows
®
Macintosh
®
USB
14
Connect the power cord
a Connect the power cord.
The installation will continue automatically.
The installation screens appear one after
another.
b When the On-Line Registration screen is
displayed, make your selection and follow the
on-screen instructions.
15
Finish and restart
a Click Finish to restart your computer.
After restarting the computer, you must be
logged on with Administrator rights.
Now go to
Proceed to Install Optional Applications on
page 39.
Important
DO NOT cancel any of the screens during the
installation. It may take a few seconds for all
screens to appear.
Note
If an error message appears during the software
installation, run the Installation Diagnostics
located in Start/All Programs/Brother/
DCP-XXXX (where DCP-XXXX is your model
name).
Finish
The installation is now
complete.