USER’S GUIDE RJ-4030 RJ-4040 Before using this printer, be sure to read this User's Guide. We suggest that you keep this manual in a handy place for future reference.
Introduction Thank you for purchasing the Brother RuggedJet RJ-4030/RJ-4040 mobile printer. The RJ-4030/RJ-4040 (hereafter referred to as “the printer”) is a mobile thermal printer. Be sure to read the User’s Guide, Product Safety Guide, Quick Reference Guide, Software User’s Guide and Network User’s Guide (RJ-4040 only) before using the printer. We suggest that you keep these documents in a handy place for future reference.
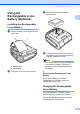
Table of Contents 1 Setting Up the Printer 1 General Description ...............................................................................................1 Connecting the Printer to External Power..............................................................2 Connecting to an AC Power Outlet (Optional).................................................2 Connecting to a DC Power Outlet (Optional)...................................................2 Using the Rechargeable Li-ion Battery (Optional) .....
Network Setting Tool (RJ-4040 only) 37 Overview ..............................................................................................................37 Using the Network Setting Tool ...........................................................................37 Starting the Network Setting Tool..................................................................37 Changing the Communications Settings .......................................................
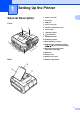
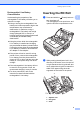
1 Setting Up the Printer General Description 1 AC/DC connector 2 Serial port 3 USB port 4 Cover open lever 5 RD Roll compartment cover 6 Paper outlet 1 1 1 Front 1 6 5 7 (Power) button 8 (Feed)button 9 POWER indicator 10 STATUS indicator 7 11 BATT (Battery) indicator 8 9 10 11 12 12 13 1 2 3 4 (Bluetooth) indicator (RJ-4030)/ (Wi-Fi) indicator (RJ-4040) 13 Bluetooth button (RJ-4030)/ Wi-Fi button (RJ-4040) 14 Belt hook 14 15 Battery cover 16 Battery cover latch Ba
Chapter 1 Connecting the Printer to External Power Connecting to an AC Power Outlet (Optional) Connect the printer to a nearby AC power outlet to power the printer or charge the rechargeable battery using AC power. a b Connect the AC adapter to the printer. c Connect the AC power cord to a nearby AC power outlet (100 - 240 VAC, 50 - 60 Hz). Connect the AC power cord to the AC adapter.
Setting Up the Printer Using the Rechargeable Li-ion Battery (Optional) Installing the Rechargeable Li-ion Battery a c Insert the battery into the battery compartment. 1 1 1 Open the battery cover by pressing the cover latch. 2 1 d Confirm that the hooks on the edge of the battery cover are inserted correctly, and then reattach the cover. Note b 1 Battery cover 2 Cover latch Swing the cover open and remove it. The voltage supplied by the rechargeable Li-ion battery fluctuates.
Chapter 1 Note • Before using the rechargeable Li-ion battery, use the following procedure to charge it. • Up to 360 minutes is needed to fully charge a rechargeable Li-ion battery. • You can print about 2,000 labels (when connected by USB, and using a new, fully charged battery.) Tested using Brother’s print test data (7% coverage 46 inches) at 73.4F (23C). a Make sure that the printer is turned off. If the printer is turned on, press and hold the (Power) button to turn it off.
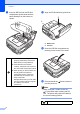
Setting Up the Printer Rechargeable Li-ion Battery Characteristics Understanding the properties of the rechargeable Li-ion battery will allow you to optimize its usage. Inserting the RD Roll 1 1 a Press and hold the (Power) button to turn the printer off. Turn and hold the cover open lever, and open the RD Roll compartment cover. b While pushing the adjuster lock in the direction of the arrow, move it to the left or right.
Chapter 1 c Insert an RD Roll into the RD Roll compartment upside down with the labels feeding from the bottom as shown. d Align the RD Roll with the guide lines. 5 4 4 Guide lines 5 Tear bar e Close the RD Roll compartment by pressing on the center of the cover. f Press and hold the turn the printer on. Make sure that the roll guide is properly positioned to prevent the RD Roll from moving sideways.
Setting Up the Printer Cutting Roll Paper Roll paper can be cut using the printer's tear bar. Pull one edge of the ejected paper up and toward the other edge diagonally. The tear bar is sharp. To avoid injury, do not touch the tear bar. 1 Attaching the Belt Clip 1 When using the printer outside the office, you can attach the included belt clip to the printer and secure the belt clip to your belt. a Secure the Phillips-head screws to the rear of the printer as shown.
Chapter 1 Make sure that the screw is tightened securely. There is a risk of injury if the screw is loose and the printer falls. Make sure that the belt clip is attached securely to the printer. There is a risk of injury if the belt clip is not attached securely and the printer falls. Make sure that the belt clip is attached securely to the wearer's belt. There is a risk of injury if the belt clip is not attached securely and the printer falls.
Setting Up the Printer Note e • Installation items: When instructed, connect the printer to the computer to finish the printer driver installation. 1 Standard Installation Installs P-touch Editor 5.0, printer driver, P-touch Update Software, Printer Setting Tool. 2 User’s Guide Displays the User’s Guide, Software User’s Guide. 3 Custom Installation Individually installs P-touch Editor 5.0, printer driver, P-touch Update Software, Printer Setting Tool.
Chapter 1 Installing the Printer Driver and the Software for RJ-4040 1 The RJ-4040 printer driver and software can be installed using the following methods: If you are going to connect the printer to your network, we recommend that you contact your system administrator prior to installation. You must know your wireless network settings before you proceed with this installation.
Setting Up the Printer Infrastructure Mode 1 It is recommended that you use a computer wirelessly connected to your network for this method. 5 You need to temporarily use a USB cable (optional) during configuration. 1 4 If you are using Windows® XP or using a network cable to connect your computer with your wireless access point/router, you need to know the SSID and Network Key of your WLAN access point/router before you proceed.
Chapter 1 3 If you do not know the security information, please consult the router manufacturer, your system administrator, or internet provider. One push configuration using WPS Windows® 7 is used in the following example. a 1 If your WLAN access point/router supports automatic wireless (one-push) setup (WPS), you can also choose this method. Insert the installer CD-ROM into your CD-ROM drive. If the model name screen appears, choose your printer.
Setting Up the Printer 5 Brother Support Displays the link to Brother Developer Center, Brother Solutions Center. • You can use the Printer Setting Tool to configure various printer settings when the printer is connected to the computer via USB. Note that the printer driver must be installed on the computer in order to configure the printer.
Chapter 1 b Choose [Yes, I have a USB cable to use for installation], and then click [Next]. d Do one of the following: If the Installation confirmation screen appears, check the box and click [Next], then go to e. Otherwise, go to f. e Check [Yes] if you want to connect with the listed SSID. Click [Next] and go to h. f The wizard will search for wireless networks available from your printer. Choose the SSID that you noted in MEMO uu page 11 and then click [Next].
Setting Up the Printer • If your access point is set to not broadcast the SSID, you can enter the SSID manually by clicking the [Advanced] button. Follow the on-screen instructions for entering the [Name (SSID)], and then click [Next]. g Enter the [Network Key] you noted in MEMO uu page 11 and then click [Next]. • If you want to manually assign an IP address to the printer, click [Change IP Address] and enter an IP address that is compatible with your network.
Chapter 1 If you choose [Cancel], installation continues. Note For Windows Vista® and Windows® 7 users, when the [Windows Security] screen appears, click the check box and click [Install] to complete the installation correctly. c One Push Configuration Using WPS and Installation The installation is now complete. Depending on your security settings, a Windows Security or antivirus software window may appear when using the printer or its software. Please allow or permit the installer to continue.
Setting Up the Printer b c d Place your printer within range of your WPS access point/router. The range may differ depending on your environment. Refer to the instructions provided with your access point/router. Turn on your printer and press and hold the Wi-Fi button until the (Wi-Fi) indicator starts blinking in blue. Press the WPS button on your WLAN access point/router. When the configuration is completed, the (Wi-Fi) indicator on your printer lights in blue. Wireless setup is now complete.
Chapter 1 i When the following screen appears, choose [Wireless Network Connection] and click [Next]. j When the [Firewall/AntiVirus detected] screen appears, choose [Change the Firewall port settings to enable network connection and continue with the installation. (Recommended)] and click [Next]. If you are not using the Windows® Firewall allow access using UDP ports 137 and 161. k Choose the printer from the list, and then click [Next].
Setting Up the Printer Uninstalling the Printer Driver • When configuring multiple printers for wireless network connection: After using a USB connection to install the drivers and the Printer Setting Tool on the computer, you can use the Network Setting Tool to easily configure network settings for multiple printers. Read "RJ-XXXX" in the following steps as your model name.
Chapter 1 g If the [User Account Control] dialog displayed, enter the password and click [OK]. The [Print Server Properties] window displayed. e Click the [Drivers] tab and choose [Brother RJ-XXXXX]. Then, click [Remove...]. f Choose [Remove driver and driver package] and click [OK]. Follow the on-screen instructions. g Close the [Print Server Properties] window. The printer driver has been uninstalled. Windows® 7 1 a Press and hold the turn it off. b c Start button - [Devices and Printers].
Setting Up the Printer Connecting the Computer and Printer Bluetooth Connection (RJ-4030 Only) Note The printer can be connected to your computer via USB cable, Bluetooth (RJ-4030 only), Wi-Fi (RJ-4040 only) and the serial cable. Follow the recommendations of the manufacturer of your Bluetooth-equipped computer or Bluetooth adapter and install any necessary hardware and software. Install the printer driver before connecting the printer to the computer.
Chapter 1 Right-click the printer icon, and then click [Printer Properties]. f g Note • You can change the printer's network settings using the Network Setting Tool (see Network Setting Tool (RJ-4040 only) uu page 37). Click the [Ports] tab. Select the port name confirmed in step c (“COM” plus a number). h Click [OK] to close the properties dialog box. i Close the printers window to finish. • The Network Setting Tool also allows you to easily apply the network setting changes to multiple printers.
2 Using the Printer 2 Operation Panel 2 2 The operation panel consists of the following buttons and indicators.
Chapter 2 Button Functions (Power) button function 2 Operation Turn the printer on While the printer is turned off, press and hold the until the POWER indicator turns on. Turn the printer off While the printer is turned on, press and hold the (Power) button until the POWER indicator turns off. (If the [Auto Power Off] feature is enabled in the RJ Utility, the printer will turn itself off automatically after the selected period of inactivity.
Using the Printer (Wi-Fi) button function (RJ-4040 only) Operation Use WPS to set wireless network settings easily Wi-Fi settings can be configured by simply pressing and holding this button, making it easy to install the printer driver or other software (see Installing the Printer Driver and the Software for RJ-4040 uu page 10). Use Wi-Fi to communicate when printing When the printer and computer are not connected via Wi-Fi, press this button to connect them and send data to the printer.
Chapter 2 Printing Solutions 2 Printing 2 Your printer can be used with several versions of the Windows® operating systems. For typical printing, use the following procedure. In most situations, the printer requires driver software to communicate with your computer. These drivers can be installed using the setup CD-ROM, and the latest versions can be downloaded from the Brother Solutions Center website (http://solutions.brother.com).
Using the Printer h Printer Driver Options Turn the printer off. The POWER indicator turns off. You can configure various settings in the printer driver screen, such as paper size, number of copies, print quality, etc. Note To print a JPEG image without using the printer driver, see JPEG Printing uu page 45. Making Prints Lighter or Darker 2 You can also use the Custom Label Tool and the RJ Utility to configure advanced settings (see Setting Paper Size uu page 28 and RJ Utility uu page 31).
Chapter 2 Setting Paper Size 2 In order to use labels with a size not listed in the [Paper Size] list of the printer driver, the label format must be added to the printer driver. a Connect the printer to be configured to the computer via USB. b Click [Start] - [All Programs] [Brother] - [Label & Mobile Printer] [Printer Setting Tool]. The [Printer Setting Tool] screen is displayed.
Using the Printer 6 Export Paper Size List... Exports the settings for the paper formats in the [Currently Registered Paper Sizes] list. The exported list can then be distributed to other computers. For details, see Distributing Paper Formats uu page 30. 7 Register Paper Size With Printer Registers the settings for the selected paper format in the printer. 8 Save Paper Size Commands Uses the settings for the paper as an added command and exports it as a file. The file extension is “.bin”.
Chapter 2 Distributing Paper Formats 2 The paper formats exported from the [Currently Registered Paper Sizes] list can be distributed to other computers. Distributing only paper formats At the sender’s computer, specify the paper format settings, and then click [Export Paper Size List...]. (See Setting Paper Size uu page 28.) The following files are created. RJ-4030: BSR403ed.txt, BSR403ed.ptd, pdt3137.bin RJ-4040: BSR404ed.txt, BSR404ed.ptd, pdt3237.bin b Save BSR403ed.txt or BSR404ed.
3 RJ Utility Overview 3 d 3 The RJ Utility is a computer program that allows you to change the printer's default settings. How to Use the RJ Utility Normally when using a computer program to print a document, print settings are specified in the printer driver's dialog box and then the data is sent to the printer. This utility can be used to adjust settings that are more advanced than the printer driver’s settings. Use the RJ Utility to configure the printer only when the printer is idle.
Chapter 3 Parameters 3 Main Window 3 14 1 2 3 4 5 6 7 8 15 16 9 10 11 17 18 12 13 20 19 1 Printer Displays the printer selected in the Printer Setting Tool. 2 Command Mode Sets the printer’s command format. Available settings: [Raster], [ESC/P], [P-touch Template] 3 Print Density Adjusts the printing density on a scale of -5 to +5. 4 Print Priority Determines the printer's print quality.
RJ Utility Available settings: [All], [Usage Log], [Printer Settings], [Printer Transfer Data] (See Printing the Printer Set-up Information uu page 51.) 8 9 Align Paper Leading Edge when the Cover is Closed Determines whether or not paper is automatically fed when the cover is closed. Available settings: [Do not Feed], [Feed] Power on when Plugged in Determines whether or not the printer turns on automatically when the power cord is connected.
Chapter 3 Bluetooth Settings (RJ-4030 only) 3 1 2 3 4 1 Bluetooth PIN code Allows you to select whether a Bluetooth PIN code (passkey) is required, change the printer's Bluetooth PIN code, and select whether Bluetooth communication is encrypted. If [Enable] is selected in the [Bluetooth PIN code] pull-down menu, the PIN code specified here must also be stored on the computer in order to communicate with the printer when using Bluetooth. You can change the PIN code if necessary.
RJ Utility Maintenance 3 1 2 1 3 Print Printer Information Click to print a report containing the following types of information. Program version Printer usage history Missing dot test pattern RJ Utility setting information List of transferred data Network setting information Wi-Fi setting information See the print sample on the next page. Note You can also print this report using the (Feed) button (see Printing the Printer Set-up Information uu page 51).
Chapter 3 Printer Information printing sample *Labels are for illustrative purposes only.
4 Network Setting Tool (RJ-4040 only) Overview 4 The Network Setting Tool is a computer program used for changing network settings via USB. Note The Network Setting Tool is installed with other software such as the printer driver.
Chapter 4 Main Window 4 1 2 3 4 5 7 8 6 1 Menu Bar Select the commands contained in each menu from the list. 2 Printer Selects the printer whose settings will be changed. If only one printer is connected, only that printer is displayed and it is not necessary to select a printer. 3 Node Name Displays the node name. Node names can be changed. 4 Applicable Settings Displays setting items. Select the item that you want to change the settings for.
Network Setting Tool (RJ-4040 only) Changing the Communications Settings b 4 Note a Make sure that the computer with the Network Setting Tool installed is connected via USB to the printer that you want to change the settings for. b Start the Network Setting Tool. Confirm that the printer that you want to change the settings for is displayed in [Printer]. If another printer is displayed, select the desired printer from the [Printer] combo box.
Chapter 4 Menu Bar 4 1 2 3 4 5 6 7 8 9 1 2 Apply Setting to the Printer Applies the settings to the printer; functions the same way as the [Apply] button on the main window. See Apply uu page 38. Save Command Settings Saves network settings in PJL command format. The file extension is “.bin”. By sending these commands to printers via USB, network settings for printers can be configured in the same way as when settings are made using the Network Setting Tool (see Mass Storage uu page 44).
Network Setting Tool (RJ-4040 only) 3 Import Import from the current computer wireless settings Imports the settings from the computer. Exported files are not encrypted. Because exported files contain authentication keys and passwords, take necessary measures to protect exported files such as by saving exported files in locations that other users cannot access. Note • Only Personal Security Authentication settings (open system, public key authentication, and WPA/WPA2-PSK) can be imported.
Chapter 4 Connected Printer’s Status 4 TCP/IP (Wireless) 4 1 2 1 1 3 4 Current Network Status Displays network status on the right side of the screen in the settings display/change area. Click the [Refresh] button to update the view. Network Settings Boot Method Select either: [STATIC], [AUTO], [BOOTP], [DHCP], [RARP]. 2 IP Address/Subnet Mask/Gateway Set the various values. You can only enter settings when the IP address setting is set to [STATIC].
Network Setting Tool (RJ-4040 only) Wireless Settings 4 Communication Mode and Authentication/Encryption Methods 4 When the Communication Mode is Ad hoc 1 2 3 4 5 6 7 8 1 Communication Mode Select either [Ad hoc] or [Infrastructure] 2 SSID (Network Name) Click the [Search...] button to display the SSID selections on a separate screen. 3 4 5 Channel Selections can be made from the displayed selections.
5 Other Functions Mass Storage Description c 5 5 The mass storage feature allows you to execute commands and perform JPEG printing by sending data from a computer or other device to the printer via USB. Files that have been copied to the printer’s mass storage area are processed when you press the Wi-Fi button/Bluetooth button. 5 Connect the computer or device to the printer via USB. The printer’s mass storage area is displayed on the computer or device’s screen.
Other Functions When the printer is turned off, mass storage mode is deactivated and any files in the mass storage area are deleted. This feature supports “.bin”, “.blf”, and “.jpg” files. Do not use other file formats with this feature. Do not create folders in the mass storage area. If a folder is created, files in the folder will not be executed. The capacity of the mass storage area is 2.45 MB. Use of files larger than 2 MB cannot be guaranteed.
6 Maintaining the Printer Roller Maintenance Maintenance of the printer may be carried out as required. However, some environments require that maintenance must be done more frequently (e.g. in dusty conditions). Print Head Maintenance Use a piece of cellophane tape to remove dirt from the roller. 2 6 Use a cotton swab and wipe the head.
Maintaining the Printer Paper Outlet Maintenance 6 If glue accumulates on the paper outlet and the printer becomes jammed, disconnect the printer from the external power outlet and clean the paper outlet with a cloth dipped in isopropyl alcohol.
7 Reference 7 Indicators 7 The indicators light and blink to indicate the printer’s status. The following symbols are used in this section to explain the meaning of the different indicator colors and patterns.
Reference POWER STATUS BATT (BATTERY) (Bluetooth) (Wi-Fi) (Once every 3 seconds) Description Wireless on, not connected* Wireless or Bluetooth on, connected (Once every second) Now setting WPS* Now resetting Formatting complete (When [Print Data after being Printed] is set to [Erase]) Now cooling 7 MCR read mode MCR read success MCR read error (Once every 4 seconds) (Twice every 4 seconds) (Once every second) Rechargeable battery power: half Rechargeable battery power: low Battery must be
Chapter 7 Indicator Warnings 7 Problem Solution The POWER indicator does not light The printer is receiving no power. If you are using AC or DC power, make sure that the AC adapter or Car adapter is properly connected (see Connecting the Printer to External Power uu page 2) and make sure that the AC or DC power outlet is turned on. If you are using DC power, check the fuse. Head or motor is cooling down The thermal head or motor is too hot.
Reference Printing the Printer Set-up Information 7 You can use the (Feed) button to print a report that lists the following printer settings: Program version Printer usage history Missing dot test pattern RJ Utility setting information List of transferred data Network setting information Wi-Fi setting information Note • You can use the RJ Utility to set in advance which items will be printed (see Printer Information Output Settings uu page 32).
8 Troubleshooting Overview 8 8 If you have any problems with the printer, first check to make sure that you have performed the following tasks correctly. Install the battery or connect the printer to an AC or DC power outlet (see Connecting the Printer to External Power uu page 2). Install and select the proper printer driver (see Installing the Printer Driver and the Software for RJ-4030 uu page 8 or Installing the Printer Driver and the Software for RJ-4040 uu page 10).
Troubleshooting Problem A data transmission error appears on your computer. Solution Is the correct port selected? Check that the correct port is selected. Is the printer in cooling mode (the POWER indicator is flashing in orange)? Wait until the indicator stops flashing and then try printing again. Is someone printing via the network? If you try to print while other users are printing large amounts of data, the printer is unable to accept your print job until the ongoing printing is finished.
Chapter 8 Problem Printed barcodes cannot be read. Solution Align the label with the print head as shown below. 1 3 2 1 Label exit slot 2 Print head 3 Recommended print direction Some types of scanners are not able to read the barcodes. Try using another scanner. We recommend printing the barcodes with [Quality] options set to [Give priority to quality].
Troubleshooting Problem Solution I want to reset the printer/delete the data transferred from the computer. To reset the printer, perform the following procedure; 1 Press and hold the (Power) button to turn the printer off. 2 Press and hold the (Feed) button and the (Power) button until the POWER, STATUS and BATTERY indicators start blinking in orange. 3 While pressing the button 3 times. 4 Release the (Power) button and the the same time.
9 Technical Information Product Specifications Model Name RJ-4030 9 RJ-4040 Printing Printing Technology Direct Thermal Print Resolution 203 dpi Print Speed Maximum 5 ips (127 mm/sec) Print Width Maximum 4.09" (104 mm) Size Weight Printer: Approximately 1.35 lb./610 g Printer with battery: Approximately 1.87 lb./850 g Dimentions Approximately 6.38" (W) x 6.93" (H) x 3.03" (D) / 162 mm (W) x 176 mm (H) x 77 mm (D) Interface USB Yes USB Ver. 2.
Technical Information Model Name RJ-4030 RJ-4040 Media specification Media type Receipt, Die cut label Media Width 2" to 4.64" (51 mm to 118 mm) Gap between labels 0.12" (3 mm) or more Thickness Receipt: 0.002" to 0.0035" (0.051 mm to 0.090 mm) Label: 0.003" to 0.007" (0.080 mm to 0.170 mm) Diameter (Max) 2.28" (58 mm) Core Diameter (Min) Receipt: 0.5" (12.7 mm) Label: 1" (25.