
user manual


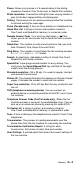


Table Of Contents
- USER’S GUIDE
- Brother numbers
- Ordering accessories and supplies
- Safety precautions
- Choosing a location
- Quick Reference Guide
- Table of Contents
- 1 Introduction
- 2 Paper
- 3 On-Screen Programming
- 4 Initial Setup
- Getting started
- Setting the Date and Time
- Turning on Automatic Daylight Savings Time
- Setting the Station ID
- Setting the Beeper Volume
- Setting the Speaker Volume
- Choosing the Handset Volume (For Volume Amplify)
- Setting Volume Amplify
- Setting the Ring Volume
- Setting Tone and Pulse dialing mode (Canada Only)
- Setting up your area code (USA only)
- Getting started
- 5 Setup Receive
- 6 Setup Send
- 7 Quick-Dial numbers and dialing options
- 8 Remote Fax Options
- 9 Printing reports
- 10 Making copies
- 11 Important information
- 12 Troubleshooting and routine maintenance
- Glossary
- Specifications
- Index
- Remote Retrieval Access Card

Troubleshooting and routine maintenance
12 - 10
3
Take the used ribbon out of the cartridge:
1
Snap out the upper and lower right white spools.
2
Slide the roll off the blue gear and lower left white spool. (Do
not remove the blue gear and lower left white spool)
.
4
Slide the white elastic off the new refill rolls and set them down
with the full roll in the lower position. (The ribbon’s shiny side
is facing down.)
5
Remove the white spools from the ends of the used cardboard
cores. Then insert them into the same positions in the new
cores.
6
Install the new ribbon in the cartridge:
1 Slip the lower left cardboard core onto the white spool of
the cartridge and then slip the upper blue core onto the
blue gear of the cartridge.
2 Insert the upper and lower right white spools into the
holders.
Insert the teeth of the white spool into the cutouts of the
cardboard core.
Blue
Gear
Used Ribbon
Upper White Spool
Cartridge
Lower White
Spool
White
Spool
(Do not
remove.)
White Spools
White Spools
Blue
Gear
Shiny side is face down.
White
Spool