
user manual


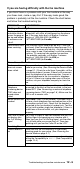


Table Of Contents
- USER’S GUIDE
- Brother numbers
- Ordering accessories and supplies
- Safety precautions
- Choosing a location
- Quick Reference Guide
- Table of Contents
- 1 Introduction
- 2 Paper
- 3 On-Screen Programming
- 4 Initial Setup
- Getting started
- Setting the Date and Time
- Turning on Automatic Daylight Savings Time
- Setting the Station ID
- Setting the Beeper Volume
- Setting the Speaker Volume
- Choosing the Handset Volume (For Volume Amplify)
- Setting Volume Amplify
- Setting the Ring Volume
- Setting Tone and Pulse dialing mode (Canada Only)
- Setting up your area code (USA only)
- Getting started
- 5 Setup Receive
- 6 Setup Send
- 7 Quick-Dial numbers and dialing options
- 8 Remote Fax Options
- 9 Printing reports
- 10 Making copies
- 11 Important information
- 12 Troubleshooting and routine maintenance
- Glossary
- Specifications
- Index
- Remote Retrieval Access Card

12 - 9
Troubleshooting and routine maintenance
Cleaning the scanner
1
Before you clean inside the fax machine, unplug the
telephone line cord first, and then the power cord from the AC
power outlet.
2
Open the top cover by lifting the lever on the right side of the
top cover.
3
Clean the white film and the glass strip with isopropyl alcohol
on a lint-free cloth.
4
Close the top cover. Press down on both sides of the top
cover until you hear it click into place.
5
Plug in the telephone line cord back in first and then plug the
power cord back into the AC power outlet.
Changing the ribbon
The starter ribbon prints up to 30 pages.
1
Open the top cover by lifting the lever on the right side of the
top cover.
2
Remove the print cartridge containing the used ribbon and set
it upside–down with the blue gear in the upper left corner.
Be careful not to bend the white film or drop anything into the
fax machine.
White Film
Glass Strip
Blue Gear